Mega Collection of PowerShell Scripts
This repo provides 500+ useful and cross-platform PowerShell scripts in the 📂Scripts subfolder — for command-line interface (CLI) usage, for remote control (via SSH), by context menu, by voice (e.g. talk2windows), by automation software (e.g. Jenkins), automatically on login/logoff/daily/etc., or simply to learn PowerShell.
Download | FAQ | Note: the scripts support Unicode — a modern console is recommended (e.g. Windows Terminal)
🔊 Scripts for Audio & Voice
| Script | Description |
|---|---|
| list-voices.ps1 | Lists the installed text-to-speech voices. Read more… |
| play-beep-sound.ps1 | Plays a short beep sound. Read more… |
| play-files.ps1 | Plays the given audio files. Read more… |
| play-happy-birthday.ps1 | Plays the Happy Birthday song. Read more… |
| play-imperial-march.ps1 | Plays the Imperial March (Star Wars). Read more… |
| play-jingle-bells.ps1 | Plays Jingle Bells. Read more… |
| play-mission-impossible.ps1 | Plays the Mission Impossible theme. Read more… |
| play-m3u.ps1 | Plays the given playlist (M3U file format). Read more… |
| play-mp3.ps1 | Plays the given sound file (MP3 file format). Read more… |
| play-super-mario.ps1 | Plays the Super Mario intro. Read more… |
| play-tetris-melody.ps1 | Plays the Tetris melody. Read more… |
| speak-checklist.ps1 | Speaks the given checklist by text-to-speech. Read more… |
| speak-countdown.ps1 | Starts a countdown by text-to-speech. Read more… |
| speak-english.ps1 | Speaks text with an English text-to-speech voice. Read more… |
| speak-epub.ps1 | Speaks the content of the given Epub file by text-to-speech. Read more… |
| speak-file.ps1 | Speaks the content of the given text file by text-to-speech. Read more… |
| speak-french.ps1 | Speaks text with a French text-to-speech voice. Read more… |
| speak-german.ps1 | Speaks text with a German text-to-speech voice. Read more… |
| speak-italian.ps1 | Speaks text with an Italian text-to-speech voice. Read more… |
| speak-spanish.ps1 | Speaks text with a Spanish text-to-speech voice. Read more… |
| speak-test.ps1 | Performs a speak test by text-to-speech. Read more… |
| speak-text.ps1 | Speaks the given text by text-to-speech. Read more… |
| tell-joke.ps1 | Tells a joke by text-to-speech. Read more… |
| tell-quote.ps1 | Tells a quote by text-to-speech. Read more… |
| turn-volume-down.ps1 | Turns the audio volume down. Read more… |
| turn-volume-fully-up.ps1 | Turns the audio volume fully up. Read more… |
| turn-volume-off.ps1 | Turns audio off. Read more… |
| turn-volume-on.ps1 | Turns audio on. Read more… |
| turn-volume-up.ps1 | Turns the audio volume up. Read more… |
⚙️ Scripts to Manage Computers
| Script | Description |
|---|---|
| add-firewall-rules.ps1 | Adds firewall rules for the given executables (needs admin rights). Read more… |
| check-cpu.ps1 | Checks the CPU temperature. Read more… |
| check-dns.ps1 | Checks the DNS resolution. Read more… |
| check-drive-space.ps1 | Checks a drive for free space left. Read more… |
| check-file-system.ps1 | Checks the file system of a drive (needs admin rights). Read more… |
| check-health.ps1 | Checks the system health. Read more… |
| check-ping.ps1 | Checks the ping latency to the internet. Read more… |
| check-swap-space.ps1 | Checks the swap space for free space left. Read more… |
| check-windows-system-files.ps1 | Checks the validity of the Windows system files (needs admin rights). Read more… |
| enable-crash-dumps.ps1 | Enables the writing of crash dumps. Read more… |
| hibernate.ps1 | Enables hibernate mode for the local computer (needs admin rights). Read more… |
| install-github-cli.ps1 | Installs GitHub CLI. Read more… |
| install-chrome-browser.ps1 | Installs the Google Chrome browser. Read more… |
| install-knot-resolver.ps1 | Installs the Knot Resolver (needs admin rights). Read more… |
| install-ssh-client.ps1 | Installs a SSH client (needs admin rights). Read more… |
| install-ssh-server.ps1 | Installs a SSH server (needs admin rights). Read more… |
| install-signal-cli.ps1 | Installs signal-cli from github.com/AsamK/signal-cli. Read more… |
| install-updates.ps1 | Installs updates (need admin rights). Read more… |
| install-wsl.ps1 | Installs Windows Subsystem for Linux (WSL), needs admin rights. Read more… |
| list-apps.ps1 | Lists the installed applications. Read more… |
| list-cli-tools.ps1 | Lists installed command-line interface (CLI) tools. Read more… |
| list-drives.ps1 | Lists all drives. Read more… |
| list-network-shares.ps1 | Lists all network shares of the local computer. Read more… |
| list-installed-software.ps1 | Lists the installed software (except Windows Store apps). Read more… |
| list-printers.ps1 | Lists all printer known to the computer. Read more… |
| list-print-jobs.ps1 | Lists all jobs of all printers. Read more… |
| list-processes.ps1 | Lists the local computer processes. Read more… |
| list-services.ps1 | Lists the services on the local computer. Read more… |
| list-system-info.ps1 | Lists system information on the local computer. Read more… |
| list-tasks.ps1 | Lists all Windows scheduler tasks. Read more… |
| list-timezone.ps1 | Lists the current time zone details. Read more… |
| list-timezones.ps1 | Lists all time zones available. Read more… |
| list-user-groups.ps1 | Lists the user groups on the local computer. Read more… |
| poweroff.ps1 | Halts the local computer (needs admin rights). Read more… |
| query-smart-data.ps1 | Queries the S.M.A.R.T. data of your HDD/SSD’s. Read more… |
| reboot.ps1 | Reboots the local computer (needs admin rights). Read more… |
| remove-print-jobs.ps1 | Removes all jobs from all printers. Read more… |
| restart-network-adapters.ps1 | Restarts all local network adapters. Read more… |
| upgrade-ubuntu.ps1 | Upgrades Ubuntu Linux to the latest (LTS) release. Read more… |
| wakeup.ps1 | Sends a magic packet to a computer to wake him up. Read more… |
💻 Scripts for the Desktop
| Script | Description | Help |
|---|---|---|
| close-calculator.ps1 | Closes the calculator application | Help |
| close-cortana.ps1 | Closes Cortana | Help |
| close-chrome.ps1 | Closes the Chrome browser | Help |
| close-program.ps1 | Closes the given program gracefully | Help |
| close-edge.ps1 | Closes the Edge browser | Help |
| close-file-explorer.ps1 | Closes Microsoft File Explorer | Help |
| close-firefox.ps1 | Closes the Firefox browser | Help |
| close-microsoft-store.ps1 | Closes the Microsoft Store app | Help |
| close-netflix.ps1 | Closes the Netflix app | Help |
| close-onedrive.ps1 | Closes Microsoft OneDrive | Help |
| close-serenade.ps1 | Closes the Serenade application | Help |
| close-snipping-tool.ps1 | Closes the Snipping Tool application | Help |
| close-spotify.ps1 | Closes Spotify | Help |
| close-system-settings.ps1 | Closes the System Settings window | Help |
| close-task-manager.ps1 | Closes the Task Manager | Help |
| close-thunderbird.ps1 | Closes Mozilla Thunderbird | Help |
| close-vlc.ps1 | Closes the VLC media player application | Help |
| close-windows-terminal.ps1 | Closes the Windows Terminal application | Help |
| enable-god-mode.ps1 | Enables the god mode (adds a new icon to the desktop) | Help |
| list-clipboard.ps1 | Lists the contents of the clipboard | Help |
| new-email.ps1 | Starts the default email client to write a new email | Help |
| open-amazon-website.ps1 | Opens Amazon’s website | Help |
| open-default-browser.ps1 | Launches the default Web browser | Help |
| open-calculator.ps1 | Starts the calculator program | Help |
| open-c-drive.ps1 | Opens the C: drive folder | Help |
| open-downloads-folders.ps1 | Opens the user’s downloads folder | Help |
| open-dropbox-folder.ps1 | Opens the user’s Dropbox folder | Help |
| open-edge.ps1 | Launches the Edge browser | Help |
| open-email-client.ps1 | Starts the default email client | Help |
| open-facebook-website.ps1 | Opens Facebook’s website | Help |
| open-file-explorer.ps1 | Opens the File Explorer | Help |
| open-firefox.ps1 | Launches the Firefox browser | Help |
| open-fritz-box.ps1 | Opens FRITZ!Box’s web interface | Help |
| open-github.ps1 | Opens GitHub’s website | Help |
| open-google-contacts.ps1 | Opens Google Contacts | Help |
| open-google-earth.ps1 | Opens Google Earth | Help |
| open-google-mail.ps1 | Opens Google Mail | Help |
| open-google-maps.ps1 | Opens Google Maps | Help |
| open-google-news.ps1 | Opens Google News | Help |
| open-google-play.ps1 | Opens Google Play | Help |
| open-google-search.ps1 | Opens Google Search | Help |
| open-google-translate.ps1 | Opens Google Translate | Help |
| open-home-folder.ps1 | Opens the user’s home folder | Help |
| open-music-folder.ps1 | Opens the user’s music folder | Help |
| open-netflix.ps1 | Starts the Netflix app | Help |
| open-microsoft-store.ps1 | Launches the Microsoft Store app | Help |
| open-notepad.ps1 | Starts the Notepad app | Help |
| open-onedrive-folder.ps1 | Opens the user’s OneDrive folder | Help |
| open-pictures-folder.ps1 | Opens the user’s pictures folder | Help |
| open-recycle-bin.ps1 | Opens the user’s recycle bin folder | Help |
| open-repos-folder.ps1 | Opens the user’s Git repositories folder | Help |
| open-snipping-tool.ps1 | Starts the Snipping Tool | Help |
| open-speed-test.ps1 | Opens Cloudflare’s speed test | Help |
| open-spotify.ps1 | Opens Spotify | Help |
| open-system-settings.ps1 | Opens system settings of Windows | Help |
| open-task-manager.ps1 | Starts the Task Manager | Help |
| open-videos-folder.ps1 | Opens the user’s videos folder | Help |
| open-windows-terminal.ps1 | Launches Windows Terminal | Help |
| open-wikipedia-website.ps1 | Opens Wikipedia’s website | Help |
| open-youtube-website.ps1 | Opens YouTube’s website | Help |
| remind-me.ps1 | Creates a scheduled task that will display a popup message | Help |
| save-screenshot.ps1 | Saves a single screenshot | Help |
| set-wallpaper.ps1 | Sets the given image as wallpaper | Help |
📁 Scripts for Files & Folders
| Script | Description | Help |
|---|---|---|
| cd-autostart.ps1 | Set the working directory to the user’s autostart folder | Help |
| cd-desktop.ps1 | Set the working directory to the user’s desktop folder | Help |
| cd-docs.ps1 | Set the working directory to the user’s documents folder | Help |
| cd-downloads.ps1 | Set the working directory to the user’s downloads folder | Help |
| cd-dropbox.ps1 | Set the working directory to the user’s Dropbox folder | Help |
| cd-home.ps1 | Set the working directory to the user’s home folder | Help |
| cd-music.ps1 | Set the working directory to the user’s music folder | Help |
| cd-onedrive.ps1 | Set the working directory to the user’s OneDrive folder | Help |
| cd-pics.ps1 | Set the working directory to the user’s pictures folder | Help |
| cd-recycle-bin.ps1 | Set the working directory to the user’s recycle bin folder | Help |
| cd-repos.ps1 | Change the working directory to the user’s Git repositories folder | Help |
| cd-root.ps1 | Set the working directory to the root directory (C: on Windows) | Help |
| cd-scripts.ps1 | Set the working directory to the PowerShell Scripts folder | Help |
| cd-ssh.ps1 | Set the working directory to the user’s SSH folder | Help |
| cd-up.ps1 | Set the working directory to one directory level up | Help |
| cd-up2.ps1 | Set the working directory to two directory levels up | Help |
| cd-up3.ps1 | Set the working directory to three directory levels up | Help |
| cd-up4.ps1 | Set the working directory to four directory levels up | Help |
| cd-videos.ps1 | Set the working directory to the user’s videos folder | Help |
| check-symlinks.ps1 | Checks every symlink in a directory tree | Help |
| check-xml-file.ps1 | Checks the given XML file for validity | Help |
| clear-recycle-bin.ps1 | Removes the content of the recycle bin folder (can not be undo!) | Help |
| copy-photos-sorted.ps1 | Copy image files sorted by year and month | Help |
| decrypt-file.ps1 | Decrypts the given file | Help |
| download-dir.ps1 | Downloads a directory tree from the given URL | Help |
| download-file.ps1 | Downloads a file from the given URL | Help |
| edit.ps1 | Edits the given file with the built-in text editor | Help |
| encrypt-file.ps1 | Encrypts the given file | Help |
| get-md5.ps1 | Prints the MD5 checksum of the given file | Help |
| get-sha1.ps1 | Prints the SHA1 checksum of the given file | Help |
| get-sha256.ps1 | Prints the SHA256 checksum of the given file | Help |
| inspect-exe.ps1 | Prints basic information of the given executable file | Help |
| list-dir-tree.ps1 | Lists the directory tree content | Help |
| list-empty-dirs.ps1 | Lists empty subfolders within the given directory tree | Help |
| list-empty-files.ps1 | Lists empty files within the given directory tree | Help |
| list-files.ps1 | Lists all files in the given folder and also in every subfolder | Help |
| list-folder.ps1 | Lists the folder content | Help |
| list-hidden-files.ps1 | Lists hidden files within the given directory tree | Help |
| list-recycle-bin.ps1 | Lists the content of the recycle bin folder | Help |
| list-unused-files.ps1 | Lists unused files in a directory tree | Help |
| list-workdir.ps1 | Lists the current working directory | Help |
| make-install.ps1 | Installs built executables and libs to the installation directory | Help |
| new-shortcut.ps1 | Creates a new shortcut file | Help |
| new-symlink.ps1 | Creates a new symbolic link file | Help |
| new-zipfile.ps1 | Creates a new .zip file from a directory | Help |
| publish-to-ipfs.ps1 | Publishes the given files or directory to IPFS | Help |
| remove-empty-dirs.ps1 | Removes empty subfolders within the given directory tree | Help |
| replace-in-files.ps1 | Search and replace a pattern in the given files by the replacement | Help |
| search-filename.ps1 | Searches the directory tree for filenames by given pattern | Help |
| search-files.ps1 | Searches the given pattern in the given files | Help |
| upload-file.ps1 | Uploads the local file to the given FTP server | Help |
♻️ Scripts to Convert Files
| Script | Description |
|---|---|
| convert-csv2txt.ps1 | Converts a .CSV file to a text file. Read more… |
| convert-mysql2csv.ps1 | Converts a MySQL database table to a .CSV file. Read more… |
| convert-ps2bat.ps1 | Converts a PowerShell script to a Batch script. Read more… |
| convert-ps2md.ps1 | Converts the comment-based help of a PowerShell script to Markdown. Read more… |
| convert-sql2csv.ps1 | Converts a SQL database table to a .CSV file. Read more… |
| convert-txt2wav.ps1 | Converts text to a .WAV audio file. Read more… |
| export-to-manuals.ps1 | Exports all scripts as manuals. Read more… |
📝 Scripts for Git
| Script | Description |
|---|---|
| build-repo.ps1 | Builds a Git repository. Read more… |
| build-repos.ps1 | Builds all Git repositories in a folder. Read more… |
| check-repo.ps1 | Checks a Git repository. Read more… |
| clean-repo.ps1 | Cleans a Git repository from untracked files. Read more… |
| clean-repos.ps1 | Cleans all Git repositories in a folder from untracked files. Read more… |
| clone-repos.ps1 | Clones well-known Git repositories. Read more… |
| configure-git.ps1 | Sets up the Git user configuration. Read more… |
| fetch-repo.ps1 | Fetches updates for a Git repository. Read more… |
| fetch-repos.ps1 | Fetches updates for all Git repositories in a folder. Read more… |
| list-branches.ps1 | Lists all branches in a Git repository. Read more… |
| list-commits.ps1 | Lists all commits in a Git repository. Read more… |
| list-latest-tag.ps1 | Lists the latest tag on the current branch in a Git repository. Read more… |
| list-latest-tags.ps1 | Lists the latests tags in all Git repositories under a directory. Read more… |
| list-repos.ps1 | Lists the Git repositories in a folder. Read more… |
| list-submodules.ps1 | Lists the submodules in a Git repository. Read more… |
| list-tags.ps1 | Lists all tags in a Git repository. Read more… |
| new-branch.ps1 | Creates a new branch in a Git repository. Read more… |
| new-tag.ps1 | Creates a new tag in a Git repository. Read more… |
| pick-commit.ps1 | Cherry-picks a Git commit into multiple branches. Read more… |
| pull-repo.ps1 | Pulls updates for a Git repository. Read more… |
| pull-repos.ps1 | Pulls updates for all Git repositories in a folder. Read more… |
| remove-tag.ps1 | Removes a tag in a Git repository. Read more… |
| switch-branch.ps1 | Switches the branch in a Git repository. Read more… |
| sync-repo.ps1 | Synchronizes a Git repository by push & pull. Read more… |
🔎 Scripts for PowerShell
| Script | Description |
|---|---|
| daily-tasks.sh | Execute PowerShell scripts automatically as daily tasks (Linux only). Read more… |
| introduce-powershell.ps1 | Introduces PowerShell to new users. Read more… |
| list-aliases.ps1 | Lists all PowerShell aliases. Read more… |
| list-automatic-variables.ps1 | Lists the automatic variables of PowerShell. Read more… |
| list-cheat-sheet.ps1 | Lists the PowerShell cheat sheet. Read more… |
| list-cmdlets.ps1 | Lists the PowerShell cmdlets. Read more… |
| list-console-colors.ps1 | Lists all console colors. Read more… |
| list-modules.ps1 | Lists the PowerShell modules. Read more… |
| list-profiles.ps1 | Lists your PowerShell profiles. Read more… |
| list-scripts.ps1 | Lists all PowerShell scripts in this repository. Read more… |
| new-script.ps1 | Creates a new PowerShell script. Read more… |
| set-profile.ps1 | Updates your PowerShell user profile. Read more… |
🛒 Various PowerShell Scripts
| Script | Description | Help |
|---|---|---|
| add-memo.ps1 | Adds the given memo text to $HOME/Memos.csv | Help |
| check-ipv4-address.ps1 | Checks the given IPv4 address for validity | Help |
| check-ipv6-address.ps1 | Checks the given IPv6 address for validity | Help |
| check-mac-address.ps1 | Checks the given MAC address for validity | Help |
| check-subnet-mask.ps1 | Checks the given subnet mask for validity | Help |
| check-weather.ps1 | Checks the current weather for critical values | Help |
| display-time.ps1 | Displays the current time for 10 seconds by default | Help |
| list-anagrams.ps1 | Lists all anagrams of the given word | Help |
| list-city-weather.ps1 | Lists the current weather of cities worldwide (west to east) | Help |
| list-countries.ps1 | Lists details of all countries | Help |
| list-credits.ps1 | Shows the credits | Help |
| list-crypto-rates.ps1 | Lists the current crypto exchange rates | Help |
| list-environment-variables.ps1 | Lists all environment variables | Help |
| list-emojis.ps1 | Lists the emojis of Unicode 13.0 | Help |
| list-fritzbox-calls.ps1 | Lists the FRITZ!Box calls | Help |
| list-fritzbox-devices.ps1 | Lists FRITZ!Box’s known devices | Help |
| list-earthquakes.ps1 | Lists earthquakes with magnitude >= 6.0 for the last 30 days | Help |
| list-exchange-rates.ps1 | Lists the current exchange rates for the given currency | Help |
| list-memos.ps1 | Lists the memos at $HOME/Memos.csv | Help |
| list-mysql-tables.ps1 | Lists the MySQL server tables | Help |
| list-news.ps1 | Lists the latest news | Help |
| list-os-releases.ps1 | Lists operating system releases and download URL | Help |
| list-os-updates.ps1 | Lists operating system updates | Help |
| list-passwords.ps1 | Prints a list of random passwords | Help |
| list-pins.ps1 | Prints a list of random PIN’s | Help |
| list-sql-tables.ps1 | Lists the SQL server tables | Help |
| list-tiobe-index.ps1 | Lists the TIOBE index of top programming languages | Help |
| list-weather.ps1 | Lists the hourly weather | Help |
| locate-city.ps1 | Prints the geographic location of the given city | Help |
| locate-ipaddress.ps1 | Prints the geographic location of the given IP address | Help |
| locate-zip-code.ps1 | Prints the geographic location of the given zip-code | Help |
| moon.ps1 | Prints the current moon phase | Help |
| new-qrcode.ps1 | Generates a new QR code image file | Help |
| reboot-fritzbox.ps1 | Reboots the FRITZ!box device | Help |
| scan-ports.ps1 | Scans the network for open/closed ports | Help |
| send-email.ps1 | Sends an email message | Help |
| send-tcp.ps1 | Sends a TCP message to the given IP address and port | Help |
| send-udp.ps1 | Sends a UDP datagram message to the given IP address and port | Help |
| set-timer.ps1 | Sets a timer for a countdown | Help |
| simulate-presence.ps1 | Simulates the human presence against burglars | Help |
| start-calibre-server.ps1 | Starts a local Calibre server | Help |
| start-ipfs-server.ps1 | Starts a local IPFS server | Help |
| switch-shelly1.ps1 | Switches a Shelly1 device in the local network | Help |
| translate-file.ps1 | Translates the given text file into other languages | Help |
| translate-files.ps1 | Translates the given text files into any supported language | Help |
| translate-text.ps1 | Translates the given text in English into other languages | Help |
| weather.ps1 | Prints the current weather forecast | Help |
| weather-report.ps1 | Prints the local weather report | Help |
| what-is.ps1 | Prints a description of the given abbreviation | Help |
| write-animated.ps1 | Writes animated text | Help |
| write-big.ps1 | Writes the given text in big letters | Help |
| write-blue.ps1 | Writes the given text in a blue foreground color | Help |
| write-braille.ps1 | Writes the given text in Braille | Help |
| write-calendar.ps1 | Writes the calendar (month of year) | Help |
| write-green.ps1 | Writes the given text in a green foreground color | Help |
| write-joke.ps1 | Writes a random Juck Norris joke | Help |
| write-lowercase.ps1 | Writes the given text in lowercase letters | Help |
| write-marquee.ps1 | Writes the given text as marquee | Help |
| write-morse-code.ps1 | Writes the given text in Morse code | Help |
| write-motd.ps1 | Writes the message of the day (MOTD) | Help |
| write-quote.ps1 | Writes a random quote | Help |
| write-red.ps1 | Writes the given text in a red foreground color | Help |
| write-rot13.ps1 | Encodes or decodes the given text with ROT13 | Help |
| write-typewriter.ps1 | Writes the given text with the typewriter effect | Help |
| write-uppercase.ps1 | Writes the given text in uppercase letters | Help |
| write-vertical.ps1 | Writes the given text in vertical direction | Help |
Feedback
Send your email feedback to: markus [at] fleschutz [dot] de
License & Copyright
This open source project is licensed under the CC0 license. All trademarks are the property of their respective owners.

This PowerShell tutorial explains, What is Windows PowerShell? What are various tools we can use to write PowerShell script, What are the advantages of using Windows PowerShell? And also this tutorial contains 51 top useful PowerShell examples with scripts.
What is Windows PowerShell?
PowerShell is a scripting language developed by Microsoft designed for system administration. PowerShell, also helpful for IT professionals to configure the system, control and automate the administration of Windows operating system. The PowerShell built the on.Net framework and PowerShell can be embedded in other applications.
Microsoft released the first version of PowerShell in 2006 for Windows XP, Window server 2003 and window Vista. Nowadays we are using the latest version PowerShell 5.0 it is delivered with Window 10 which is by default and one more benefits of the latest version of window PowerShell is, it also works with Windows Server 2008 R2, Windows Server 2012 and Windows Server 2012 R2, Windows 7 Service Pack 1 and Windows 8.1
Advantages Of PowerShell
PowerShell is more powerful than the command prompt, it allows function, variable, loop string etc.
- The command line is a text-based scripting language and PowerShell is an object-oriented Scripting language.
- The Command line also work with PowerShell editor.
- We can execute complex Scripting language also in PowerShell.
- It can automate a lengthy task within a few seconds. Suppose we want to add 500 users to a group. Doing this manually is time-consuming, hectic so we can automate the thing using the more user-friendly PowerShell scripting language.
- We can reuse the PowerShell code again and again.
- We can merge the PowerShell script with another script to perform a different task.
- The PowerShell is handy for working with active directory also.
You may like following PowerShell tutorials:
- PowerShell reference variable
- Working with PowerShell Date Command (Get-Date)
- PowerShell find files modified in last N days
- How to check if file created last 24 hours using PowerShell?
- Delete list items created before N days using PowerShell in SharePoint Online
- How to create and use PowerShell global variable
- PowerShell find files modified in last 24 hours and PowerShell get last modified time of files in folder
- Create folder if not exists using PowerShell
- PowerShell create encrypted password file and use in SharePoint online
- Create file if not exists with name as today’s date using PowerShell
- How to check file size using PowerShell Script [Easy Way]
Editors For PowerShell
These are the editor in which we can write the PowerShell script.
- PowerShell ISE
- ISE (w/ISESteroids)
- PowerShell Studio
- Visual Studio Code
- Visual Studio
- PowerShell Plus
Here I am using PowerShell ISE. PowerShell ISE is a good environment for working with PowerShell commands(the PowerShell Commands are called “cmdlets”).
The output of cmdlets is an array of an object or objects.
The cmdlets are not case sensitive. When we will add more than one string then it should be separated by “;”.
Example:
How to check the latest version of PowerShell install in the server. For checking the version, we need to follow the command “$PSVersionTable”.

I have added the command in PowerShell ISE and Click on run. Now we can able to see all the version which install in the server.
Get-Help: The Get-Help command we can use for checking all PowerShell cmdlets. The Get-Help cmdlet is also helpful about how to give a command and its parameter in PowerShell. We can add this command with another command for Get-Help. For example, if we want to check how the Get-Process command will work, then follow the command: “Get-Help -Name Get-Process”

Now we will see 51 very useful PowerShell examples below:
Example-1: Working with Folder Using PowerShell
In the PowerShell article now we are going to see how to work different operation like create a folder, copy folder, delete folder, remove folder using PowerShell.
PowerShell create a folder :
New-Item cmdlets are used to add a new folder in your System. Follow the command:
New-Item -Path 'G:padminiNewPowerShellFolder' -ItemType DirectoryWe need to pass the path in the New-item. “NewPowerShellFolder” is my folder name which we want to create in the mentioned path.
We add “ItemType Directory” because we want to create a directory so we mentioned item type is a directory.

Now you can find out your new folder(“NewPowerShellFolder”) in G drive.
PowerShell copy folder :
For copy a folder from one drive to another drive we need to use Copy-Item cmdlets.
Here we copy the SourceFolder to DestinationFolder
Copy-Item 'G:padminiSourceFolder' 'C:DestinationFolder'PowerShell delete folder:
We can remove a folder using Remove-Item cmdlet in PowerShell.
Remove-Item 'C:DestinationFolderSourceFolder'PowerShell move folder:
To move a folder from a directory “Move-Item” cmdlets is used.
Move-Item C:SourceFolder G:padminiPowerShell rename folder:
“Rename-Item” cmdlet is used to rename a folder.
Rename-Item 'G:padminipadmini images'for check the folder exists or not in our drive “Test-Path” cmdlet is used.
Test-Path 'G:padminiSiteCollectionFolder'PowerShell Check a folder exists :
To Check a folder exist or not in PowerShell we can use Test-Path cmdlets.
Test-Path 'G:padminiSiteCollectionFolder'Example-2: Working with File Using PowerShell
Now we are going to discuss how to work with a different operation of the file using PowerShell.
Create New File Using PowerShell:
For creating a file using PowerShell we need to follow the same cmdlets “New–Item”. For the file, we need to mention “ItemType as File”. Pass the location or path where we want to create a file.
I have created the file in ‘G:padminiNewPowerShellFolder’ location. The path which we will pass in New-Item is ‘G:padminiNewPowerShellFolderImportantNoteRelatedToPowerShell.txt’ -ItemType File.
“ImportantNoteRelatedToPowerShell.txt” is my file name and I want to add the file as textbox type.
New-Item -Path 'G:padminiNewPowerShellFolderImportantNoteRelatedToPowerShell.txt'-ItemType File
Copy files from one folder to another using PowerShell script:
“Copy-Item” cmdlets are used to copy a file from one folder to another folder in PowerShell.
Copy-Item 'G:padminiSourceFolderNewText.txt' 'C:DestinationFolderNewText.txt'In the above script, we need to give two locations and pass to Copy-Item. In the first location where the file is there which we want to copy and in the second location we need to give the location where we want to pass the file.
We need to copy the file from ‘G:padminiSourceFolderNewText.txt’ to ‘C:DestinationFolderNewText.txt’ location.

We can able to see the text file is copied in “C:DestinationFolder” location.
PowerShell Delete File from Folder:
The “Remove-Item” cmdlets are used to delete a file from the folder. To simply delete a file the command is
Remove-Item 'C:NewFolderForPowerShellImportantNoteRelatedToPowerShell.txt'But if we want to delete the file recursively then use the command
Remove-Item 'G:padminiNewPowerShellFolderImportantNoteRelatedToPowerShell.txt'-RecursePowerShell move file to another folder:
To move a file from one location(folder) to another folder the Move-Item cmdlets is used.
The PowerShell script is :
Move-Item 'G:padminiSourceFolderPSNote.txt' C:DestinationFolderThe file is copied from ‘G:padminiNewPowerShellFolderTest File.txt’ to ‘c:NewFolderForPowerShellTest File.txt’.
Rename File using PowerShell:
For renaming a file the ‘Rename-Item’ cmdlets are used.
Rename-Item 'C:NewFolderForPowerShellPowerShell.txt'We need to give the path where the file exists which we want to change the name. When we will pass the path In “Rename-Item”.It is asking for “Newname:” in PowerShell console like below. Give the name. Now our file name automatically renamed.

Check file is exist or not using PowerShell:
To check a file is exist or not we need to use “Test-Path” cmdlets.
Test-Path 'C:NewFolderForPowerShellNew File.txt'In the OutPut, we can able to see “True”.
Retrieve content from a file using PowerShell:
For retrieving the content from a list “Get-Content” cmdlets is used.
Pass the path of a file in “Get-Content” cmdlets.
We will get all the value of the file.

Example-3: PowerShell Get-Date and time and Set-Date and time:
In the PowerShell example, we will discuss how will Get-Date and Set-Date using PowerShell.
Display Current Date in PowerShell:
To get the today’s system date we can use the cmdlets “Get-Date”. The output should be in the format of Day, Date, year time.

Get-DatePowerShell Display Only Date:
Suppose we want to see the only date, not time, then use the cmdlets “Get-Date -DisplayHint Date”.
Get-Date -DisplayHint DateThe OutPut:
Tuesday, September 25, 2018
Like the above, if we want to display only time then use “Get-Date -DisplayHint Time”
PowerShell display date and time in the shortcut:
When we want to see the date and time in shortcut format go for the cmdlets:
Get-Date -Format gOutPut:
9/25/2018 4:50 PM
In the “Get-Date -Format g” the .net Framework is used.
PowerShell Date Format yy/mm/dd/offset from UTC:
In PowerShell, we can also see the system time in year(full year)/month(two digits numeric month)/day(day in the week)/offset from UTC. The cmdlets we can use:
Get-Date -UFormat "%Y / %m / %d / %A / %Z"OutPut is:
2018 / 09 / 25 / Tuesday / +05
PowerShell get Day of Year:
When we want to know one date number of position in 365 we need to follow the cmdlets:
(Get-Date - the Year 2018 -Month 9 -Day 25).DayOfYearOutPut:
268
(Get-Date – the Year 2018 -Month 9 -Day 25).DayOfYear is used to count the day of the year for the current date.
25 September 2018 is the 268 number day in the year 2018. We all know the year contains 365 days from there today’s date is 268.
PowerShell Convert Date and Time To UTC Time:
To convert the current date and time to UTC the cmdlets used:
$a = Get-Date
$a.ToUniversalTime()
OutPut:
Tuesday, September 25, 2018, 12:14:23 PM
Here we declare a variable:
We can declare a variable using the $ symbol. By using the Get-Date cmdlets we can able to find out today’s date and the value is stored in the $a variable. To convert the current date t0 UTC.
$a.ToUniversalTime()PowerShell Set System Date:
We can set the system date and time using PowerShell.
set-date -date "06/08/2019 18:53"OutPut:
Saturday, June 8, 2019, 6:53:00 PM
Adding Dates with PowerShell:
We can add the date to the system date. Here I want to add 4 days with system days.
Set-Date -Date (Get-Date).AddDays(5)Output:
In the output, we can able to see what is the date after 5 days
Sunday, September 30, 2018 6:10:46 PM
PowerShell set System Clock back 15 minutes:
Set the System Clock back 15minutes:
By using the “Set-Date -Adjust -0:15:0 -DisplayHint Time” we can set the system time 15 minutes back.
Set-Date -Adjust -0:15:0 -DisplayHint TimeOutPut:5:54:23 PM
PowerShell add minutes to System clock:
When we add the below cmdlets automatically 150 minutes add to the System clock.
$a = New-TimeSpan -Minutes 150
Set-Date -Adjust $a
OutPut:
Tuesday, September 25, 2018, 10:04:41 PM
Example-4: PowerShell Create and read XML file
In the PowerShell Tutorial now we will see how to create and read an XML file.
PowerShell Create a New XML file:
For creating an XML file following the same cmdlets which we were using creating a text file but when we need to give the file name as “.xml” in the path. Remember in the text file we have mentioned the file name with .txt like that for XML file .xml.
Script or cmdlets for creating a New XML file:
New-Item G:padminiSourceFolderNewFile.xml -ItemType File
PowerShell Add Content to XML file:
To add some content to XML file using PowerShell use the cmdlets:”Set-Content“.
Set-Content G:padminiSourceFolderNewFile.xml '<title>Welcome to Top 51 PowerShell Example</title>'We need to pass the file location in “Set-Content “, then add the content which we want to add in the file.
Here I have added the content “Welcome to Top 51 PowerShell Example” in the title tag.
PowerShell Retrieve Content from the XML file:
Get-Content cmdlets are used to get the content from the XML file. Pass the location of the file in Get-Content.
Get-Content G:padminiSourceFolderNewFile.xmlWe can able to see the OutPut in PowerShell console.
Example-5: PowerShell Create HTML and read HTML file
Now we will see how to Create and read an HTML file using PowerShell.
PowerShell Create a New HTML file:
To create file use PowerShell cmdlets “New-Item”. Pass the location to “New-Item”. Add the file type and Item Type File.
Here I want to add the HTML file soI have added “NewHtmlFile.html”.
New-Item G:padminiSourceFolderNewHtmlFile.html -ItemType FilePowerShell Add Content To HTML file:
To add content to a list the Set-Content cmdlets is using. In the Set-Content cmdlets pass the location of HTML file.
In HTML tag add the content which we want to add an HTML file.
Here I have added “Welcome To Top 51 PowerShell Example”.
Set-Content G:padminiSourceFolderNewHtmlFile.html '<html><h1>Welcome To Top 51 PowerShell Example</h1></html>'

Set-Content G:padminiSourceFolderNewHtmlFile.html '<html><h1>Welcome To Top 51 PowerShell Example</h1></html>'Set-Content G:padminiSourceFolderNewHtmlFile.html '<html><h1>Welcome To Top 51 PowerShell Example</h1></html>'
PowerShell Retrive content from HTML file:
To retrive the content from HTML file the Get-Content cmdlets is used. We need to pass the HTML file location in the Get-Content cmdlets.
Get-Content G:padminiSourceFolderNewHtmlFile.htmlIn the PowerShell console we can able to see the HTML file content.
Example-6: PowerShell create and reads CSV file
In the below example we will discuss how to create and read a CSV file.
PowerShell Create CSV file:
To creating a CSV file the New-Item cmdlets is used as like every file but we need to mention the file type.
Here I am creating a CSV file so I have mentioned “NewCSVfile.csv”.
ew-Item G:padminiSourceFolderNewCSVFile.csv -ItemType FileJust mentioned the file type as the filename. filetype like NewCSVfile.csv.
PowerShell Add Content To CSV file:
To add Content to a CSV file, the “Set-Content” is used. Pass the file location in the Set-Content cmdlets. Directly add the value which you want to add to the CSV file. Here I have added ‘Monday, Sunday, Tuesday’ in the CSV file.
Set-Content G:padminiSourceFolderNewCSVFile.csv 'Monday,Sunday,Tuesday'PowerShell Retrieve Content From CSV file:
To retrieve the content from CSV file Get-Content cmdlets is used. We need to pass the CSV file location to retrieve the content.
Get-Content G:padminiSourceFolderNewCSVFile.csvIn the Power Console, we can able to see all the content which stored in a CSV file.
Example-7: PowerShell Erase File Content and Append text to a file
In the below example we will see how to erase and append content to a file using PowerShell.
Erasing a Content from a file:
To clear the content from the file the “Clear-Content” cmdlets are used. In the “Clear-Content” cmdlets pass the file location.
Clear-Content G:padminiSourceFolderNewHtmlFile.htmlAppend Text To A File:
We can set the value in a file using “Set-Content” cmdlets. But when we want to add more text than we can use “Add-Content” cmdlets. Pass the location of a file.
Here I want to add some more text in my HTML file. So I have added the “Add-Content” cmdlets and pass the location of my HTML file and an HTML tag, I have added the content.
Add-Content G:padminiSourceFolderNewHtmlFile.html "<html><h2>PowerShell is a more powerful scripting language</h2></html>"Example-8: PowerShell get unique values
Below example is describing:
- Assign a value to a variable in PowerShell
- PowerShell sort and get a unique value
Assign a value to a variable in PowerShell:
Some rule to declare a variable and assign a value to a variable in PowerShell we should know.
- PowerShell variable start with a “$” symbol
- PowerShell variable contains a letter, number and underscores only.
- We should not use the predefined function as a PowerShell variable name.
- We can use the other character which PowerShell is not allowing we can place inside a curly bracket.
Example:
$variableValue
$variableValue_1
$VariableValue
the”-” is not allowed in PowerShell so we can add the variable like below:
${variable-Value}
Assign a value to a variable:
we can assign a value to a PowerShell variable using (=) operator.
$variableValue= 10
We can write $variableValue=$integerValue=$a=1
We can assign a single value to multiple variable.
We can also do assign the value to a variable in a single line like below.
$p,$q,$r=10,34,23
Suppose we take one variable name as listValue and assign some value.
$listValue=123,12345,1234567,123,12345678,124
When we will put $listValue in Power console we can able to see all the value which the variable contains.
PowerShell sort and get unique values:
To get the shorted and unique value to follow the below script.
$listValue| sort | get-uniqueFirst, it shorted all the value then find the unique value and display in PowerShell console.
Example-9: PowerShell measure-object count
We can able to count the number of Lines, Words, Characters Property of a file by using the “Get-Content|measure-object -character -line -word”.
By using the Get-Content cmdlets we can retrieve all the content of the file.
“measure-object -character -line -word” is used to count the character, line, and words of a file. It will work on over “Get-Content”. So we are using “|” here for run two cmdlets at a time.
PSNote.txt| measure-object -character -line -wordExample-10: PowerShell Get-ChildItem cmdlets
Retrieve all the content of Folder:
To retrieve the content we can use the Get-ChildItem cmdlets it will display all the file and subfolder.
Here I have added the path of the folder in which we want to retrieve the content “Get-ChildItem”, we can able to see in PowerShell console all the file and folder which the “SourceFolder” is contained.
Get-ChildItem G:padminiSourceFolder
Retrieve all text file of Folder:
To retrieve all the text file which the folder contains We can able to see in PowerShell console using “Get-ChildItem G:padminiSourceFolder *.txt -Recurse -Force”.
These above cmdlets are displayed all the text file which is present in the current folder and subfolder. The recurse parameter is used to get the content recursively and the force parameter displays all the hidden files forcefully.
Get-ChildItem G:padminiSourceFolder *.txt -Recurse -Force
Example-11: PowerShell Compare Two Text File
Two compare two files use the below cmdlets.
Compare-Object -ReferenceObject $(Get-Content G:padminiSourceFolderNewPSNote.txt) -DifferenceObject $(Get-Content G:padminiSourceFolderPSNote.txt)G:padminiSourceFolderNewPSNote.txt contains:
“PowerShell is a scripting language.
PowerShell supports programming.
PowerShell more potent than command editor.
Welcome to the Top Beautiful PowerShell Example”
G:padminiSourceFolderPSNote.txt:
“PowerShell is a scripting language.
PowerShell supports programming.
PowerShell more potent than command editor.”
The different text line is “Welcome to the Top Beautiful PowerShell Example”
So in the output, we can able to see the difference text line.

Example-12: PowerShell start-sleep minutes
To stop the PowerShell for some time we can use “Start–Sleep” cmdlets.
Here I am trying to stop the processing for some second and minutes.
Start-Sleep -m 200//for minutes
Start-Sleep -s 20//for second
Example-13: PowerShell for Loop Example
Basically for Loop is used to execute the block of statement repeatedly when the condition is true.
Syntax for ForLoop:
for (<init>; <condition>; <repeat>)
{code to be execute till the condition is true}
$arrayItem = @("Laptop", "Mobile", "Tablet")
for($i = 0; $i -lt $arrayItem.length; $i++)
{
$arrayItem[$i]
}
In the above script I have taken one array variable(arrayItem) and store some value to the arrayvariable.
@ symbol is specify that we are creating an array.
And I have declared one more variable “i”, check the condition is I less than (-lt) array item length. Up to the condition is true the block of code will execute. The code will stop executing when the condition is false.
In the PowerShell console, we can able to see all the array value.
Example-14: PowerShell forEach Loop Example
In the below script I have added one for each loop example. I have declared a variable ArrayList and assign some value to the variable.
I have declare one more variable $item.
$arrayList = @("Laptop", "Mobile", "Tablet")
foreach ($item in $array)
{
$item
}
Example-15: PowerShell while Loop
In the while loop first we are declaring an array with the varible “arrayItem”.
I have declared on more counter variable and assign 0 value.
while(condition)
The condition is counter is less than the length of $arratItem.
If the condition is true then go for the code to be executed then increment the counter value to one.
$arrayItem = @("Laptop", "Mobile", "Tablet")
$counter = 0;
while($counter -lt $arrayItem.length){
$arrayItem[$counter]
$counter += 1
}
Output:
- Laptop
- Mobile
- Tablet
Example-16: PowerShell do…while Loop
In the below PowerShell do…while Loop I have declare arrayItem variable and store some value Laptop, Mobile and Tablet.
I have declared one more variable named as a counter and assign the value to counter is 0.
In the do part the code is there to execute and increment counter value by 1.
In the while part Condition is there is the counter is less then length of array item.
$arrayItem = @(“laptop”, “Mobile”, “Tablet”)
$counter = 0;

do {
$arrayItem[$counter] $counter += 1
}
while($counter -lt $arrayItem.length)
Example-17: PowerShell if statement
We all know the if statement is nothing but a collection of boolen expression. We know the boolen statement has only two value either true or false. In the if statemnet if the condition is true then block of code which is inside the curly bracket will execute. The code will not execute if the condition is false.
Here I have declared x and y and assign some value to it.
In the if condition I am just checking that is the x value is less than or equal to y.
If the condition is true go for a block of code which is inside the curly bracket.
If the condition is false then the code will not execute.
$x = 60
$y=70
if($x -le $y){
write-host("x is smaller than y")
}
Example-18: PowerShell if…else statement
In the if else statement when the condition is true then go for the block of code of if part otherwise goes to else part and execute the block of code or else part.
In the below example we checked x is less than equal to y. The statement is false so we need to go for else part.
$x = 60
$y=50
if($x -le $y){
write-host("x is smaller than y")
}
else
{
write-host("x is greater than y")
}
Output:
x is greater than y
Example-19: PowerShell if…elseif…else Statement
In the below example I have discussed the if else if statement in PowerShell.
I have declared two variable x and y assign 30 value to both of it.
First I have checked if x is not equal to y. Then the block of code will execute and write “x not equal to y”.
Else if I have checked that if x value is higher than equal to y. Then display “x greater than y”.
Else if I have checked x is less than equal to y. Then display “x is less than y”.
Else display x is equal to y.
$x = 30
$y=30
if($x -ne $y){
write-host("x not equal to y")
} elseif($x -ge $y){
write-host("x is greater than y")
} elseif($x-le$y){
write-host("x is less than y")
}
else
{
write-host("x is equal to y")
}
Example-20: PowerShell nested if statement
In the nested if ststement we can place a if statement or if else ststement inside a other if statement and if else statement.
Here I have to use the if statement inside another if statement.
I have declared the variable x,y, and z and assign the value to x,y and z variable.
I have checked if x greater than y then go for inside if statement and check if x greater than z. If both the “if statement” are true then display “x is greater than y and z”.
$x = 30
$y = 10
$z =5
if($x -gt $y){
if($x -gt $z) {
write-host(“X is larger than y and z”)
}
}
Example-21: PowerShell switch statement
Switch statement is nothing but a series of if statement. This statement is used for checking multiple condition. We can understand better by the below example.
First I have declared and assigned a value to a variable(season).
switch($season) means switch(1)The one value is Winter. The output value will store in the Result variable. Then I have written one statement write-host($result). It will print the result value.
$season = 1
switch ( $season )
{
0 { $result = 'Summer' }
1 { $result = 'Winter' }
2 { $result = 'rain' }
}
write-host($result)
Output: Winter
The collect of value is called case. Here 0,1,2 are case value.
When we want to break the statement we can directly write break statement.
Example-22: PowerShell Array
PowerShell Array is designed to store a collection of the same type of item or a different type of item.
$N=1,2,3,4,5,6
Here I am declaring an Array variable and assign some value. A comma separates the values.
$N=1..6
In PowerShell Array, we can declare and assign the value like 1…6 also.
In the PowerShell array no datatype is mentioned then the PowerShell creates each array as an object array.
Using the GetType method we can able to know the type of array value.
$NumberList = 1,2,3,4,5,6,7,8
write-host("Display all the Array element:")
$NumberList
write-host("Get the length of array:")
$NumberList.Length
write-host("Get fourth element of array")
$NumberList[3]
write-host("Get partial array")
$subList = $NumberList[1..3]
write-host("print subList")
$subList
write-host("using for loop")
for ($i = 0; $i -le ($NumberList.length - 1); $i += 1) {
$NumberList[$i]
}
write-host("Assign values")
$NumberList[1] = 10
$NumberList
OutPut:
Display all the Array element:
1
2
3
4
5
6
7
8
Get the length of array:
8
Get fourth element of array
4
Get partial array
print subList
2
3
4
using for loop
1
2
3
4
5
6
7
8
Assign values
1
10
3
4
5
6
7
8
Example-23: PowerShell Alias
Alias is nothing but an alternative name for cmdlets. In the below example I have created a new name for Get-Help cmdlets. I have created an alias named as “PowerShell command”.
New-Alias -Name PowerShellCommand -Value Get-Help
PowerShell command
In PowerShell, some default shortcut name or alias is there. We can able to know all the shortcut cmdlets by using Get-alias cmdlets.
Get-aliasExample-24: PowerShell Hashtable
Hashtables is nothing but an array but we can store paired key and value. Basically, the object that is used as a key, and the value that you want to be linked to that key.
Empty Hashtable:
$NumberList=@{}Example:
$hash = @{ ID = 13; Name = "Purnima"; Color = "fair"}$HashValue= @{ ID = 13; Name = "Purnima"; Color = "fair"}
write-host("Print all hashtable keys")
$HashValue.keys
write-host("Print all hashtable values")
$HashValue.values
write-host("Get ID")
$HashValue["ID"]
write-host("print Size")
$HashValue.Count
write-host("Add key-value")
$HashValue["Updated"] = "Now"
write-host("sort by key")
$HashValue.GetEnumerator() | Sort-Object -Property keyOutput:
Print all hashtable keys
ID
Name
Color
Print all hashtable values
13
Purnima
fair
Get ID
13
print Size
3
Add key-value
sort by key
Name Value
—- —–
Color fair
ID 13
Name Purnima
Updated Now
Example-25: PowerShell Bracket
The PowerShell allow the brackets are
- Parenthesis brackets− ()
- Braces brackets− {}
- Square brackets− []
- <angle> bracket
Parenthesis brackets:
Basically, the curve bracket is used to
- close the multiple statements.
- used in loop
- Pass the parameter
- assign array value
Braces brackets:
The curly bracket is used to
execute a block of statement
enclose the code
Square brackets:
Represent each array item.
Suppose $A=@(1,2,3,4)
$A[1] is 2.
$arrayItem = @("Laptop", "Mobile", "Tablet")
for($i = 0; $i -lt $arrayItem.length; $i++)
{
$arrayItem[$i]
}
Some time we are using the angle bracket
In the below example we can abe to see when we add item to HTML file.
Set-Content G:padminiSourceFolderNewHtmlFile.html '<html>Welcome To Top 51 PowerShell Example</html>'Example-26: PowerShell Backtick
PowerShell support set of Backtick character
- `n-Newline
- `t- horizontal tabline
- `v-vertical tabline
- `o-null
- `b-backspace
- `e-Escape
- `%-stop parsing
Ex:
Write–host “Collection of `n important PowerShell `t Example”
OutPut:
Collection of important PowerShell Example
Example-27: Function in PowerShell
A function in PowerShell is a block of code has a name assign by the user. We can use the function multiple times in code. We need not write the code again and again. We can call the function in a program whenever required.
Syntax:
function functionName
{
code
}
Example of simple function without using Parameter:
function displayDate
{
Get-Date
}
When pass some parameter to function we need to use param keyword
function devidedValue
{
Param ([int]$x,[int]$y)
$z = $x / $b
Write-Output $z
}
Whenever it is required we need to call by the function name.
Factorial of an integer value:
function Factorial-Of-A-Number([int]$number)
{
if($number -lt 0)
{
$factValue = 0
}
elseif($number -le 1)
{
$factValue = 1
}
else
{
$factValue = $number * (Get-Factorial($number - 1))
}
return $factValue
}
$number = Read-Host 'Enter a value'
$factValue = Factorial-Of-A-Number $number
Write-Output "$number! = $factValue"
Example-28: PowerShell Split and Join String
Split the text using PowerShell:
The split operator is used to split the string value. The below example is split of a string value.
$stringValue="Top  51 Window  PowerShell Example"
$arrValue = $stringValue -split ' '
$arrValue
OutPut:
- Top
- 51
- Window
- PowerShell
- Example
Join String Value:
In the below example we will discuss how to join the string value. To join multiple value join opearator is used.
$stringValue=("Top "," 51"," Window"," PowerShell"," Example")
$arrValue = -join$stringValue
$arrValue
OutPut:
Top 51 Window PowerShell Example
Example-29: How to show a message box from PowerShell
Below is the PowerShell script which will show a message box.
$msgBoxInput = [System.Windows.MessageBox]:: Show('Would you like to exit the page','Leave the page or not','YesNoCancel','Error')
switch ($msgBoxInput) {
'Yes' {
Write-Host "You pressed yes"
}
'No' {
Write-Host "You pressed No"
}
'Cancel' {
Write-Host "You pressed cancel"
}
}
OutPut:
You pressed yes

Example-30: Write Warning Message and change the color of the text
To write a warning message “Write-Warning” is used.
Write-Warning "Give a Proper UserName"
To change the text color below script is used.
Write-Host "Top 51 Window PowerShell Example" -BackgroundColor Red
Write-Host "Top 51 Window PowerShell Example" -ForegroundColor Yellow
Write-Host "Top 51 Window PowerShell Example" -BackgroundColor green
Write-Host "Top 51 Window PowerShell Example" -ForegroundColor Red
Example-31: Retrieving User Information From Active Directory
The below cmdlets is used to retrieve all the username whose password is never expired.
Search-ADAccount -PasswordNeverExpires | FT Name, ObjectClass, UserPrincipalName
Example-32: PowerShell registry value
We will get all the PowerShell Drives using Get-“PSDrive” cmdlets.
Get-"PSDrive
We can able to see two registry key:HKCU and HKLM.
Example-33: PowerShell get IP to address remote computer
By using the below cmdlets we can able to find out Current system IP address.
Get-WmiObject -Class Win32_NetworkAdapterConfiguration -Filter IPEnabled=TRUE -ComputerName . | Format-Table -Property IPAddress
Example-34: PowerShell restart-computer
To restart the current system “Restart-Computer” cmdlets is used.
Restart-ComputerExample-35: PowerShell find five processes using memory
ps | sort –p ws | select –last 5
Example-36: PowerShell working with Binary PowerShell
Convert an integer value to hexadecimal value:
$hexValue=0x1234
$hexValue
By simply putting “0x” before a number, we can convert an integer value into a hexadecimal value.
Convert integer to Binary value:
[Convert]::ToString(1234,2)To convert an integer value to binary in the ToString function pass two parameter one number which we want to convert and 2.
Example-37: PowerShell Create form
For creating a Winform I have created a variable “NewForm” and create a new form. I have set the size and Start position of form.
I have created an button and click event by calling add_click() method and pass it a PowerShell script block. I have let the button size defult and then add the button to form controls collection and finally call to ShowDialog() method and store in Dialouge variable.
Add-Type -AssemblyName System.Windows.Forms
$NewForm = New-Object Windows.Forms.Form
$NewForm.Size = New-Object Drawing.Size @(250,150)
$NewForm.StartPosition = "CenterScreen"
$Button = New-Object System.Windows.Forms.Button
$Button.add_click({Get-Date|Out-Host})
$Button.Text = "Click here"
$NewForm.Controls.Add($Button)
$Dialouge = $NewForm.ShowDialog()
Output:When we click on button it will show date and time.

Example-38: PowerShell Clear All History
To clear all the history information using “Clear-History”.
Clear-HistoryExample-39: PowerShell Get-EventLog
The “Get-EventLog” is used to collect the machine event log.
In the below script I am trying to collect all information of System log file.
Get-EventLog -Log "System"Example-40: PowerShell Get disk Information
Previously when we want any information about the disks we need to open the CMD window and use disk part. But nowadays the beautiful PowerShell provides the cmdlets “Get-Disk”.
The “Get-Disk” will give all information about the disk attached to our current Operating System.
By using “Get-PhysicalDisk” cmdlets we can able to get all the physical disc information.
To see all the information of virtual disk created for storage pools we will use “Get-VirtualDisk” cmdlets.

To display the volume object we can use Get-volume cmdlets.
Get-volumeExample-41: Take Screenshot Through PowerShell
In the below script I have explained how to take a screenshot in our system using PowerShell cmdlets.
For taking a screenshot we need to do the following steps:
Step-1: First Get the screen information means property of screens like height, width, and co-ordinates. We need to configure the area up to which area we want to copy the screen.
Virtual Screen property is used to get all the property of screen which we want to take the screenshot.
$ScreenInformation = [System.Windows.Forms.SystemInformation]::VirtualScreen
$ScreenWidth = $ScreenInformation.Width
$ScreenHeight = $ScreenInformation.Height
$Left = $ScreenInformation.Left
$Top = $ScreenInformation.Top
Step-2: Create a BitmapObject to store image
In step-2 we need to create a new object named as BitmapObject. For the BitmapObject specify screen height and screen width.
$BitmapObject = New-Object System.Drawing.Bitmap $ScreenWidth, $ScreenHeight$ScreenWidth and $ScreenHeight is a variable in which I have store the width and height of screen.
Step-3: create a graphic object
Now I have created a graphic object of the same height and width and pass the “BitmapObject”. The Graphics class is used to draw the BitmapObject. This Graphics object is used to capture the screen.
$GraphicObject = [System.Drawing.Graphics]::FromImage($BitmapObject)Using the GraphicObject and the method CopyFromScreen we will capture the area of screen . We need to set the co-ordination.
$GraphicObject.CopyFromScreen($Left, $Top, 0, 0, $BitmapObject.Size)For saving the screenshot to local system
For saving the screenshot to local system save $BitmapObject to file. We have dclare a file variable and store the file location where we want to store the capture screen. I want to save the file innewscreenshot So I have to give the address of the file.
$File = "D:Padmini filesnewscreenshot.png"$BitmapObject.Save($File)$File = "D:Padmini filesnewscreenshot.png"
Add-Type -AssemblyName System.Windows.Forms
Add-type -AssemblyName System.Drawing
$ScreenInformation = [System.Windows.Forms.SystemInformation]::VirtualScreen
$ScreenWidth = $ScreenInformation.Width
$ScreenHeight = $ScreenInformation.Height
$Left = $ScreenInformation.Left
$Top = $ScreenInformation.Top
$BitmapObject = New-Object System.Drawing.Bitmap $ScreenWidth, $ScreenHeight
$GraphicObject = [System.Drawing.Graphics]::FromImage($BitmapObject)
$GraphicObject.CopyFromScreen($Left, $Top, 0, 0, $BitmapObject.Size)
$BitmapObject.Save($File)
Write-Output "Screenshot saved to your file:"
Write-Output $FileExample-42: PowerShell casting Value
When we are doing any kind of operation with different datatype value then the casting concept arises. It will convert the data type.
For example
$StringValue = "PowerShell" $DoubleValue = 2.0
$SumValue = $StringValue + $DoubleValuewrite-output $SumValue
Here I have taken two variable $StringValue and $DoubleValue. One variable is string type and other variable is double type. So when we will get for sum value we will get error.
So for overcoming the error, we need to follow:
Trace-Command -Name TypeConversion -pshost {[string]$DoubleValue + $StringValue}The above one is preferred method for casting value
Example-43: PowerShell Change The Look
To Change the PowerShell color we need to use the below command.
$Host.UI.RawUI.BackgroundColor="DarkRed"
$Host.UI.RawUI.ForegroundColor="white"
In the Output, we can able to see background color with Dark red and the text is a white color.
Example-44: PowerShell gets and stop the process:
get-processBy the cmdlets get-process, we will get all the process which is running in the current system.

get-process -id 196We will get the particular process name which is running in the current system.
To stop a particular process
stop-process-id 196Example-45: Add-Printer Powershell
Get Printers in System using PowerShell:
The “Get-Printer” cmdlets used to get all the printer name associated with the system.
Get-Printer
Remove Printer to System using PowerShell:
To remove the printer from your System “Remove-Printer” cmdlets is used.
Remove-Printer -Name "Microsoft XPS Document Writer"The above cmdlets used to Remove the printer name “Microsoft XPS Document Writer”.
Add Printer to System using PowerShell:
When we want to create a new printer to the system we need to mention the value of the parameter. The parameters are
- Name
- DriverName
- PortName
Add-Printer -Name "Microsoft Print to PDF " -DriverName "Microsoft Print To PDF " -PortName " PORTPROMPT:"Example-46: Convert to HTML
ConvertTo-Html -InputObject (Get-Process)The ConvertTo-Html parameter is used to converts .NET Framework objects to HTML and we can see the output in a Webpage.
In the above example, I have converted the output of Get-Process to HTML. We can able to see the output in WebPage also.
Example-47: PowerShell Set strict mode
Here we will discuss how to Set strict mode, and how to off the strict mode.
Set-StrictMode -Version 1.0This Set-“StrictMode” command turns strict mode on and sets it to version 1.0.
Set-StrictMode -OffThe “Set-StrictMode -Off” cmdlets used to turn off the strict mode.
Example-48: PowerShell Get all IP Addresses
Get all the IP address configuration in our system the ‘Get-NetIPAddress’ cmdlets is used. The IP address such as IPv4, IPV6 and the IP interfaces with which addresses are associated.
Get-NetIPAddress
Example-49: PowerShell Get PnpDevice
The “Get-PnpDevice” cmdlet is used to returns information about Plug and Play (PnP) devices in Your System.
Get-PnpDevice
Get-PnpDevice -FriendlyName 'Generic USB Hub'
Get-PnpDevice -FriendlyName “Motherboard resources” command gets all the devices named “Motherboard resources”.
Get-PnpDevice -FriendlyName "Motherboard resources"Like that, we can able to see all the device details by Status, class, FriendlyName, and InstanceId.
Example-50: PowerShell get application pool
“Get-IISAppPool” cmdlets are used to gets all the information about application pool. We can able to see all the application pool name, Status, CLR ver, Pipeline Mode and Start Mode.
Get-IISAppPool
Example-51: PowerShell send email Gmail
By using the below script we can able to send an email to PowerShell.
$From = "xyz@gmail.com"
$To = "abc@gmail.com"
$Cc = "pqr@gmail.com"
$Subject = "Email Subject"
$Body = "Insert body text here"
$SMTPServer = "smtp.gmail.com"
$SMTPPort = "587"
Send-MailMessage -From $From -to $To -Cc $Cc -Subject $Subject -Body $Body -SmtpServer $SMTPServer -port $SMTPPort -UseSsl -Credential (Get-Credential)
You may like following PowerShell tutorials:
- Missing argument in parameter list PowerShell
- Get SharePoint document library size using PowerShell
- PowerShell cannot be loaded because running scripts is disabled on this system windows 10
- PowerShell SharePoint Online: The remote server returned an error: (403) Forbidden
- Connect-PnPOnline : The ‘Connect-PnPOnline’ command was found in the module ‘SharePointPnPPowerShellOnline’
- SharePoint Online Automation: Upload Files Remotely to SharePoint Online Document Library using PowerShell
- Working with PowerShell in SharePoint Online/2016/2013
- Retrieve all list names and list guids from SharePoint online site using PowerShell
Conclusion:
This PowerShell tutorial we discuss what is Windows PowerShell? Advantages of Windows PowerShell, Different editors we can use to write PowerShell Scripts. Also, we have seen 51 very useful PowerShell examples.

I am Bijay a Microsoft MVP (8 times – My MVP Profile) in SharePoint and have more than 15 years of expertise in SharePoint Online Office 365, SharePoint subscription edition, and SharePoint 2019/2016/2013. Currently working in my own venture TSInfo Technologies a SharePoint development, consulting, and training company. I also run the popular SharePoint website EnjoySharePoint.com
Содержание

Управление дисками и файлами
Получение текущего расположения (Get-Location)
Чтобы определить путь к текущему каталогу, введите команду Get-Location.
PS> Get-Location
Path
----
C:Documents and SettingsPowerUser
Примечание
Командлет Get-Location аналогичен команде pwd в оболочке BASH. Командлет Set-Location аналогичен команде cd в Cmd.exe.
Настройка текущего расположения (Set-Location)
Команда Get-Location используется с командой Set-Location. Команда Set-Location позволяет вам указать расположение текущего каталога.
Set-Location -Path C:Windows
Обратите внимание, что после ввода команды вы не получите прямого отклика о действии команды. Большинство команд Windows PowerShell, выполняющих действия, практически не создают выходных данных, так как выходные данные не всегда полезны. Чтобы проверить успешность внесения изменения в каталог при вводе команды Set-Location, укажите параметр -PassThru при вводе команды Set-Location.
PS> Set-Location -Path C:Windows -PassThru

Path
----
C:WINDOWS
Параметр -PassThru можно использовать с некоторыми командами Set в Windows PowerShell для возврата сведений о результате, когда отсутствуют выходные данные по умолчанию.
Вы можете указать пути относительно текущего расположения так же, как и в большинстве командных оболочек UNIX и Windows. В стандартной нотации для относительных путей точка ( . ) представляет текущую папку, а две точки ( .. ) — родительский каталог текущего расположения.
Например, если вы находитесь в папке C:Windows, точка ( . ) представляет C:Windows, а две точки ( .. ) представляют C: . Текущее расположение можно изменить на корень диска C: путем ввода следующей команды:
PS> Set-Location -Path .. -PassThru

Path
----
C:
Тот же метод работает для дисков Windows PowerShell, которые не являются дисками файловой системы, например HKLM: . В реестре в качестве расположения можно задать раздел HKLMSoftware путем ввода следующего кода:
PS> Set-Location -Path HKLM:SOFTWARE -PassThru

Path
----
HKLM:SOFTWARE
После этого можно изменить расположение каталога на родительский каталог, который является корнем диска Windows PowerShell HKLM: с помощью относительного пути:
PS> Set-Location -Path .. -PassThru

Path
----
HKLM:
Вы можете ввести Set-Location или использовать любой из встроенных псевдонимов Windows PowerShell для Set-Location (cd, chdir, sl). Пример:
cd -Path C:Windows
chdir -Path .. -PassThru
sl -Path HKLM:SOFTWARE -PassThru
Сохранение и отзыв последних расположений (Push-Location и Pop-Location)
При изменении расположения полезно отслеживать свое предыдущее расположение и иметь возможность вернуться к нему. Командлет Push-Location в Windows PowerShell создает упорядоченный журнал («стек») путей к каталогам, которые вы открывали, чтобы можно было вернуться по нему на шаг назад, используя дополнительный командлет Pop-Location.
Например, Windows PowerShell обычно запускается в корневом каталоге пользователя.
PS> Get-Location

Path
----
C:Documents and SettingsPowerUser
Чтобы передать текущее расположение в стек, а затем переместить его в папку локальных параметров, введите:
Push-Location -Path "Local Settings"
После этого можно передать расположение локальных параметров в стек и переместить его в папку Temp, введя следующее:
Push-Location -Path Temp
Чтобы убедиться, что каталоги изменены, введите команду Get-Location.
PS> Get-Location

Path
----
C:Documents and SettingsPowerUserLocal SettingsTemp
После этого можно перейти в последний открытый каталог, введя команду Pop-Location, и проверить изменение, введя команду Get-Location.
PS> Pop-Location
PS> Get-Location

Path
----
C:Documents and SettingsmeLocal Settings
Как и в случае с командлетом Set-Location, можно включить параметр -PassThru при вводе командлета Pop-Location, чтобы открыть указанный каталог.
PS> Pop-Location -PassThru

Path
----
C:Documents and SettingsPowerUser
Кроме того, можно использовать командлеты расположения с сетевыми путями. Если у вас есть сервер FS01 с общей папкой Public, можно изменить расположение, введя
Set-Location \FS01Public
или диспетчер конфигурации служб
Push-Location \FS01Public
Чтобы изменить расположение на любой доступный диск, можно использовать команды Push-Location и Set-Location. Например, если у вас есть локальный дисковод компакт-дисков с буквой диска D, содержащий компакт-диск с данными, вы можете изменить расположение на него, введя команду Set-Location D: .
Если дисковод пуст, вы получите следующее сообщение об ошибке:
PS> Set-Location D:
Set-Location : Cannot find path 'D:' because it does not exist.
Работа с файлами и папками. Получение списка файлов и папок, содержащихся в папке.
Извлечь все элементы непосредственно из папки можно с помощью командлета Get-ChildItem. Для отображения скрытых и системных элементов добавьте необязательный параметр Force. Например, эта команда отображает непосредственное содержимое диска C Windows PowerShell (которое совпадает с содержимым физического диска C Windows):
Get-ChildItem -Path C: -Force
Эта команда выводит только элементы, содержащиеся на диске непосредственно, так же как и команда DIR оболочки Cmd.exe или команда ls оболочки UNIX. Для показа вложенных элементов необходимо также указать параметр -Recurse. (Время выполнения этой операции будет очень велико.) Для вывода всего содержимого диска C введите:
Get-ChildItem -Path C: -Force -Recurse
Командлет Get-ChildItem позволяет отфильтровать элементы с помощью параметров Path, Filter, Include и Exclude, но обычно осуществляется лишь фильтрация по имени. Сложную фильтрацию на основе других свойств элементов можно выполнить с помощью Where-Object.
Следующая команда находит все исполняемые файлы в папке Program Files, которые были в последний раз изменены после 1 октября 2005 г. и размер которых не менее одного мегабайта и не более десяти мегабайт:
Get-ChildItem -Path $env:ProgramFiles -Recurse -Include *.exe | Where-Object -FilterScript {($_.LastWriteTime -gt '2005-10-01') -and ($_.Length -ge 1mb) -and ($_.Length -le 10mb)}
Копирование файлов и папок
Копирование выполняется с помощью командлета Copy-Item. Следующая команда создает резервную копию C:boot.ini в C:boot.bak:
Copy-Item -Path C:boot.ini -Destination C:boot.bak
Если целевой файл уже существует, то попытка копирования завершается неудачей. Чтобы перезаписать имеющийся целевой файл, используйте параметр Force.
Copy-Item -Path C:boot.ini -Destination C:boot.bak -Force
Эта команда работает, даже если целевой объект доступен только для чтения.
Так же выполняется и копирование папок. Эта команда копирует папку C:temptest1 в новую папку C:tempDeleteMe рекурсивно.
Copy-Item C:temptest1 -Recurse C:tempDeleteMe
Можно также скопировать избранные элементы. Следующая команда копирует все файлы TXT, содержащиеся в папке C:data, в папку C:temptext:
Copy-Item -Filter *.txt -Path c:data -Recurse -Destination C:temptext
Для копирования элементов файловой системы можно использовать и другие средства. В Windows PowerShell по-прежнему работают команды XCOPY, ROBOCOPY и такие COM-объекты, как Scripting.FileSystemObject. Например, можно воспользоваться COM-классом Scripting.FileSystem сервера сценариев Windows для создания резервной копии файла C:boot.ini в файле C:boot.bak:
(New-Object -ComObject Scripting.FileSystemObject).CopyFile('C:boot.ini', 'C:boot.bak')
Создание файлов и папок
Создание новых элементов осуществляется одинаковым образом всеми поставщиками Windows PowerShell. Если поставщик Windows PowerShell поддерживает более одного типа элементов (например, поставщик Windows PowerShell FileSystem различает каталоги и файлы), необходимо указать тип элемента.
Эта команда создает папку C:tempNew Folder:
New-Item -Path 'C:tempNew Folder' -ItemType Directory
Эта команда создает пустой файл C:tempNew Folderfile.txt.
New-Item -Path 'C:tempNew Folderfile.txt' -ItemType File
Важно!
При использовании параметра Force с командой New-Item для создания папки, которая уже существует, она не перезапишет и не заменит папку. Будет просто возвращен имеющийся объект папки. Однако, если использовать New-Item -Force в уже имеющимся файле, файл будет полностью перезаписан.
Удаление всех файлов и папок, содержащихся в папке
Удалить вложенные элементы можно с помощью командлета Remove-Item, однако он потребует подтверждения удаления, если элемент сам что-нибудь содержит. Например, при попытке удаления папки C:tempDeleteMe, которая содержит другие элементы, Windows PowerShell предварительно предложит подтвердить удаление этой папки:
Remove-Item -Path C:tempDeleteMe

Confirm
The item at C:tempDeleteMe has children and the Recurse parameter was not
specified. If you continue, all children will be removed with the item. Are you
sure you want to continue?
[Y] Yes  [A] Yes to All  [N] No  [L] No to All  [S] Suspend  [?] Help
(default is "Y"):
Если подтверждение для каждого вложенного элемента нежелательно, задайте параметр Recurse:
Remove-Item -Path C:tempDeleteMe -Recurse
Подключение локальной папки как диска
Отобразить локальную папку можно с помощью команды New-PSDrive. Следующая команда создает локальный диск P:, корневым каталогом которого является локальный каталог Program Files, отображающийся только в сеансе PowerShell:
New-PSDrive -Name P -Root $env:ProgramFiles -PSProvider FileSystem
Как и при использовании сетевых дисков, диски, отображенные в Windows PowerShell, немедленно становятся доступными оболочке Windows PowerShell. Чтобы создать подключенный диск, отображающийся в проводнике, нужен параметр -Persist. Но с этим параметром можно использовать только удаленные пути.
Чтение текстового файла в массив
Одним из наиболее общих форматов хранения текстовых данных является файл, отдельные строки которого рассматриваются как отдельные элементы. Командлет Get-Content используется для чтения всего файла за один шаг, как показано далее:
PS> Get-Content -Path C:boot.ini
[boot loader]
timeout=5
default=multi(0)disk(0)rdisk(0)partition(1)WINDOWS
[operating systems]
multi(0)disk(0)rdisk(0)partition(1)WINDOWS="Microsoft Windows XP Professional"
 /noexecute=AlwaysOff /fastdetect
multi(0)disk(0)rdisk(0)partition(1)WINDOWS=" Microsoft Windows XP Professional
with Data Execution Prevention" /noexecute=optin /fastdetect
Командлет Get-Content сразу рассматривает данные, считанные из файла, как массив с одним элементом на строку содержимого файла. Убедиться в этом можно, проверив свойство Length полученного содержимого:
PS> (Get-Content -Path C:boot.ini).Length
6
Эта команда наиболее полезна для непосредственного ввода в Windows PowerShell информационных списков. Например, можно хранить в файле C:tempdomainMembers.txt список имен компьютеров или IP-адресов по одному имени на каждую строку файла. Вы можете использовать командлет Get-Content, чтобы извлечь содержимое файла и поместить его в переменную $Computers:
$Computers = Get-Content -Path C:tempDomainMembers.txt
Теперь переменная $Computers представляет собой массив, содержащий в каждом элементе имя компьютера.
Работа с файлами, папками и разделами реестра
Перечисление файлов, папок и разделов реестра (Get-ChildItem)
Так как получение коллекции элементов из определенного расположения является обычной задачей, командлет Get-ChildItem разработан специально для возврата всех элементов, найденных в контейнере, например в папке.
Если необходимо вернуть все файлы и папки, которые находятся непосредственно в папке C:Windows, введите:
PS> Get-ChildItem -Path C:Windows
    Directory: Microsoft.Windows PowerShell.CoreFileSystem::C:Windows

Mode                LastWriteTime     Length Name
----                -------------     ------ ----
-a---        2006-05-16   8:10 AM          0 0.log
-a---        2005-11-29   3:16 PM         97 acc1.txt
-a---        2005-10-23  11:21 PM       3848 actsetup.log
...
Списки выглядят аналогично тем спискам, которые появляются при вводе команды dir в Cmd.exe или команды ls в командной оболочке UNIX.
С помощью параметров командлета Get-ChildItem можно создавать очень сложные списки. Далее рассмотрим несколько сценариев. Синтаксис командлета Get-ChildItem можно увидеть, введя:
Get-Command -Name Get-ChildItem -Syntax
Эти параметры можно скомбинировать и сопоставить для получения настраиваемых выходных данных.
Перечисление всех элементов в контейнере (-Recurse)
Чтобы увидеть оба элемента в папке Windows и все элементы во вложенных папках, используйте параметр Recurse для Get-ChildItem. В списке отображается все, что находится в папке Windows, а также элементы в ее вложенных папках. Пример:
PS> Get-ChildItem -Path C:WINDOWS -Name
addins
AppPatch
assembly
...
Принудительное перечисление скрытых элементов (-Force)
В выходных данных команды Get-ChildItem не отображаются элементы, которые обычно невидимы в проводнике или Cmd.exe. Чтобы показать скрытые элементы, используйте параметр Force для Get-ChildItem. Пример:
Get-ChildItem -Path C:Windows -Force
Этот параметр называется Force, так как позволяет принудительно переопределить обычное поведение команды Get-ChildItem. Параметр Force широко используется для принудительного выполнения действия командлетом. Тем не менее, он не будет выполнять действия, компрометирующие систему безопасности.
Сопоставление имен элементов с подстановочными знаками
Команда Get-ChildItem допускает подстановочные знаки в пути к перечисляемым элементам.
Так как сопоставление с подстановочными знаками обрабатывается подсистемой Windows PowerShell, все командлеты, которые принимают подстановочные знаки, используют одну нотацию и имеют одно поведение сопоставления. В нотацию подстановочных знаков Windows PowerShell входит:
- Звездочка (*) — соответствует нулю или большему количеству вхождений любого символа.
- знак вопроса (?) — соответствует ровно одному символу;
- Открывающая квадратная скобка ([) и закрывающая квадратная скобка (]) — заключают в себя набор символов для сопоставления.
Далее приводится несколько примеров работы спецификации из подстановочных знаков.
Чтобы найти в каталоге Windows все файлы, имеющие суффикс .log и ровно пять символов в основном имени, введите следующую команду:
PS> Get-ChildItem -Path C:Windows?????.log

    Directory: Microsoft.Windows PowerShell.CoreFileSystem::C:Windows
Mode                LastWriteTime     Length Name
----                -------------     ------ ----
...
-a---        2006-05-11   6:31 PM     204276 ocgen.log
-a---        2006-05-11   6:31 PM      22365 ocmsn.log
...
-a---        2005-11-11   4:55 AM         64 setup.log
-a---        2005-12-15   2:24 PM      17719 VxSDM.log
...
Чтобы найти в каталоге Windows все файлы с именами, начинающимися на букву x, введите:
Get-ChildItem -Path C:Windowsx*
Чтобы найти все файлы с именами, начинающимися на x или z, введите:
Get-ChildItem -Path C:Windows[xz]*
Исключение элементов (-Exclude)
Вы можете исключить определенные элементы с помощью параметра Exclude для Get-ChildItem. Это позволит вам выполнить сложную фильтрацию в одном операторе.
Например, предположим, что вы пытаетесь найти библиотеку службы времени Windows в папке System32 и все, что вам известно об имени библиотеки, — то, что оно начинается на W и содержит «32».
Выражение w*32*.dll найдет все библиотеки DLL, удовлетворяющие условию, но может также вернуть библиотеки Windows 95 и библиотеки, совместимые с 16-разрядной версией Windows, в именах которых содержится «95» или «16». Файлы с такими числами в именах можно пропустить, используя параметр Exclude с шаблоном *[9516]* :
PS> Get-ChildItem -Path C:WINDOWSSystem32w*32*.dll -Exclude *[9516]*

Directory: Microsoft.PowerShell.CoreFileSystem::C:WINDOWSSystem32
Mode                LastWriteTime     Length Name
----                -------------     ------ ----
-a---        2004-08-04   8:00 AM     174592 w32time.dll
-a---        2004-08-04   8:00 AM      22016 w32topl.dll
-a---        2004-08-04   8:00 AM     101888 win32spl.dll
-a---        2004-08-04   8:00 AM     172032 wldap32.dll
-a---        2004-08-04   8:00 AM     264192 wow32.dll
-a---        2004-08-04   8:00 AM      82944 ws2_32.dll
-a---        2004-08-04   8:00 AM      42496 wsnmp32.dll
-a---        2004-08-04   8:00 AM      22528 wsock32.dll
-a---        2004-08-04   8:00 AM      18432 wtsapi32.dll
Смешение параметров Get-ChildItem
В одной команде можно использовать несколько параметров Get-ChildItem. Перед тем как комбинировать параметры, убедитесь, что понимаете принципы сопоставления подстановочных знаков. Например, следующая команда не возвращает результатов:
Get-ChildItem -Path C:Windows*.dll -Recurse -Exclude [a-y]*.dll
Результаты отсутствуют, даже если существуют две библиотеки, которые начинаются на букву z в папке Windows.
Результаты не возвращены, так как подстановочный знак указан как часть пути. Хотя команда и была рекурсивной, командлет Get-ChildItem ограничил элементы до тех, которые находятся в папке Windows с именами, заканчивающимися на .dll.
Чтобы указать рекурсивный поиск для файлов, имена которых соответствуют специальному шаблону, используйте параметр -Include.
PS> Get-ChildItem -Path C:Windows -Include *.dll -Recurse -Exclude [a-y]*.dll

    Directory: Microsoft.Windows PowerShell.CoreFileSystem::C:WindowsSystem32Setup

Mode                LastWriteTime     Length Name
----                -------------     ------ ----
-a---        2004-08-04   8:00 AM       8261 zoneoc.dll

    Directory: Microsoft.Windows PowerShell.CoreFileSystem::C:WindowsSystem32

Mode                LastWriteTime     Length Name
----                -------------     ------ ----
-a---        2004-08-04   8:00 AM     337920 zipfldr.dll
Работа с записями реестра. Создание списков записей реестра.
Существует несколько способов просмотра реестра. Самый простой — получить имена свойств, связанные с разделом. Например, чтобы просмотреть имена записей в разделе реестра HKEY_LOCAL_MACHINESoftwareMicrosoftWindowsCurrentVersion, используйте Get-Item. Разделы реестра содержат свойство с универсальным именем Property, которое является списком записей реестра в разделе. Следующая команда выбирает свойство Property и расширяет элементы так, чтобы они отображались в списке:
Get-Item -Path Registry::HKEY_LOCAL_MACHINESOFTWAREMicrosoftWindowsCurrentVersion |
  Select-Object -ExpandProperty Property
DevicePath
MediaPathUnexpanded
ProgramFilesDir
CommonFilesDir
ProductId
Чтобы просмотреть записи реестра в более удобочитаемой форме, используйте Get-ItemProperty.
Get-ItemProperty -Path Registry::HKEY_LOCAL_MACHINESOFTWAREMicrosoftWindowsCurrentVersion
PSPath              : Microsoft.PowerShell.CoreRegistry::HKEY_LOCAL_MACHINESO
                      FTWAREMicrosoftWindowsCurrentVersion
PSParentPath        : Microsoft.PowerShell.CoreRegistry::HKEY_LOCAL_MACHINESO
                      FTWAREMicrosoftWindows
PSChildName         : CurrentVersion
PSDrive             : HKLM
PSProvider          : Microsoft.PowerShell.CoreRegistry
DevicePath          : C:WINDOWSinf
MediaPathUnexpanded : C:WINDOWSMedia
ProgramFilesDir     : C:Program Files
CommonFilesDir      : C:Program FilesCommon Files
ProductId           : 76487-338-1167776-22465
WallPaperDir        : C:WINDOWSWebWallpaper
MediaPath           : C:WINDOWSMedia
ProgramFilesPath    : C:Program Files
PF_AccessoriesName  : Accessories
(default)           :
Все свойства Windows PowerShell раздела имеют префиксы PS, например PSPath, PSParentPath, PSChildName и PSProvider.
Для создания ссылки на текущее расположение можно использовать нотацию *.*. Set-Location можно использовать для изменения значения на контейнер реестра CurrentVersion.
Set-Location -Path Registry::HKEY_LOCAL_MACHINESOFTWAREMicrosoftWindowsCurrentVersion
Кроме того, можно использовать встроенный диск HKLM PSDrive с Set-Location.
Set-Location -Path hklm:SOFTWAREMicrosoftWindowsCurrentVersion
Затем можно использовать нотацию *.* для текущего расположения, чтобы перечислить свойства без указания полного пути.
Get-ItemProperty -Path .
...
DevicePath          : C:WINDOWSinf
MediaPathUnexpanded : C:WINDOWSMedia
ProgramFilesDir     : C:Program Files
...
Расширение пути работает так же, как и в файловой системе, поэтому в этом расположении можно получить перечисление ItemProperty для HKLM:SOFTWAREMicrosoftWindowsHelp с помощью Get-ItemProperty -Path ..Help.
Получение одной записи реестра
Если необходимо получить конкретную запись в разделе реестра, можно использовать один из нескольких возможных подходов. Этот пример получает значение DevicePath в HKEY_LOCAL_MACHINESOFTWAREMicrosoftWindowsCurrentVersion.
Вместе с Get-ItemProperty используйте параметр Path, чтобы указать имя раздела и параметр Name, а также имя записи DevicePath.
Get-ItemProperty -Path HKLM:SoftwareMicrosoftWindowsCurrentVersion -Name DevicePath
PSPath       : Microsoft.PowerShell.CoreRegistry::HKEY_LOCAL_MACHINESoftware
               MicrosoftWindowsCurrentVersion
PSParentPath : Microsoft.PowerShell.CoreRegistry::HKEY_LOCAL_MACHINESoftware
               MicrosoftWindows
PSChildName  : CurrentVersion
PSDrive      : HKLM
PSProvider   : Microsoft.PowerShell.CoreRegistry
DevicePath   : C:WINDOWSinf
Эта команда возвращает стандартные свойства Windows PowerShell, а также свойство DevicePath.
Примечание
Хотя Get-ItemProperty содержит параметры Filter, Include и Exclude, их нельзя использовать для фильтрации по имени свойства. Эти параметры относятся к разделам реестра (путям элементов), а не записям реестра. Записи реестра — это свойства элементов.
Другой вариант — использовать средство командной строки Reg.exe. Для получения справки по reg.exe введите reg.exe /? в командной строке. Чтобы найти запись DevicePath, используйте reg.exe, как показано в следующей команде:
reg query HKLMSOFTWAREMicrosoftWindowsCurrentVersion /v DevicePath
! REG.EXE VERSION 3.0

HKEY_LOCAL_MACHINESOFTWAREMicrosoftWindowsCurrentVersion
    DevicePath  REG_EXPAND_SZ   %SystemRoot%inf
Также можно использовать объект WshShell COM, чтобы найти некоторые записи реестра, хотя этот метод не работает с большими двоичными данными или именами записей реестра, содержащими такие символы, как . Добавьте имя свойства с разделителем «» в путь элемента:
(New-Object -ComObject WScript.Shell).RegRead("HKLMSOFTWAREMicrosoftWindowsCurrentVersionDevicePath")
%SystemRoot%inf
Настройка одной записи реестра
Если необходимо изменить определенную запись в разделе реестра, можно использовать один из нескольких подходов. Этот пример изменяет запись Path в разделе HKEY_CURRENT_USEREnvironment. Запись Path указывает расположение для поиска исполняемых файлов.
- Получите текущее значение записи Path с помощью
Get-ItemProperty. - Добавьте новое значение, отделив его с помощью
;. - Используйте
Set-ItemPropertyс указанным разделом, именем записи и значением, чтобы изменить запись реестра.
$value = Get-ItemProperty -Path HKCU:Environment -Name Path
$newpath = $value.Path += ";C:srcbin"
Set-ItemProperty -Path HKCU:Environment -Name Path -Value $newpath
Примечание
Хотя Set-ItemProperty содержит параметры Filter, Include и Exclude, их нельзя использовать для фильтрации по имени свойства. Эти параметры относятся в разделам реестра (путям элементов), а не к записям реестра (свойствам элементов).
Другой вариант — использовать средство командной строки Reg.exe. Для получения справки по reg.exe введите reg.exe /? . в командной строке.
В следующем примере запись Path изменяется за счет удаления пути, добавленного в предыдущем примере. Get-ItemProperty по-прежнему используется для получения текущего значения, исключая анализ строки, возвращаемой reg query. Методы SubString и LastIndexOf используются для получения последнего добавленного пути в запись Path.
$value = Get-ItemProperty -Path HKCU:Environment -Name Path
$newpath = $value.Path.SubString(0, $value.Path.LastIndexOf(';'))
reg add HKCUEnvironment /v Path /d $newpath /f
The operation completed successfully.
Создание новых записей реестра
Чтобы добавить новую запись реестра с именем PowerShellPath в раздел CurrentVersion, используйтеNew-ItemProperty с путем к разделу, именем записи и значением записи. В этом примере используется значение переменной Windows PowerShell $PSHome, в которой хранится путь к каталогу установки Windows PowerShell.
Вы можете добавить новую запись в раздел с помощью следующей команды, и команда также вернет сведения о новой записи:
New-ItemProperty -Path HKLM:SOFTWAREMicrosoftWindowsCurrentVersion -Name PowerShellPath -PropertyType String -Value $PSHome
PSPath         : Microsoft.PowerShell.CoreRegistry::HKEY_LOCAL_MACHINESOFTWAREMicrosoftWindowsCurrentVersion
PSParentPath   : Microsoft.PowerShell.CoreRegistry::HKEY_LOCAL_MACHINESOFTWAREMicrosoftWindows
PSChildName    : CurrentVersion
PSDrive        : HKLM
PSProvider     : Microsoft.PowerShell.CoreRegistry
PowerShellPath : C:Program FilesWindows PowerShellv1.0
Значение PropertyType должно быть именем элемента перечисления Microsoft.Win32.RegistryValueKind из следующей таблицы:
Примечание
Запись реестра можно добавить в несколько расположений, указав массив значений для параметра Path:
New-ItemProperty -Name PowerShellPath -PropertyType String -Value $PSHome `
  -Path HKLM:SOFTWAREMicrosoftWindowsCurrentVersion, HKCU:SOFTWAREMicrosoftWindowsCurrentVersion
Кроме того, можно перезаписать существующее значение записи реестра, добавив параметр Force в любую команду New-ItemProperty.
Переименование записей реестра
Чтобы переименовать запись PowerShellPath в PSHome, используйте Rename-ItemProperty.
Rename-ItemProperty -Path HKLM:SOFTWAREMicrosoftWindowsCurrentVersion -Name PowerShellPath -NewName PSHome
Чтобы отобразить переименованное значение, добавьте параметр PassThru в команду.
Rename-ItemProperty -Path HKLM:SOFTWAREMicrosoftWindowsCurrentVersion -Name PowerShellPath -NewName PSHome -passthru
Удаление записей реестра
Чтобы удалить записи реестра PSHome и PowerShellPath, используйте Remove-ItemProperty.
Remove-ItemProperty -Path HKLM:SOFTWAREMicrosoftWindowsCurrentVersion -Name PSHome
Remove-ItemProperty -Path HKCU:SOFTWAREMicrosoftWindowsCurrentVersion -Name PowerShellPath
Доброго времени суток дорогие читатели. В данной статье мы познакомимся с основами Powershell. Данный язык программирования используется во всех ОС Microsoft начиная с Windows XP SP3. Писать Powershell скрипты должен уметь каждый уважающий себя системный администратор windows.
Все команды в Powershell как правило используются в форме командлетов. Все командлеты это специализированные классы .NET Framework и .NET Core (используется в PowerShell Core 6 и выше).
Powershell класса .NET Framework это версии с 1 по 5.1 а Powershell .NET Core это версия 6 и выше (на данный момент 7.0). По заявлению Microsoft новых функций в Powershell 5.1 (.NET Framework) вносить уже не будут. Однако 7 версия еще не полностью поддерживает все модули предыдущих версий. Но судя по всему Microsoft стремится к этому и скоро версия Core будет единственной. В общем cmd отходит в прошлое и теперь без Powershell никуда. Давайте приступим к практике. Так всегда лучше запоминается материал.
Запуск Powershell
На примере Windows 10 Powershell можно запустить просто нажав правой кнопкой мыши на меню пуск.
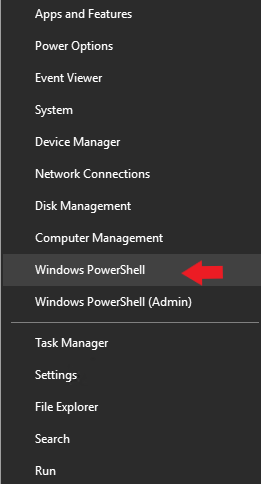
Также нижняя строчка позволяет запустить Powershell с повышенными правами администратора.
Еще можно воспользоваться поиском в WIndows 10 и ввести название powershell

Как видно на картинке выше нашелся не только Powershell но и Powershell ISE. Консоль powershell удобна если требуется запустить последовательно не больше одной команды. Либо несколько команд в конвейере. Однако в случае написания полноценных скриптов лучше использовать Powershell ISE. Это бесплатная среда разработки сценариев на языке Powershell поставляется вместе с ОС Windows.
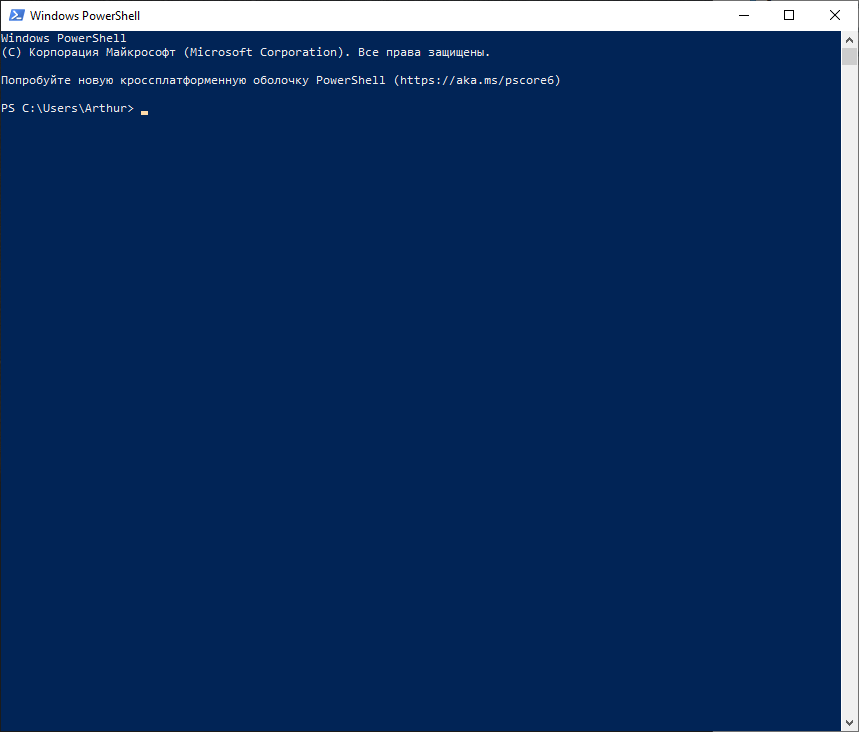
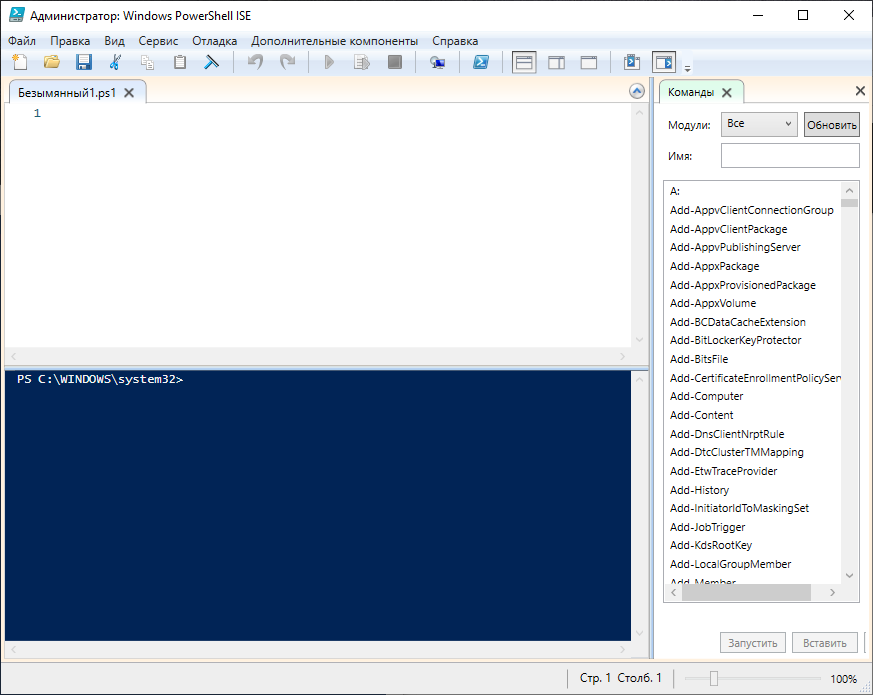
Сразу после запуска консоли рекомендую запустить командлет Get-Help — встроенная справка по всем командлетам, аналог man в Linux.
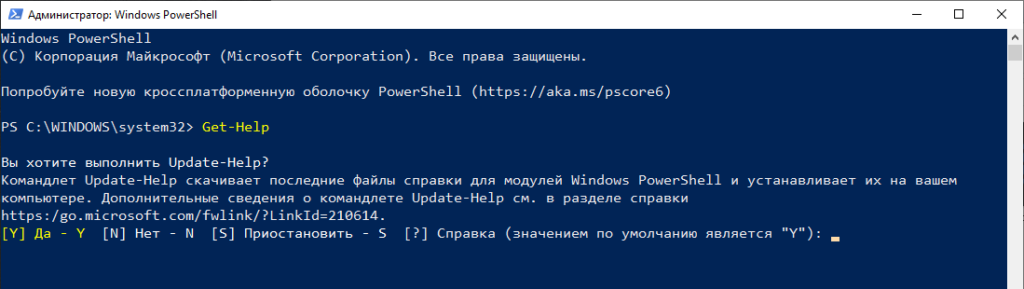
Видим что консоль предлагает обновить встроенную помощь. Нажимаем Y и соглашаемся.
Командлеты
Командлеты — это название команд в Powershell. Каждый командлет реализует заложенную в него функциональность. Как правило наименование командлета состоит из пары: глагол-существительное. Например: Get-Help — получить помощь. Обычно Get используется чтобы получить информация, Set — внести изменение, New — создать новый объект, политику и т.п. и Remove -удалить объект, политику и т.п.
Командлеты не чувствительны к регистру. Написать Get или get не важно, powershell воспримет эти команды одинаково.
Чтобы получить список всех доступных командлетов необходимо использовать Get-Command
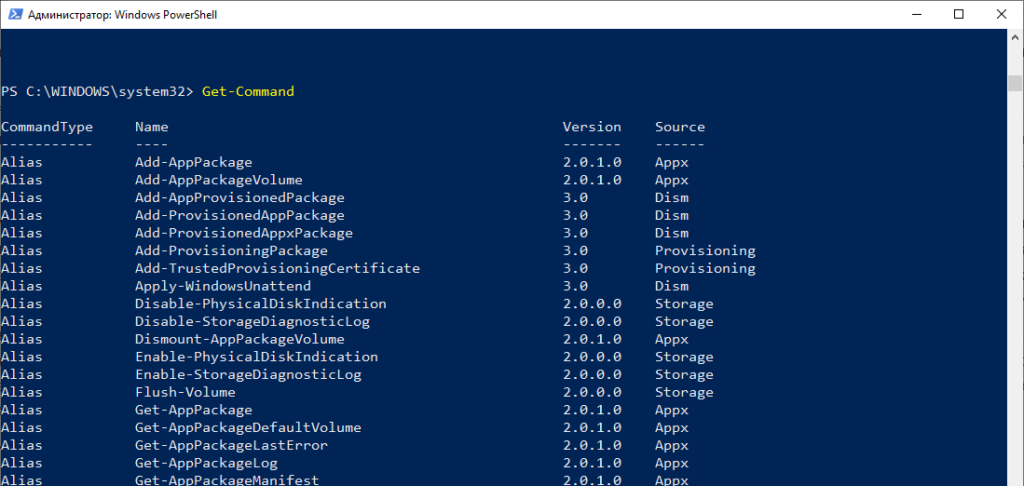
Для получения справки по любому командлету напишите Get-Help имя-комндлета. Например
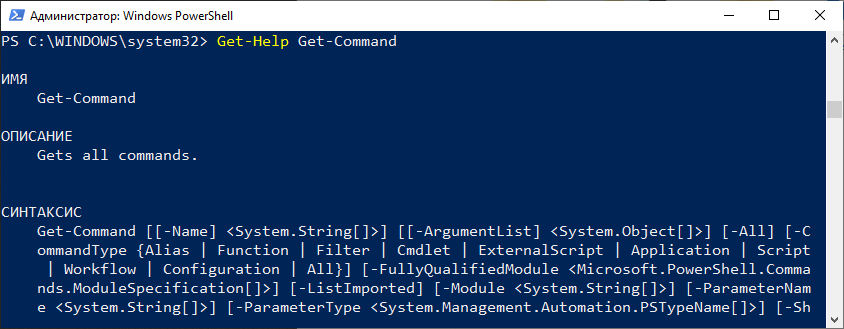
Давайте представим что нам необходимо вывести список командлетов для управления процессами. Воспользуемся Get-Command и укажем ему параметры для более точного поиска.
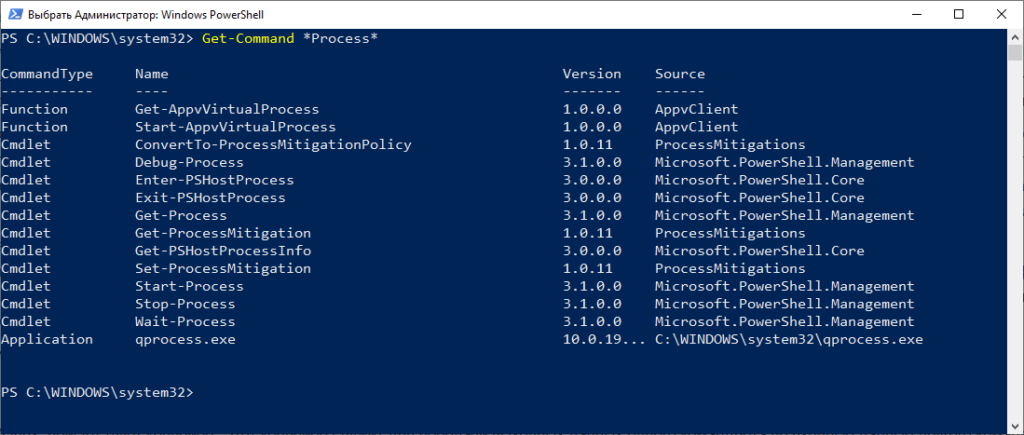
И вот мы видим список командлетов позволяющих управлять процессами: Get-Process — список всех запущенных процессов, Start-Process — запустить указанный процесс, Stop-Process— остановить указанный процесс, Wait-Process — ожидать указанный процесс. Как видно из названий командлетов можно легко понять для чего каждый служит.
Используя командлет Get-Help можно получить справку по любому командлету.
PS C:WINDOWSsystem32> Get-Help Get-Process

ИМЯ
    Get-Process

ОПИСАНИЕ
    Gets the processes that are running on the local computer or a remote computer.


СИНТАКСИС
    Get-Process [[-Name] <System.String[]>] [-ComputerName <System.String[]>] [-FileVersionInfo] [-Module] [<CommonParameters>]

    Get-Process [-ComputerName <System.String[]>] [-FileVersionInfo] -Id <System.Int32[]> [-Module] [<CommonParameters>]

    Get-Process [-ComputerName <System.String[]>] [-FileVersionInfo] -InputObject <System.Diagnostics.Process[]> [-Module] [<Com
    monParameters>]

    Get-Process -Id <System.Int32[]> -IncludeUserName [<CommonParameters>]

    Get-Process [[-Name] <System.String[]>] -IncludeUserName [<CommonParameters>]

    Get-Process -IncludeUserName -InputObject <System.Diagnostics.Process[]> [<CommonParameters>]


ОПИСАНИЕ
    The `Get-Process` cmdlet gets the processes on a local or remote computer.

    Without parameters, this cmdlet gets all of the processes on the local computer. You can also specify a particular process b
    y process name or process ID (PID) or pass a process object through the pipeline to this cmdlet.

    By default, this cmdlet returns a process object that has detailed information about the process and supports methods that l
    et you start and stop the process. You can also use the parameters of the `Get-Process` cmdlet to get file version informati
    on for the program that runs in the process and to get the modules that the process loaded.


ССЫЛКИ ПО ТЕМЕ
    Online Version: https://docs.microsoft.com/powershell/module/microsoft.powershell.management/get-process?view=powershell-5.1
    &WT.mc_id=ps-gethelp
    Debug-Process
    Get-Process
    Start-Process
    Stop-Process
    Wait-Process

ЗАМЕЧАНИЯ
    Для просмотра примеров введите: "get-help Get-Process -examples".
    Для получения дополнительных сведений введите: "get-help Get-Process -detailed".
    Для получения технических сведений введите: "get-help Get-Process -full".
    Для получения справки в Интернете введите: "get-help Get-Process -online"
При использовании командлета есть возможность указать несколько параметров при запуске. Первый параметр можно не называть. Выше я писал Get-Command *Process* где указал поиск командлетов со словом Process. Однако я не написал параметр -Name, хотя именно его и указал. Если полностью то поиск по имени выглядит так: Get-Command -Name *Process* . В случае отсутствия непосредственного указания -Name Powershell принимает в качестве имени введенное слово *Process*.
Давайте выведем список процессов с именем WhatsApp
Get-Process -Name WhatsApp -IncludeUserName
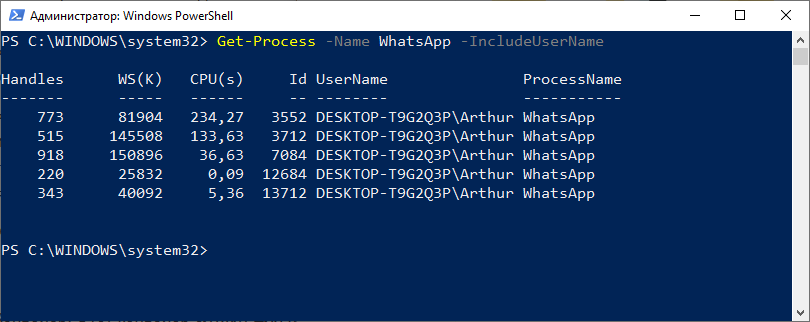
Мы вывели все процессы с именем WhatsApp и добавили в вывод дополнительный параметр -IncludeUserName, что позволило нам увидеть кем запущен процесс.
Алиасы
Алиасы в Powershell это по сути более короткие названия командлетов. Т.е. любому командлету можно присвоить свое короткое имя (alias). Например алиасом для командлета Get-Process является gps. Согласитесь куда проще и быстрее написать gps чем Get-Process.
Список всех alias можно получить используя командлет Get-Alias
PS C:WINDOWSsystem32> get-alias

CommandType     Name                                               Version    Source
-----------     ----                                               -------    ------
Alias           % -> ForEach-Object
Alias           ? -> Where-Object
Alias           ac -> Add-Content
Alias           asnp -> Add-PSSnapin
Alias           cat -> Get-Content
Alias           cd -> Set-Location
Alias           CFS -> ConvertFrom-String                          3.1.0.0    Microsoft.PowerShell.Utility
Alias           chdir -> Set-Location
Alias           clc -> Clear-Content
Alias           clear -> Clear-Host
Alias           clhy -> Clear-History
Alias           cli -> Clear-Item
Alias           clp -> Clear-ItemProperty
Alias           cls -> Clear-Host
Alias           clv -> Clear-Variable
Alias           cnsn -> Connect-PSSession
Alias           compare -> Compare-Object
Alias           copy -> Copy-Item
Alias           cp -> Copy-Item
Alias           cpi -> Copy-Item
Alias           cpp -> Copy-ItemProperty
Alias           curl -> Invoke-WebRequest
Alias           cvpa -> Convert-Path
Alias           dbp -> Disable-PSBreakpoint
Alias           del -> Remove-Item
Alias           diff -> Compare-Object
Alias           dir -> Get-ChildItem
Alias           dnsn -> Disconnect-PSSession
Alias           ebp -> Enable-PSBreakpoint
Alias           echo -> Write-Output
Alias           epal -> Export-Alias
Alias           epcsv -> Export-Csv
Alias           epsn -> Export-PSSession
Alias           erase -> Remove-Item
Alias           etsn -> Enter-PSSession
Alias           exsn -> Exit-PSSession
Alias           fc -> Format-Custom
Alias           fhx -> Format-Hex                                  3.1.0.0    Microsoft.PowerShell.Utility
Alias           fl -> Format-List
Alias           foreach -> ForEach-Object
Alias           ft -> Format-Table
Alias           fw -> Format-Wide
Alias           gal -> Get-Alias
Alias           gbp -> Get-PSBreakpoint
Alias           gc -> Get-Content
Alias           gcb -> Get-Clipboard                               3.1.0.0    Microsoft.PowerShell.Management
Alias           gci -> Get-ChildItem
Alias           gcm -> Get-Command
Alias           gcs -> Get-PSCallStack
Alias           gdr -> Get-PSDrive
Alias           ghy -> Get-History
Alias           gi -> Get-Item
Alias           gin -> Get-ComputerInfo                            3.1.0.0    Microsoft.PowerShell.Management
Alias           gjb -> Get-Job
Alias           gl -> Get-Location
Alias           gm -> Get-Member
Alias           gmo -> Get-Module
Alias           gp -> Get-ItemProperty
Alias           gps -> Get-Process
Alias           gpv -> Get-ItemPropertyValue
Alias           group -> Group-Object
Alias           gsn -> Get-PSSession
Alias           gsnp -> Get-PSSnapin
Alias           gsv -> Get-Service
Alias           gtz -> Get-TimeZone                                3.1.0.0    Microsoft.PowerShell.Management
Alias           gu -> Get-Unique
Alias           gv -> Get-Variable
Alias           gwmi -> Get-WmiObject
Alias           h -> Get-History
Alias           history -> Get-History
Alias           icm -> Invoke-Command
Alias           iex -> Invoke-Expression
Alias           ihy -> Invoke-History
Alias           ii -> Invoke-Item
Alias           ipal -> Import-Alias
Alias           ipcsv -> Import-Csv
Alias           ipmo -> Import-Module
Alias           ipsn -> Import-PSSession
Alias           irm -> Invoke-RestMethod
Alias           ise -> powershell_ise.exe
Alias           iwmi -> Invoke-WmiMethod
Alias           iwr -> Invoke-WebRequest
Alias           kill -> Stop-Process
Alias           lp -> Out-Printer
Alias           ls -> Get-ChildItem
Alias           man -> help
Alias           md -> mkdir
Alias           measure -> Measure-Object
Alias           mi -> Move-Item
Alias           mount -> New-PSDrive
Alias           move -> Move-Item
Alias           mp -> Move-ItemProperty
Alias           mv -> Move-Item
Alias           nal -> New-Alias
Alias           ndr -> New-PSDrive
Alias           ni -> New-Item
Alias           nmo -> New-Module
Alias           npssc -> New-PSSessionConfigurationFile
Alias           nsn -> New-PSSession
Alias           nv -> New-Variable
Alias           ogv -> Out-GridView
Alias           oh -> Out-Host
Alias           popd -> Pop-Location
Alias           ps -> Get-Process
Alias           pushd -> Push-Location
Alias           pwd -> Get-Location
Alias           r -> Invoke-History
Alias           rbp -> Remove-PSBreakpoint
Alias           rcjb -> Receive-Job
Alias           rcsn -> Receive-PSSession
Alias           rd -> Remove-Item
Alias           rdr -> Remove-PSDrive
Alias           ren -> Rename-Item
Alias           ri -> Remove-Item
Alias           rjb -> Remove-Job
Alias           rm -> Remove-Item
Alias           rmdir -> Remove-Item
Alias           rmo -> Remove-Module
Alias           rni -> Rename-Item
Alias           rnp -> Rename-ItemProperty
Alias           rp -> Remove-ItemProperty
Alias           rsn -> Remove-PSSession
Alias           rsnp -> Remove-PSSnapin
Alias           rujb -> Resume-Job
Alias           rv -> Remove-Variable
Alias           rvpa -> Resolve-Path
Alias           rwmi -> Remove-WmiObject
Alias           sajb -> Start-Job
Alias           sal -> Set-Alias
Alias           saps -> Start-Process
Alias           sasv -> Start-Service
Alias           sbp -> Set-PSBreakpoint
Alias           sc -> Set-Content
Alias           scb -> Set-Clipboard                               3.1.0.0    Microsoft.PowerShell.Management
Alias           select -> Select-Object
Alias           set -> Set-Variable
Alias           shcm -> Show-Command
Alias           si -> Set-Item
Alias           sl -> Set-Location
Alias           sleep -> Start-Sleep
Alias           sls -> Select-String
Alias           sort -> Sort-Object
Alias           sp -> Set-ItemProperty
Alias           spjb -> Stop-Job
Alias           spps -> Stop-Process
Alias           spsv -> Stop-Service
Alias           start -> Start-Process
Alias           stz -> Set-TimeZone                                3.1.0.0    Microsoft.PowerShell.Management
Alias           sujb -> Suspend-Job
Alias           sv -> Set-Variable
Alias           swmi -> Set-WmiInstance
Alias           tee -> Tee-Object
Alias           trcm -> Trace-Command
Alias           type -> Get-Content
Alias           wget -> Invoke-WebRequest
Alias           where -> Where-Object
Alias           wjb -> Wait-Job
Alias           write -> Write-Output
Как видно из списка для alias использованы аналогичные по значению команды из Linux: ls, man, mount, md, kill и т.п. Видимо чтобы линуксоиду было по привычнее 🙂 Можно создать свой alias используя командлет New-Alias
Конвейер
Конвейер используется для передачи выходных данных командлета идущего вначале во входные данные командлета следующего за ним. Ничего непонятно? 🙂 Давайте на примерах, так всегда яснее.
Возьмем уже известный нам командлет Get-Process, посмотрим на его вывод
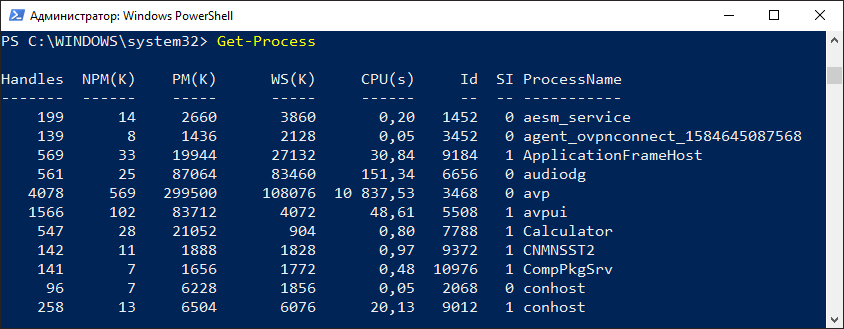
Как по мне многовато лишних столбцов. Мне эта информация не нужна, поэтому я выберу только нужные данные. Для таких целей служит командлет Select-Object. Давайте используем его в конвейере.
Get-Process|Select-Object ID,CPU,ProcessName
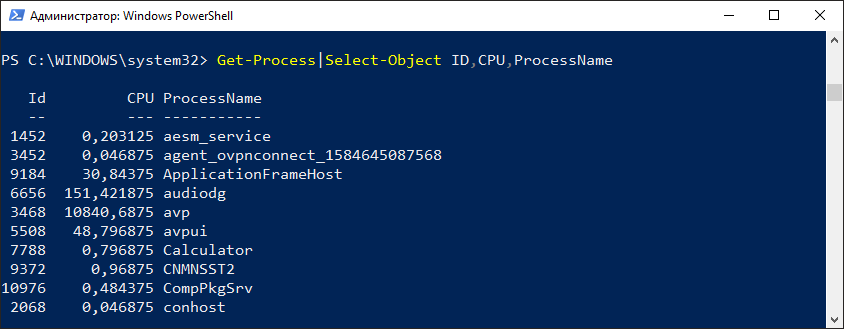
Как вы уже наверно догадались конвейер обозначается знаком | и идет сразу следом за командлетом. И так данные по конвейеру можно передавать и дальше другим командлетам. Итак я передал выходные данные (список запущенных процессов) на вход командлета Select-Object. Который в свою очередь выбрал данные по 3 столбцам ID, CPU, ProcessName. Теперь можно передать эти данные дальше. Например выгрузить в текстовый файл
Get-Process|Select-Object ID,CPU,ProcessName|Out-File C:TMPout.txt
Просто не правда ли? У нас конвейер из трех командлетов, на выходе которого получаем текстовый файл со списком запущенных процессов и необходимой информацией по ним.
Структура объектов
В Powershell объекты играют самую важную роль. От типа объекта зависит что именно с ним можно сделать. Узнать тип объекта и вывести список всех его элементов позволяет команда Get-Member
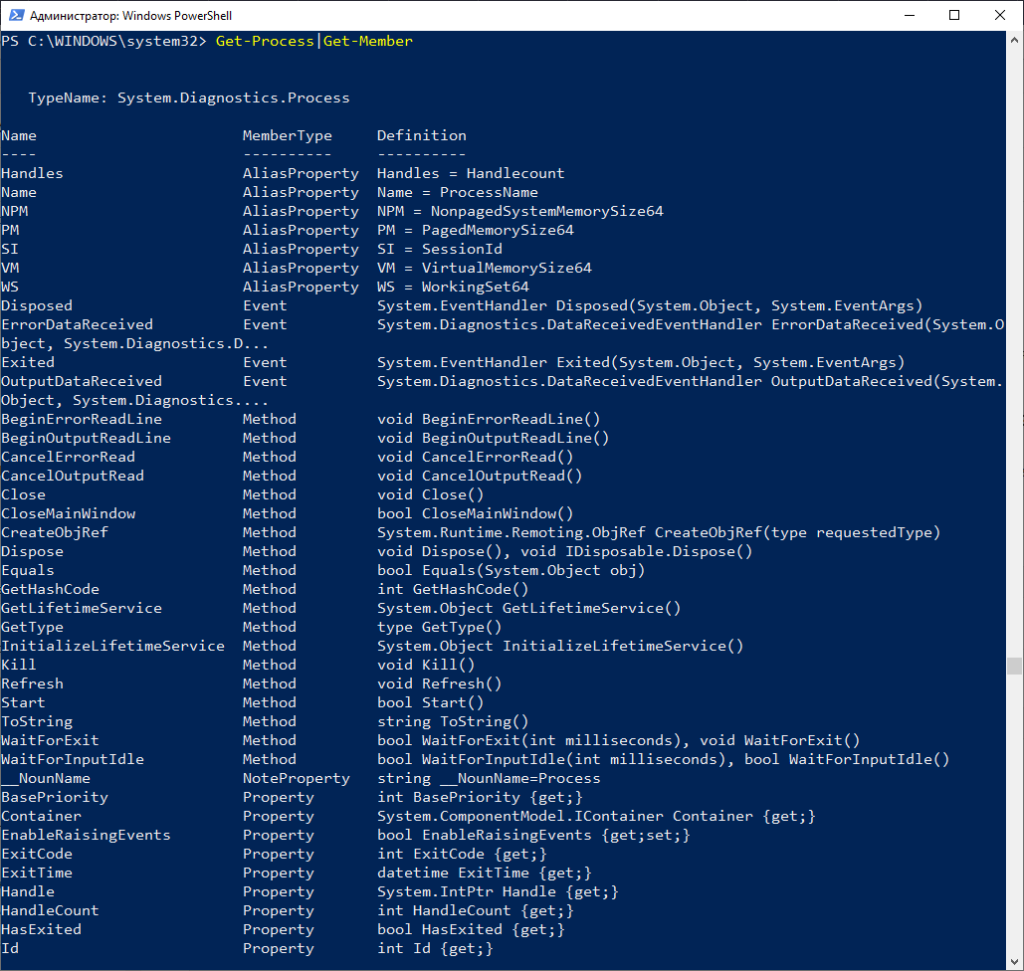
Вот далеко не полный список элементов командлета Get-Process. В данному случае тип данных это System.Diagnostics.Process
Давайте посмотрим тип данных у новой переменной
$new="Test"
$new|Get-Member
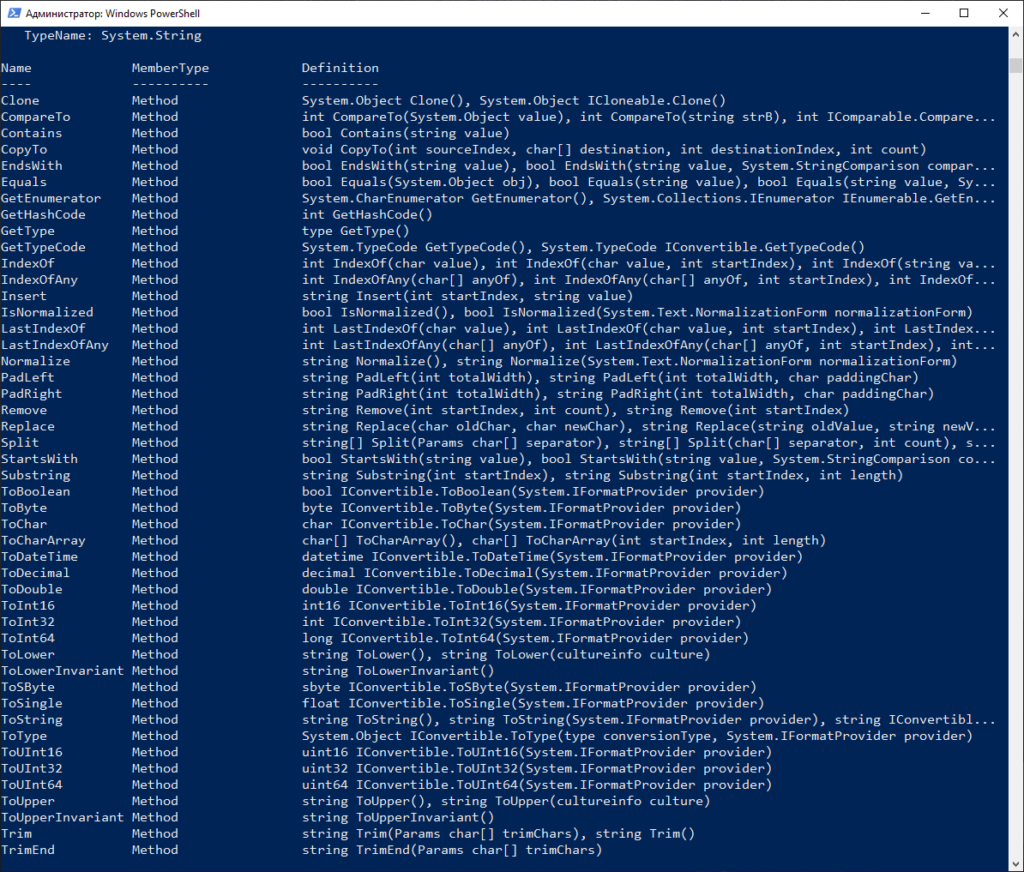
В данном случае тип данных System.String т.е. строка. Что вполне логично. А теперь посмотрите что можно сделать с этой строкой с учетом указанных выше параметров.
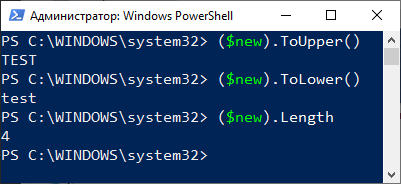
Как видно на картинке выше мы заключаем нашу тестовую переменную $new в скобки и после них пишем точку и указываем метод. В примере я использовал три метода:
- ToUpper — перевод всех букв в строке в верхний регистр
- ToLower — перевод всех букв в строке в нижний регистр
- Length — подсчитать количество символов в строке
Это всего лишь небольшой пример что можно сделать с параметрами объекта. Чаще используйте Get-Member и вы откроете для себя безграничные возможности манипуляции над объектами.
Скрипты Powershell
В самом начале статьи указал на встроенный инструмент Powershell ISE. Давайте запустим его и создадим свой первый скрипт. Кстати скрипты сохраняются в файлах с расширением ps1
Скрипт будет запускать блокнот, далее выполняется проверка если блокнот запущен выводится сообщение об этом и после блокнот закрывается. Если блокнот не запущен то выводится соответствующее сообщение об этом. На самом деле блокнот будет всегда запущен, т.к. мы вначале скрипта написали Start-Process notepad
Start-Process notepad
$a=Get-Process notepad
if ($a.ProcessName -like "Notepad")
{
Write-Host "Блокнот запущен, давайте его закроем"
Stop-Process -name notepad
}
else
{
Write-Host "Блокнот не запущен, что поделать"
}
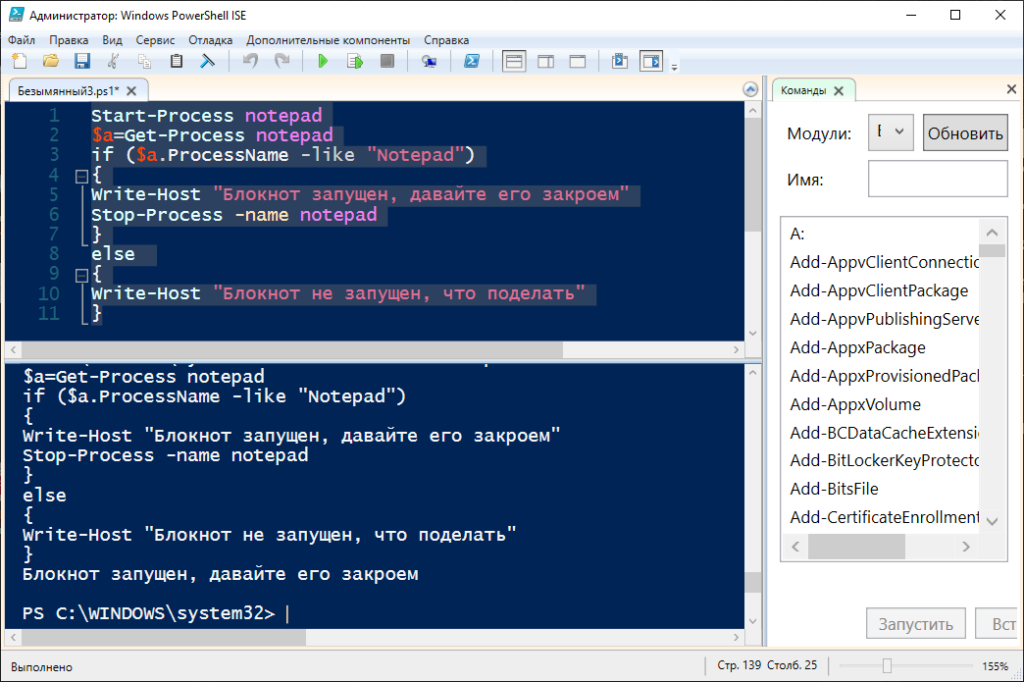
В этом скрипте я использовал цикл if else. О циклах будет подробнее в следующей статье. Итак давайте сохраним скрипт и выполним его.
В ответ мы получим такую ошибку:
Невозможно загрузить файл, так как выполнение сценариев отключено в этой системе. Для получения дополнительных сведений см.
 about_Execution_Policies по адресу https:/go.microsoft.com/fwlink/?LinkID=1351
70.
    + CategoryInfo          : Ошибка безопасности: (:) [], ParentContainsError
   RecordException
    + FullyQualifiedErrorId : UnauthorizedAccess
Все верно, изначально в WIndows запрещено выполнять скрипты Powershell. Это сделано для повышения безопасности системы. Для включения возможности запуска скриптов Powershell необходимо запустить Powershell от Администратора и ввести командлет Set-ExecutionPolicy с одним из параметров:
- Restricted — политика по умолчанию. Выполнение всех скриптов запрещено
- RemoteSigned — разрешено запускать собственные скрипты и подписанные доверенным разработчиком
- AllSigned — разрешено запускать скрипты, подписанные доверенным разработчиком. Каждый раз перед запуском такого скрипта PowerShell будет запрашивать подтверждение
- Unrestricted — в системе разрешается запускать любые скрипты
Если вы полностью уверены в запускаемых скриптах можете поставить Unrestricted. Давайте так и сделаем
Set-ExecutionPolicy -Unrestricted
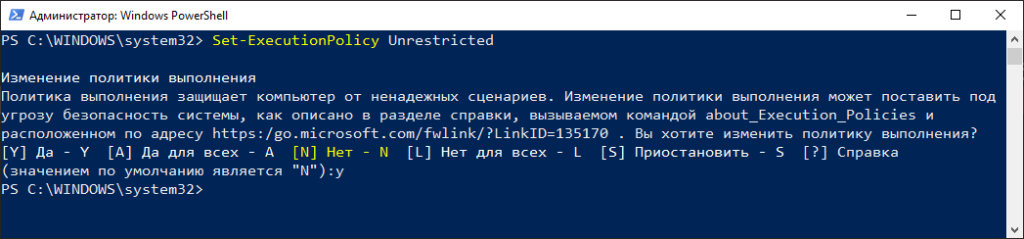
Будет предупреждение по безопасности, соглашаемся нажав Y
Можем посмотреть текущую настройку политики безопасности при помощи командлета Get-ExecutionPolicy
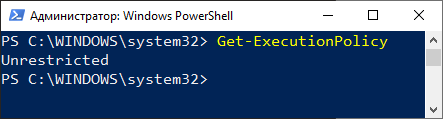
В данной статье мы рассмотрели основы чтобы подготовиться писать скрипты Powershell. В следующих статьях мы более подробно изучим циклы, массивы, функции, работу со строками и много другое. Кстати вот раздел посвященный Powershell. Там много всего интересного 😉
Рекомендую к прочтению:
- Переменные
- Операторы сравнения
- Операторы условий
- Циклы
Хотите отблагодарить автора статьи? Это даст ему дополнительный стимул к написанию новых статей.

В этой записи буду складировать свои (и не только свои) небольшие PowerShell скрипты, которые не настолько велики, чтоб им посвящать отдельную запись.
Скрипты будут достаточно полезны в качестве примеров для создания скриптов со схожим функционалом.
Windows Powershell — оснастка командной строки и скриптовый язык для различной автоматизации задач и администрирования в windows. Официальный сайт — microsoft.com/powershell
Содержание
- 1 Удаление всех бекапов кроме трех последних
- 2 Удаляем файлы старше трех месяцев
- 3 Разрешение скачанного изображения
- 4 Среднее арифметическое трех последних чисел
- 5 Количество файлов в папках и размер папок
- 6 Случайный афоризм из файла
- 7 Отображение mp3-файлов с низким битрейтом
- 8 Удаление изображений с плохим качеством
- 9 Копирование бекапов на резервную площадку
- 10 Информация об обновлениях WSUS
- 11 Лочим экран и произносим текст
- 12 Вывод размера какой-либо веб страницы
- 13 Остальные Powershell-скрипты:
Удаление всех бекапов кроме трех последних
На сервере локально сохраняются бекапы, где папки именуются таким образом: «klbackup2014-01-22#23-00-00». PowerShell скрипт переносит эти папки на сетевой диск и хранить не более 3-х последних бекапов.
Copy-Item "C:backupsklbackup*" "\ServerBackupsklBackup" -force -recurse -ErrorAction stop
Remove-Item "C:backupsklbackup*" -force -recurse
$folders = Get-ChildItem "\ServerBackupsklBackupklbackup*"
$i = 0
While ($i -lt $folders.count-3) {
   Remove-Item $folders[$i] -force -recurse
   $i++
}
Удаляем файлы старше трех месяцев
$date = (Get-Date).AddMonths(-3)
Get-ChildItem -Path D:FilesCommon | where {!$_.PSIsContainer} |
foreach {
   if ($_.LastWriteTime -lt $date) {
      # в тестовых целях указываем -whatif
      # когда убедимся что все корректно работает то убираем его
      Remove-Item $_ -whatif
   }
}
Разрешение скачанного изображения
PowerShell скрипт скачивает изображение из Интернета и отображает ее разрешение
Function Get-Image{
   begin{[void][System.Reflection.Assembly]::LoadWithPartialName("System.Drawing") |Out-Null}
   process{
      $fi=[System.IO.FileInfo]$_
      if( $fi.Exists){
         $img = [System.Drawing.Image]::FromFile($_)
         $img.Clone()
         $img.Dispose()
      }else{Write-Host "File not found: $_" -fore yellow }
   }
   end{}
}

#Скачиваем файл
$webclient = New-Object System.Net.WebClient
$url = "http://cs418720.userapi.com/v418720852/20d0/DiSlb-_mVBg.jpg"
$file = "D:ImageSize.jpg"
$webclient.DownloadFile($url,$file)

#Получаем ширину и высоту изображения
$image = $file | Get-Image
$Width = $image.Width
$Height = $image.Height
#Вывод на экран
write-output “Width:$Width, Height:$Height"
Среднее арифметическое трех последних чисел
Из файла, в котором содержаться в каждой строке по числу, нужно получить три последние числа и выдать их среднее арифметическое.
$date = Get-Date -format yyyy-MM-dd
$filename = "C:Program FilesZabbixCheckHost_INET-" + $date + ".res"
$file = Get-Content $filename #считываем файл в переменную. В файле каждая строка содержит по числу.
$lenght = $file.count #получаем количество строк файла
$avg=([int]$file[$lenght-1]+[int]$file[$lenght-2]+[int]$file[$lenght-3])/3 #вычисляем арифметическое среднее трех последних чисел
Write-Host([int]$avg) #выводим среднее арифметическое с откидыванием дроби
Количество файлов в папках и размер папок
PowerShell скрипт выводит на экран и в файл D:CountFiles.csv информацию о том, сколько содержит файлов каждая папка и подпапки в директории D:Photos, а также размер этих папок и подпапок. csv файл можно импортировать в exel или гугл-таблицы и отсортировать столбцы по возрастанию или спаданию. Скрипт может пригодиться при оптимизации файлового хранилища.
$source="D:Photos"
Get-ChildItem $source -recurse -force | where {$_.psIscontainer} | foreach {
   $count = Get-ChildItem $_.fullname -recurse | where {$_.length} | Measure-Object -property length -Sum
   Write-Host($_.FullName)
   $FilesSize = '{0:F}' -f ((($count.Sum)/1024)/1024)
   Write-Host("Files: " + $count.count )
   Write-Host("Size: " + $FilesSize + " MB")
   '"' + $_.FullName + '","' + $count.count + '","' + $FilesSize + '"' | Out-File D:CountFiles.csv -Append
}
Случайный афоризм из файла
#Автор скрипта: https://elims.org.ua
#читаем содержимое файла в масив построчно и берем случайную строку
$file = Get-Content "C:aphorism.txt"
$aphorism = Get-Random -input $file #берем случайный афоризм из массива афоризмов
$tag = Get-Random -input " #афоризмы"," #цитаты", " #цитаты" #берем случайный тег
$aphorism = $aphorism + $tag
Write-Host($aphorism)
Отображение mp3-файлов с низким битрейтом
PowerShell скрипт выводит список mp3-файлов, которые находятся в папке D:vk-music и имеют битрейт мене 320
#скрипт выводит список mp3-файлов, которые находятся в папке D:vk-music и имеют битрейт мене 320
$objShell = New-Object -ComObject Shell.Application
$mp3files = Get-ChildItem "D:vk-music" -include "*.mp3" -recurse #получили список mp3-файлов
foreach($mp3Item in $mp3files){ #для каждого файла из списка
 $file = split-path $mp3Item -leaf #из полного имени вырезали имя файла
 $path = split-path $mp3Item #из полного имени вырезали адрес папки
 $objFolder = $objShell.namespace($path)
 $objFile = $objFolder.parsename($file)
 if ($objFolder.getDetailsOf($objFile, 28)) { # 28 - номер свойства файла, в котором хранится информация о битрейте
  $bitrate = [int]$objFolder.getDetailsOf($objFile, 28).Substring(1,3) #из строки, где хранится битрейт, вырезаем числовое значение битрейта
  if ($bitrate -lt 320) { #если битрейт меньше 320
   "№" + ++$i + ' bitrate: ' + $bitrate + " file: " + [string]$mp3Item #выводим битрейт и полное имя файла
  }
 }
}
Удаление изображений с плохим качеством
Удаляем в указанных папках (рекурсивно) изображения jpg с худшим качеством чем HD Ready
Function Get-Image{
 begin{[System.Reflection.Assembly]::LoadWithPartialName("System.Drawing") |Out-Null}
 process{
 $fi=[System.IO.FileInfo]$_
 if( $fi.Exists){
 $img = [System.Drawing.Image]::FromFile($_)
 $img.Clone()
 $img.Dispose()
 }else{Write-Host "File not found: $_" -fore yellow }
 }
 end{}
}

$paths = @()
$paths = $paths + "D:Folder1"
$paths = $paths + "E:Folder2"
$paths = $paths + "X:Folder3"

Foreach ($path in $paths) {
 Get-ChildItem -Path $path -recurse -filter *.jpg | where {!$_.PSIsContainer} | foreach {
 #Получаем ширину и высоту изображения
 $image = $_.FullName | Get-Image
 $Width = $image.Width
 $Height = $image.Height
 #Вывод на экран
 $pixels = $Width*$Height
 $hd_ready = 1280*720
 $string = $_.FullName+' Width:'+$Width+' Height:'+$Height + " Pixels:"+$pixels
 $image.dispose()
 if ($pixels -le $hd_ready) {
 Remove-Item $_.FullName
 write-host $string
 }
 }
}
Копирование бекапов на резервную площадку
Если PowerShell скрипт запущен в определенное время и определенный день, то он начинает копировать файлы из указанных папок. Ход процесса записывается в лог файл.
После окончания работы:
- присылается письмо в котором указано:
- свободное место на локальных дисках (до старта и после окончания), объем бекапа
- время старта и окончания, длительность бекапа
- средняя скорость копирования
- компьютер выключается
Компьютер выключается потому, что он в основном выключен. Для резервного копирования он автоматически включается (настройка в биосе).
$StartTimeHour = (Get-Date).Hour #Запоминаем когда запустилась задача
$Day_of_week = [int]((Get-Date).DayofWeek) #текущий день недели
if ((($Day_of_week -eq 2)-or($Day_of_week -eq 4)-or($Day_of_week -eq 6))-and($StartTimeHour -eq 11)) {
#старт копирования если сейчас вторник, среда, суббота и при этом 11 часов
 $StartTime = Get-Date -Format "yyyy.MM.dd HH:mm:ss" #время старта копирования
 $Free_Space_Start = Get-WMIObject Win32_LogicalDisk -Filter "DeviceID='D:'" | ForEach-Object {[math]::truncate($_.freespace / 1GB)} #свободное место до бекапа
 $Free_Space_Start_Bytes = Get-WMIObject Win32_LogicalDisk -Filter "DeviceID='D:'" | ForEach-Object {$_.freespace} #свободное место до бекапа
 $log_file = "D:Backupslog.txt" #лог файл скрипта, можно понять на каком этапе работа скрипта
 $date = "{0:yyyy-MM-dd}" -f (get-date) #текущая дата для имени папки
 $path = "D:Backups" + $date + "" #имя папки
 if (-not(Test-Path $path)) { #если папка не существует
 write-host "создаем папку: " + $path
 $result = New-Item -ItemType directory -Path $path #создаем папку
 }
 #копируем резервные копии медка
 $time = "{0:yyyy-MM-dd HH:mm:ss}" -f (get-date)
 $string = $time + " Start Copy \172.16.13.1BackupsMedoc"
 "##################################################" | Out-File -Append $log_file -Encoding UTF8
 $string | Out-File -Append $log_file -Encoding UTF8
 & robocopy \172.16.13.1BackupsMedoc D:BackupsMedoc /e /log:"D:Backupsrobocopy_log.txt"
 #копируем резервные копии разных устройств и ПО
 $time = "{0:yyyy-MM-dd HH:mm:ss}" -f (get-date)
 $string = $time + " Start Copy \172.16.13.1BackupsOther"
 $string | Out-File -Append $log_file -Encoding UTF8
 & robocopy \172.16.13.1BackupsOther D:BackupsOther /e /log:"D:Backupsrobocopy_log.txt"
 #копируем резервные копии Windows с 1-го сервера
 $path = $path + "WindowsImageBackup"
 $time = "{0:yyyy-MM-dd HH:mm:ss}" -f (get-date)
 $string = $time + " Start Copy \172.16.13.1BackupsWindowsImageBackup"
 $string | Out-File -Append $log_file -Encoding UTF8
 & robocopy \172.16.13.1BackupsWindowsImageBackup $path /e /log:"D:Backupsrobocopy_log.txt"
 #копируем резервные копии Windows с 2-го сервера
 $time = "{0:yyyy-MM-dd HH:mm:ss}" -f (get-date)
 $string = $time + " Start Copy \172.16.13.2BackupsWindowsImageBackup"
 $string | Out-File -Append $log_file -Encoding UTF8
 & robocopy \172.16.13.2BackupsWindowsImageBackup $path /e /log:"D:Backupsrobocopy_log.txt"
 #запись в лог-файл окончания работы
 $time = "{0:yyyy-MM-dd HH:mm:ss}" -f (get-date)
 $string = $time + " Finish Backup"
 $string | Out-File -Append $log_file -Encoding UTF8
 "##################################################" | Out-File -Append $log_file -Encoding UTF8
 #Формируем данные для письма
 $EndTime = Get-Date -Format "yyyy.MM.dd HH:mm:ss"
 $Free_Space_End = Get-WMIObject Win32_LogicalDisk -Filter "DeviceID='D:'" | ForEach-Object {[math]::truncate($_.freespace / 1GB)} #свободное место после бекапа
 $Free_Space_End_Bytes = Get-WMIObject Win32_LogicalDisk -Filter "DeviceID='D:'" | ForEach-Object {$_.freespace} #свободное место до бекапа
 $backup_Size = $Free_Space_Start-$Free_Space_End
 $backup_Size_Bytes = $Free_Space_Start_Bytes-$Free_Space_End_Bytes
 $Work_time = $(NEW-TIMESPAN –Start $StartTime –End $EndTime)
 $Work_time_seconds = $Work_time.TotalSeconds
 $NetworkSpeed = '{0:N1}' -f ((($backup_Size_Bytes / $Work_time_seconds) / (1024*1024)) * 8)
 $Mail_String = "Свободное место до бекапа: " + $Free_Space_Start + " ГБ | `r`n"
 $Mail_String = $Mail_String + "Свободное место после бекапа:" + $Free_Space_End + " ГБ | `r`n"
 $Mail_String = $Mail_String + "Размер бекапа: " + $backup_Size + " ГБ | `r`n"
 $Mail_String = $Mail_String + "Старт бекапа: " + $StartTime + " | `r`n"
 $Mail_String = $Mail_String + "Конец бекапа: " + $EndTime + " | `r`n"
 $Mail_String = $Mail_String + "Время выполнения: " + $Work_time + " | `r`n"
 $Mail_String = $Mail_String + "Средняя скорость копирования: " + $NetworkSpeed + " Мбит в секунду `r`n"
 Write-host $Mail_String
 #Заголовки письма и данные почтового ящика
 $From = "admin-notify@домен.com.ua"
 $To = "admin@домен.ком.ua"
 $SMTPServer = "адрес.сервера.com.ua"
 $SMTPPort = "25"
 $Username = "admin-notify@домен.ком.ua"
 $Password = "тут_пароль"
 $subject = "Copy Backups to ReserveServer"
 $body = $Mail_String
 #формируем сообщение в формате html:
 $message = New-Object System.Net.Mail.MailMessage $From, $To
 $message.Subject = $subject
 $message.IsBodyHTML = $true
 $message.Body = $body
 #Отправляем:
 Write-host "Отправляем письмо"
 $smtp = New-Object System.Net.Mail.SmtpClient($SMTPServer, $SMTPPort)
 $smtp.EnableSSL = $true
 $smtp.Credentials = New-Object System.Net.NetworkCredential($Username, $Password)
 $smtp.Send($message)
 Write-host "Письмо отправленно"
 & shutdown -s -t 300 #выключаем компьютер через 5 минут
}
Информация об обновлениях WSUS
Этот Powershell скрипт получает информацию со WSUS и показывает:
- количество обновлений по заданных критериям
- краткую сводную информацию об обновлениях
- имена обновлений
- отображает список обновлений по заданным критериям для каждого компьютера по отдельности
$WSUSServer = 'SERVER_NAME' #WSUS-сервер
$PortNumber = 8530 #http порт wsus
[void][reflection.assembly]::LoadWithPartialName("Microsoft.UpdateServices.Administration")
$wsus = [Microsoft.UpdateServices.Administration.AdminProxy]::getUpdateServer($WSUSServer,$False,$PortNumber)
$UpdateScope = New-Object Microsoft.UpdateServices.Administration.UpdateScope
#$UpdateScope.ApprovedStates = 'NotApproved' #указываем критерии апдейтов: не одобренные
#$UpdateScope.IncludedInstallationStates = 'NotInstalled' #указываем критерии апдейтов: не проинсталированные
$UpdateScope.IncludedInstallationStates = 'Installed' #указываем критерии апдейтов: проинсталированные
$UpdateScope #просматриваем сформированные критерии апдейтов
$wsus.GetUpdateCount($updatescope) #получаем и выводим количество апдейтов
$wsus.GetUpdateStatus($updatescope,$False) #получаем и выводим краткую информацию об обновлениях
$wsus.GetUpdates($updatescope).Title #выводим имена апдейтов

$computers = $wsus.GetComputerTargets() #все компьютеры со wsus
ForEach ($computer in $computers){ #для каждого компьютера
 $Computername = $computer.fulldomainname #получаем его имя
 $updates = $computer.GetUpdateInstallationInfoPerUpdate($updateScope) #получаем апдейты по указаным критериям
 $UpdateCount = $updates.Count #количество апдейтов для текущего компьютера
 write-host $Computername $UpdateCount #выводим имя компьютера и количество апдейтов
 $i = 0
 ForEach ($update in $updates) { #для каждого апдейта выводим подробную информацию
 $i++
 $update_info = $update.GetUpdate() #запрашиваем инфо об апдейте
 $UpdateTitle = $update_info.Title #имя апдейта
 $IsApproved = $update_info.IsApproved #является ли он одобренным
 write-host $Computername $i "of" $UpdateCount $IsApproved $UpdateTitle
 }
}
Лочим экран и произносим текст
Задача: если в заббиксе сработал тригер и он не потвержден, то необходимо лочить экран и произность этот тригер.
Тригеры из заббикса запрашиваются утилитой zabbixctl и выводяться в текстовый файл, который опубликован по веб-адресу.
Сам powershell скрипт:
Add-Type -AssemblyName System.speech
$speak = New-Object System.Speech.Synthesis.SpeechSynthesizer
$request = (New-Object System.Net.WebClient).DownloadString("http://server/status.txt") #получаем тригеры
$speak.Rate = -2 #Замедляем скорость произношения
$zabbix_message = ($request -split 'n')[0] #первая строка - первый тригер
if ($zabbix_message.length -ge 1) { #если строка не пустая
 cmd /c rundll32.exe user32.dll,LockWorkStation #лочим экран
 $speak.Speak("zabbix. " + $zabbix_message) #произносим текст
 $Time = Get-Date -Format "yyyy.MM.dd HH:mm:ss"
 $log_message = $Time + " " + $zabbix_message
 $log_message | Out-File -Append "c:WINDOWSscriptslog.txt" -Encoding UTF8 #записываем в лог-файл
}
Вывод размера какой-либо веб страницы
$web = New-Object System.Net.WebClient
"{0} bytes" -f ($web.DownloadString("https://elims.org.ua/")).length.toString("###,###,##0")
Остальные Powershell-скрипты:
- Powershell скрипты для Вконтакте
- Powershell скрипт: Автоответчик болтун для Вконтакте
- Powershell скрипт: Антиспам в коментариях стены и фотоальбомах сообщества во Вконтакте
- Powershell скрипт: Чтение Вконтакте через RSS
- Powershell скрипт: скачиваем фотографии из Вконтакте
- Powershell скрипт для скачивания музыки из Вконтакте
- Powershell скрипт: Отправка писем через gmail
- Powershell скрипт: охрана с помощью вебкамеры
- PowerShell скрипт автопубликации изображений на блог
Понравилось? =) Поделись с друзьями:
В этой статье про PowerShell для начинающих мы посмотрим, как писать скрипты, которые помогают оптимизировать управление Windows-окружением.
PowerShell — это объектно-ориентированный программный движок и скриптовый язык с интерфейсом командной строки, предоставляющий широкие возможности для конфигурирования операционных систем семейства MS Windows. Он предлагает как чисто консольный интерфейс, так и полноценную среду разработки PowerShell ISE (Integrated Scripting Environment, встроенное скриптовое окружение) для скриптов.
Для запуска интерфейса командной строки введите powershell в меню «Выполнить» (WinKey + R). PowerShell ISE запускается с помощью команды «PowerShell ISE» в том же меню. ISE более предпочтительно, так как предоставляет более широкие возможности разработчику благодаря подсветке синтаксиса, функции автозаполнения кода и другим особенностям, присущим многим «большим» IDE.

Среда разработки Windows PowerShell ISE
Написание и запуск скриптов
Скрипты сохраняются в виде файлов с расширением .ps1. Несмотря на то, что PowerShell уже давно является нативной частью ОС Windows, вы не сможете запустить его скрипты простым двойным щелчком. Для этого надо кликнуть правой кнопкой по скрипту и выбрать «Запустить в PowerShell».
Также существуют системные политики, ограничивающие выполнение скриптов. Можно проверить текущие параметры политики, введя команду Get-ExecutionPolicy. Результатом будет одно из следующих значений:
- Restricted — выполнение скриптов запрещено. Стандартная конфигурация;
- AllSigned — можно запускать скрипты, подписанные доверенным разработчиком; перед запуском скрипта PowerShell запросит у вас подтверждение;
- RemoteSigned — можно запускать собственные скрипты или те, что подписаны доверенным разработчиком;
- Unrestricted — можно запускать любые скрипты.
Для начала работы необходимо изменить настройку политики запуска на RemoteSigned, используя команду Set-ExecutionPolicy:

После выполнения команды можно будет запускать свои скрипты
Командлеты
Командлеты — это команды с предопределённой функцией, подобные условным операторам в языках программирования. У них есть несколько ключевых особенностей:
- существуют системные, пользовательские и опциональные командлеты;
- результатом выполнения командлета будет объект или массив объектов;
- командлеты могут обрабатывать данные и передавать их другим командлетам с помощью конвейеров;
- командлеты нечувствительны к регистру, так что нет никакой разницы между
Get-ADUser,get-aduserиgEt-AdUsEr; - в качестве разделителя используется символ
;.
Каждый командлет содержит в себе глагол и существительное, разделяемые дефисом. Например:
- Get-Process — отобразить текущие процессы, запущенные на компьютере;
- Get-Service — отобразить список служб и их статус;
- Get-Content — отобразить содержимое указанного файла, например
Get-Content C:WindowsSystem32driversetchosts.
При необходимости список всех доступных командлетов можно вывести с помощью Get-Help-Category. Запомните эту команду — она крайне важна для тех, кто изучает PowerShell с нуля, так как помогает быстрее начать ориентироваться в его возможностях.

Результат выполнения команды Get-Help-Category
Также можно создавать свои командлеты, но эта тема выходит за рамки нашего руководства по PowerShell для начинающих.
Параметры
У каждого командлета есть несколько параметров, определяющих его работу. PowerShell ISE автоматически предлагает все доступные параметры с отображением их типа. Например, Get-Service-NameW* выводит список служб, у которых имя начинается с W. Если вы забыли, какие параметры у введённого командлета, воспользуйтесь Get-Member.
Например, Get-Process | Get-Member:

Список параметров командлета Get-Process
Если вы не нашли того, что нужно, или не уверены в том, как правильно задаются параметры, можно даже запросить примеры с помощью параметра -Examples. Встроенное руководство по PowerShell покажет, для чего используются разные параметры:

Примеры использования командлета
Некоторые командлеты также могут вызываться с помощью алиасов. Например, вместо Get-Help можно просто написать Help — эта команда также вызовет встроенное руководство по PowerShell.
При написании больших скриптов или коллективной разработке можно пользоваться комментариями. Каждый комментарий начинается с символа #, а блок комментариев ограничивается комбинациями символов <# и #> в начале и в конце соответственно.
Конвейер
PowerShell позволяет осуществлять обмен данными между командлетами с помощью конвейера. Например:
GetService | SortObject -property Status— сортировка запущенных служб по статусу;“Hello World!” | Out-File C:pstest.txt— запись текста в файл.
Можно использовать несколько конвейеров. Например, следующий скрипт выводит список имён всех служб за исключением остановленных:
Get-Service | WHERE {$_.status -eq “Running”} | SELECT displayname
Заключение
Это руководство для тех, кто изучает PowerShell с нуля, поэтому здесь раскрыты только базовые понятия и приёмы. После его прочтения у вас должно появиться представление о том, что собой представляет этот инструмент. Также мы рассмотрели варианты изменения политики выполнения скриптов, что такое командлет, как они обмениваются данными с помощью конвейера и как получить свойства нужного объекта. Помните, что в случае затруднений можно воспользоваться командлетом Get-Help — это одна из самых важных команд для начинающих изучать PowerShell.
Если пользуетесь не только Windows, но и Linux, посмотрите статью про команды терминала Linux для начинающих. В ней рассказывается про работу с процессами и файлами, навигацию, каналы, xargs, awk и grep.
Перевод статьи «Windows PowerShell Scripting Tutorial for Beginners»