На что обратить внимание?
- Концепция BDD — есть расширение методологии TDD.
- Тесты пишутся на предметно-ориентированном языке, их легко изменять.
- Тесты становятся доступны как программистам и тестировщикам, так и менеджерам.
- Тесты не зависят от целевого языка программирования. Миграция на другой язык сильно упрощается.
Таким образом, суть состоит в том, что изначально на основе определенных лингвистических шаблонов составляются верхнеуровневые сценарии, описывающие вероятное поведение системы. После этого разрабатывается функциональность. Ожидается, что после завершения разработки предопределенные тестовые сценарии станут успешно выполняться.
Сценарий – описание поведения определенной функциональности системы, составленное на естественном языке по определенному шаблону. Важно, что для подготовки сценариев используются общеупотребительные языки. Это позволяет автоматизаторам и тестировщикам заказчика легко составлять сценарии вместе.
Общеупотребительный язык – определенные лингвистические конструкции, интерпретируемые программным кодом автотестов. Как следствие, отпадает необходимость трудозатрат на преломление, изменение или же конкретизацию документации под разработку или QA.
BDD фокусируется на следующих вопросах:
- С чего начинается процесс.
- Что нужно тестировать, а что нет.
- Сколько проверок должно быть совершено за один раз.
- Что можно назвать проверкой.
- Как понять, почему тест не прошёл.
Исходя из этих вопросов, BDD требует, чтобы шаги тестов были целыми предложениями, которые начинаются с глагола в сослагательном наклонении и следовали бизнес целям.
Описание приемочных тестов должно вестись на гибком языке пользовательской истории. В настоящее время в практике BDD устоялась следующая структура:
1) Заголовок (англ. Title). В сослагательной форме должно быть дано описание бизнес-цели.
2) Описание (англ. Narrative). В краткой и свободной форме должны быть раскрыты следующие вопросы:
- Кто является заинтересованным лицом данной истории;
- Что входит в состав данной истории;
- Какую ценность данная история предоставляет для бизнеса
3) Сценарии (англ. Scenarios). В одной спецификации может быть один и более сценариев, каждый из которых раскрывает одну из ситуаций поведения пользователя. Каждый сценарий обычно строится по одной и той же схеме:
- Начальные условия (одно или несколько);
- Событие, которое инициирует начало этого сценария;
- Ожидаемый результат или результаты.
На что обратить внимание?
- Технически сопоставление происходит посредством регулярного выражения /^User enters login ‘(.+)’$/ , которое и находится в Step Definition.
- Логин пользователя (он же захваченный параметр ‘user_login’) передается в переменную login_word. Она в свою очередь передается на вход функции enter().
2) Результаты шагов
Исполнение каждого шага завершается в одним из следующих статусов:
- Success
- Undefined
- Pending
- Failed Steps
- Skipped
- Ambiguous
Рассмотрим каждый более детально:
1) Success
В случае, если Cucumber находит нужный Step Definition, он запускает выполнение содержимого шага. Если блок кода в соответствующем Step Definition не выдает ошибок по ходу исполнения, шаг помечается как успешный.
Цвет: зеленый
2) Undefined
Если Cucumber не удается найти соответствующее определение шага, то степ помечается как неопределенный и все последующие шаги в сценарии будут пропущены.
Цвет: желтый
3) Pending
Если определение шага выполнено не полностью, то шаг помечается как в ожидании.
Цвет: желтый
4) Failed Steps
Если блок кода внутри Step Definition завершается с ошибкой, то шаг считается проваленным.
Цвет: красный
5) Skipped
Шаги, следующие за Undefined, Pending и Failed степами, не вызываются.
Цвет: голубой
6) Ambiguous
Чтобы Cucumber точно знал, какой блок кода ему вызывать, определение шага должно быть строго уникальным. Cucumber возвращает Cucumber::Ambiguous error, в случае если присутствуют неоднозначные Step Definitions.
3) Организация хранения шагов
Определения шагов можно хранить как в одном файле, так и в нескольких. Однако, скорее всего, на начальном этапе работы с проектом, они вполне поместятся в один. А уже по мере роста появится необходимость сгруппировать их по смыслу и разнести в разные файлы. Так проект будет проще поддерживать в будущем.
Технически абсолютно неважно, как будут называться эти файлы, и какие шаги будут в них храниться. Однако существует рекомендация называть их *_steps.rb (если используется Ruby).
Например, в приложении для резюме будет уместно выделить следующие файлы:
 Автор: Энджи Джонс (Angie Jones)
Оригинал статьи
Перевод: Ольга Алифанова
Разработка на основе поведения, также известная как BDD – это основанная на примерах методология для разработки ПО. Ключевой момент в BDD – это совместная деятельность Бизнеса, Разработки и Тестировщиков. Эти участники также известны как «Три товарища».
Начиная работу над новой фичей, три товарища собираются вместе и пишут примеры использования этой фичи. Обсуждая эти примеры, они приходят к общему пониманию того, как фича должна себя вести в различных сценариях.
Давайте посмотрим на пример такой встречи.
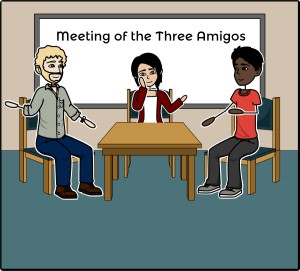 Встреча трех товарищей
Команда Parabank создает новую фичу, позволяющую пользователям выводить деньги со счета. Три товарища начинают представлять этот сценарий и поведение приложения.
Они используют синтаксис Gherkin, который позволяет им пользоваться доменно-специфичным языком в формате «Если – Когда – Тогда» (Given, When, Then).
Синтаксис Given-When-Then заставляет их подумать о текущем состоянии системы («Если«), действии, которое совершено в системе («Когда«), и результирующем поведении системы («Тогда«).
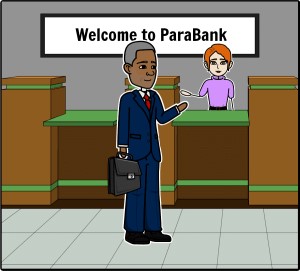 Три товарища решают набросать первый сценарий – «счастливый путь», когда пользователь выводит деньги со своего счета.
Они размышляют над предусловиями, определяющими текущее состояние системы перед тем, как предприняты какие-либо действия. Они решают, что им нужны:
- Пользователь, у которого есть учетная запись.
- Определенное количество денег у этой записи, допустим, $100.
Они записывают это в формате Gherkin, используя два утверждения «Если».
Если у пользователя есть учетная запись
И баланс учетной записи 100.00 долларов
Отметьте использования слова «И«. Это ключевое слово используется, если утверждение не единственное. В отличие от «Если А, Если Б», оно записано в более разговорном формате – «Если А и Б».
Теперь, когда предусловия определены, они описывают действие. Это делается при помощи утверждения «Когда«.
Когда пользователь выводит 10.00 долларов
И, наконец, команда обсуждает, как система должна себя вести в такой ситуации. Это делается через два «Тогда«-утверждения.
Тогда баланс учетной записи должен стать равным 90,00 долларов
И должна быть записана новая транзакция.
Теперь у команды есть полный описанный сценарий, и три товарища знают, что им нужно создать.
Преимущества BDD
У использования BDD много преимуществ. Члены команды могут сотрудничать и добиваться общего понимания еще до того, как началась разработка. Это значит, что все двусмысленности и разницы во мнениях можно обсудить очень рано и разобраться с ними до старта разработки.
Все говорят на одном доменно-специфичном языке, поэтому нет терминологической путаницы.
Сценарии, записанные через синтаксис Gherkin, можно использовать как исполняемые артефакты, которые лежат в основе автоматизированного тестирования этих артефактов.
 Использование Gherkin для автоматизации тестов
Сценарий в стиле Gherkin можно добавлять в фича-файл. Вот пример фича-файла, который служит как входные данные для сценариев тест-автоматизации.
Однако многие команды застревают на этом этапе, потому что им не хватает множества деталей выполнения этого сценария.
Он гласит, что у пользователя есть учетная запись. У какого пользователя? Где информация об учетной записи?
Он гласит, что пользователь выводит десять долларов, но не говорит о шагах, которые для этого нужно предпринять. На какие страницы мне перейти, и на какие элементы интерфейса кликнуть?
Он описывает ожидаемый результат, но не говорит, куда идти, чтобы их проверить.
 Из-за этого тестировщики зачастую переделывают краткий фича-файл во что-то вроде этого:
Да, тут куда больше деталей, но у этого подхода есть минусы.
Помимо того, что он снижает переиспользуемость шагов, эти шаги несут в себе кучу деталей реализации и явно диктуют, как нужно писать автотест.
Одна из причин, по которой три товарища создают сценарии на основе поведения, а не реализации – это то, что на самом деле то, как вы это сделаете, не так уж важно. Добавление детализации ведет к утере цели поведения в сценарии.
Если мы не даем деталей реализации для разработки продукта – мы не должны давать их и для разработки автотестов.
Вернемся к краткому сценарию, описывающему поведение. Да, там отсутствует множество деталей, но это нормально. На самом деле это отлично!
Как мы узнаем, как это внедрять, спросите вы?
Мы оставим это на усмотрение того, кто пишет код автоматизации. Мы верим, что разработчики создадут фичу, даже если у них нет детальных подробностей – и мы делаем то же самое для разработки кода автотестов.
Давайте возьмем каждый из этих шагов и посмотрим, как превратить их в связующий код, который выполняет этот сценарий, в то же время следуя принципам хорошей тест-автоматизации.
Создание (связующего) кода автотестов
Используя Cucumber, тест-автоматизатор берет сценарии, созданные тремя товарищами, и кладет их в исполняемый фича-файл. Вот с каким файлом он будет работать:
Feature: Withdraw
    As a customer, I want to withdraw funds from my account

Scenario: Withdraw from account when funds are available
    Given a customer has an account
    And the account balance is 100.00 dollars
    When the customer withdraws 10.00 dollars
    Then the account balance should be 90.00 dollars
    And a new transaction should be recorded
Тест-автоматизатор создает Java-файл для кода автоматизации. Код в этом файле называется определением шагов, и он соответствует шагам фича-файла.
package cucumber.stepdefs;

public class WithdrawStepDefs {

}
Он также добавляет файл прогона, чтобы сообщить Cucumber, где находятся фича-файлы и файлы определения шагов.
package cucumber;

import org.junit.runner.RunWith;
import cucumber.api.CucumberOptions;
import cucumber.api.junit.Cucumber;

@RunWith(Cucumber.class)
@CucumberOptions(
  plugin = {"pretty"},
  glue = {"cucumber.stepdefs"},
  features = {"src/test/java/cucumber/features"})
public class CucumberTestOptions {

}
Шаг 1
Теперь все готово для того, чтобы привязать шаги из фича-файлы к связующему коду! Вот первый шаг:
Given a customer has an account
К нему добавляется связующий код в WithdrawStepDefs, привязывающийся к шагу. Это делается с использованием аннотации @Given с текстом из фича-файла.
package cucumber.stepdefs;

public class WithdrawStepDefs {

  @Given("a customer has an account")
  public void createNewAccount(){

  }
}
Сразу за этим аннотированным связующим шагом идет метод, который должен выполняться, когда вызывается шаг. Этот метод можно назвать как угодно, и он может выполнять любой код на усмотрение тест-инженера.
Снова напомним, что инженер не знает, что это за пользователь и что у него за учетная запись. Это нормально. Он может выбрать пользователя для сценария, и вывести детали об этом пользователе на более низкий уровень, а не хранить их внутри фича-файла. Инженер решает добавить информацию о пользователе в файл свойств. У него уже есть один файл свойств, где хранится URL приложения, а также место расположения исполняемого chromedriver, и он просто добавляет новую секцию с деталями пользователя.
################
#  APP         #
################

app.url=http://parabank.parasoft.com/parabank/

################
#  SELENIUM    #
################

webdriver.chrome.driver=resources/chromedriver

################
#  CUSTOMER    #
################

customer.id=12212
customer.username=john
customer.password=demo
Чтобы сделать что-то с этой учетной записью, пользователю нужно авторизоваться. Это тоже не то, что стоит хранить в фича-файле, потому что это нужно практически для всех сценариев! Выводим на уровень ниже.
Тест-инженер решает положить это в отдельный Java-файл, чтобы внедрить это только один раз, а затем тест-сценарии автоматически выполнят это через наследование:
package base;

import components.LoginComponent;
import org.junit.AfterClass;
import org.junit.BeforeClass;
import org.openqa.selenium.WebDriver;
import org.openqa.selenium.chrome.ChromeDriver;

import java.io.File;
import java.io.FileInputStream;
import java.util.Properties;

public class BaseTests {

    protected static WebDriver driver;

    @BeforeClass
    public static void launchApplication() {
        loadTestProperties();

        driver = new ChromeDriver();
        driver.get(System.getProperty("app.url"));

        new LoginComponent(driver).login();
    }

    @AfterClass
    public static void closeBrowser() {
        driver.quit();
    }

    private static void loadTestProperties(){
        Properties props = System.getProperties();
        try {
            props.load(
                    new FileInputStream(new File("resources/test.properties")));
        } catch(Exception e) {
            e.printStackTrace();
            System.exit(-1);
        }
    }
}
Автоматизатор также обновляет файл определения шагов, чтобы расширить класс BaseTests.
public class WithdrawStepDefs extends BaseTests
Итак, с авторизацией разобрались. Теперь надо разобраться с учетной записью. Хорошо, что детали учетной записи не были описаны в фича-файле. Это позволяет тест-инженеру следовать хорошим практикам. Он не хочет использовать запись, которая уже существует, потому что если в параллели запускаются еще какие-то тесты, пользующиеся этой учеткой (и ожидающие определенного количества средств), это вызовет противоречия в тестовых данных, и тесты упадут. Поэтому он решает создать новую запись на лету, а так как в фича-файлей нет деталей внедрения – он может это сделать.
Другое принятое решение – использовать веб-сервисы приложения для создания такой записи. Создание записи – не часть теста, это его предусловие. Нет никаких причин делать это на уровне интерфейса – это займет много времени. Так как эти шаги не были продиктованы фича-файлом, инженер может выбрать наилучший способ внедрения. Он использует инструмент Rest-Assured для вызова веб-сервиса и парсинга ответа.
Примечание: исходный код используемых файлов можно найти на Github по ссылке в конце статьи.
package cucumber.stepdefs;

import base.BaseTests;
import cucumber.api.java.en.*;
import io.restassured.response.Response;
import services.Endpoints;
import utils.ServicesUtils;

import static java.lang.String.*;
import static utils.ServicesUtils.HttpMethod.*;
import static io.restassured.path.json.JsonPath.from;

public class WithdrawStepDefs extends BaseTests {

    private Response response;
    private int accountId;

    @Given("a customer has an account")
    public void createNewAccount(){
        String customerId = System.getProperty("customer.id");
        String endpoint = format(Endpoints.CREATE_ACCOUNT, customerId);
        response = ServicesUtils.execute(endpoint, POST);
        accountId = from(response.asString()).get("id");
    }
}
Это покрывает первый шаг сценария.
Шаг 2
Перейдем к следующему шагу
And the account balance is 100.00 dollars
Теперь автоматизатору надо убедиться, что у новой учетной записи есть баланс в 100 долларов. Он решает сделать это на уровне служб, чтобы тесты были быстрее.
    @And("^the account balance is (.*) dollars$")
    public void setAccountBalance(float desiredBalance) {
        float currentBalance = getCurrentBalance();
        if(desiredBalance != currentBalance){
            deposit(desiredBalance - currentBalance);
        }
    }

    private float getCurrentBalance(){
        String endpoint = format(Endpoints.GET_ACCOUNT, accountId);
        response = ServicesUtils.execute(endpoint, GET);
        return from(response.asString()).get("balance");
    }

    private void deposit(float amount){
        ServicesUtils.execute(format(Endpoints.DEPOSIT, accountId, amount), POST);
    }
Заметьте, что в первой строке для суммы используется (*). Это делает шаг переиспользуемым для будущих сценариев. Из-за этого метод должен принимать параметр в качестве значения – это переменная desiredBalance. Смотрите, как эффективен наш инженер, когда точные шаги не продиктованы фича-файлом!
Шаг 3
Следующий шаг тоже можно не выполнять через UI! Слава богу, что шаг говорит только о том, что должно произойти, а не о том, как это должно произойти. Автоматизатор решает вновь воспользоваться вызовом веб-службы.
When the customer withdraws 10.00 dollars
    @When("the customer withdraws (.*) dollars")
    public void withdraw(double withdrawAmount){
        String endpoint = format(Endpoints.WITHDRAW, accountId, withdrawAmount);
        response = ServicesUtils.execute(endpoint, POST);
    }
Шаг 4
Что дальше?
Then the account balance should be 90.00 dollars
Утверждение «Когда«. Настало время проверок. Автоматизатору нужно убедиться, что теперь на счету 90 долларов. Еще один вызов веб-службы спешит на помощь!
    @Then("the account balance should be (.*) dollars")
    public void verifyBalance(float balance){
        Assert.assertEquals(balance, getCurrentBalance(), 0.0f);
    }
Шаг 5.
Последний шаг. Еще одна проверка.
And a new transaction should be recorded
Автоматизатор размышляет, как это сделать. Он может сделать это через вызов веб-службы, но знает, что важно в том числе проверить, что запись о транзакции правильно отображается пользователю, и все детали находятся на своих местах.
Вот как выглядит интерфейс, когда все работает:

На этой странице КУЧА деталей. Автоматизатор хочет убедиться, что все тут верно: общий баланс, доступный баланс, номер учетной записи, ее тип, записи о транзакции, и так далее.
Он не рвется писать все эти проверки. И затем его осеняет – ему и не нужно их писать! Все это не определялось фича-файлом, и инженер может принять мудрое решение и воспользоваться более эффективным подходом. Он решает использовать Applitools Eyes API для единичной визуальной проверки скриншота всей страницы целиком. Таким образом все, что нужно, будет покрыто, а кода будет меньше.
    @Then("a new transaction should be recorded")
    public void verifyTransactionRecord(){
        AccountActivityPage activityPage = NavigationUtils.goToAccountActivity(driver, accountId);
        Assert.assertEquals(valueOf(accountId), activityPage.getAccountId());

        eyes.open(driver, "Parabank", "Withdraw from account when funds are available");
        eyes.checkWindow();
        eyes.close();
    }
Так как часть данных на странице будет меняться после каждого прогона теста (номер учетной записи и даты транзакций), она просто аннотирует эти области в дашборде Applitools, чтобы визуальная проверка учитывала динамичность этих областей.
Хороший Gherkin, хорошая автоматизация
Так как инженер-автоматизатор взял файл Gherkin от встречи трех товарищей и не правил его, добавляя детали реализации, он смог работать умнее, когда создавал код теста. Он мог при необходимости пользоваться интерфейсом, API, вызовами базы данных, и чем угодно еще для создания более эффективных тестов, в то же время следуя принципам хорошей тест-автоматизации.
Полное решение на GitHub
Обсудить в форуме
Gherkin is learned best by example. Whereas the previous post in this series focused on Gherkin syntax and semantics, this post will walk through a set of examples that show how to use all of the language parts. The examples cover basic Google searching, which is easy to explain and accessible to all. You can find other good example references from Cucumber and Behat. (Check the Automation Panda BDD page for the full table of contents.)
As a disclaimer, this post will focus entirely upon feature file examples and not upon automation through step definitions. Writing good Gherkin scenarios must come before implementing step definitions. Automation will be covered in future posts. (Note that these examples could easily be automated using Selenium.)
A Simple Feature File
Let’s start with the example from the previous post:
Feature: Google Searching
  As a web surfer, I want to search Google, so that I can learn new things.

  Scenario: Simple Google search
    Given a web browser is on the Google page
    When the search phrase "panda" is entered
    Then results for "panda" are shown
This is a complete feature file. It starts with a required Feature section and a description. The description is optional, and it may have as many or as few lines as desired. The description will not affect automation at all – think of it as a comment. As an Agile best practice, it should include the user story for the features under test. This feature file then has one Scenario section with a title and one each of Given–When–Then steps in order. It could have more scenarios, but for simplicity, this example has only one. Each scenario will be run independently of the other scenarios – the output of one scenario has no bearing on the next! The indents and blank lines also make the feature file easy to read.
Notice how concise yet descriptive the scenario is. Any non-technical person can easily understand how Google searches should behave from reading this scenario. “Search for pandas? Get pandas!” The feature’s behavior is clear to the developer, the tester, and the product owner. Thus, this one feature file can be shared by all stakeholders and can dispel misunderstandings.
Another thing to notice is the ability to parameterize steps. Steps should be written for reusability. A step hard-coded to search for pandas is not very reusable, but a step parameterized to search for any phrase is. Parameterization is handled at the level of the step definitions in the automation code, but by convention, it is a best practice to write parameterized values in double-quotes. This makes the parameters easy to identify.
Additional Steps
Not all behaviors can be fully described using only three steps. Thankfully, scenarios can have any number of steps using And and But. Let’s extend the previous example:
Feature: Google Searching
  As a web surfer, I want to search Google, so that I can learn new things.

  Scenario: Simple Google search
    Given a web browser is on the Google page
    When the search phrase "panda" is entered
    Then results for "panda" are shown
    And the related results include "Panda Express"
    But the related results do not include "pandemonium"
Now, there are three Then steps to verify the outcome. And and But steps can be attached to any type of step. They are interchangeable and do not have any unique meaning – they exist simply to make scenarios more readable. For example, the scenario above could have been written as Given-When-Then-Then-Then, but Given-When-Then-And-But makes more sense. Furthermore, And and But do not represent any sort of conditional logic. Gherkin steps are entirely sequential and do not branch based on if/else conditions.
Doc Strings
In-line parameters are not the only way to pass inputs to a step. Doc strings can pass larger pieces of text as inputs like this:
Feature: Google Searching
  As a web surfer, I want to search Google, so that I can learn new things.

  Scenario: Simple Google search
    Given a web browser is on the Google page
    When the search phrase "panda" is entered
    Then results for "panda" are shown
    And the result page displays the text
      """
      Scientific name: Ailuropoda melanoleuca
      Conservation status: Endangered (Population decreasing)
      """
Doc strings are delimited by three double-quotes ‘”””‘. They may fit onto one line, or they may be multiple lines long. The step definition receives the doc string input as a plain old string. Gherkin doc strings are reminiscent of Python docstrings in format.
Step Tables
Tables are a valuable way to provide data with concise syntax. In Gherkin, a table can be passed into a step as an input. The example above can be rewritten to use a table for related results like this:
Feature: Google Searching
  As a web surfer, I want to search Google, so that I can learn new things.

  Scenario: Simple Google search
    Given a web browser is on the Google page
    When the search phrase "panda" is entered
    Then results for "panda" are shown
    And the following related results are shown
      | related       |
      | Panda Express |
      | giant panda   |
      | panda videos  |
Step tables are delimited by the pipe symbol “|”. They may have as many rows or columns as desired. The first row contains column names and is not treated as input data. The table is passed into the step definition as a data structure native to the language used for automation (such as an array). Step tables may be attached to any step, but they will be connected to that step only. For good formatting, remember to indent the step table and to space the delimiters evenly.
The Background Section
Sometimes, scenarios in a feature file may share common setup steps. Rather than duplicate these steps, they can be put into a Background section:
Feature: Google Searching
  As a web surfer, I want to search Google, so that I can learn new things.

  Background:
    Given a web browser is on the Google page

  Scenario: Simple Google search for pandas
    When the search phrase "panda" is entered
    Then results for "panda" are shown

  Scenario: Simple Google search for elephants
    When the search phrase "elephant" is entered
    Then results for "elephant" are shown
Since each scenario is independent, the steps in the Background section will run before each scenario is run, not once for the whole set. The Background section does not have a title. It can have any type or number of steps, but as a best practice, it should be limited to Given steps.
Scenario Outlines
Scenario outlines bring even more reusability to Gherkin. Notice in the example above that the two scenarios are identical apart from their search terms. They could be combined with a Scenario Outline section:
Feature: Google Searching
  As a web surfer, I want to search Google, so that I can learn new things.

  Scenario Outline: Simple Google searches
    Given a web browser is on the Google page
    When the search phrase "<phrase>" is entered
    Then results for "<phrase>" are shown
    And the related results include "<related>"

    Examples: Animals
      | phrase   | related       |
      | panda    | Panda Express |
      | elephant | Elephant Man  |
Scenario outlines are parameterized using Examples tables. Each Examples table has a title and uses the same format as a step table. Each row in the table represents one test instance for that particular combination of parameters. In the example above, there would be two tests for this Scenario Outline. The table values are substituted into the steps above wherever the column name is surrounded by the “<” “>” symbols.
A Scenario Outline section may have multiple Examples tables. This may make it easier to separate combinations. For example, tables could be added for “Planets” and “Food”. Each Examples table is connected to the Scenario Outline section immediately preceding it. A feature file can have any number of Scenario Outline sections, but make sure to write them well. (See Are Multiple Scenario Outlines in a Feature File Okay?)
Be careful not to confuse step tables with Examples tables! This is a common mistake for Gherkin beginners. Step tables provide input data structures, whereas Examples tables provide input parameterization.
Tags
Tags are a great way to classify scenarios. They can be used to selectively run tests based on tag name, and they can be used to apply before-and-after wrappers around scenarios. Most BDD frameworks support tags. Any scenario can be given tags like this:
Feature: Google Searching
  As a web surfer, I want to search Google, so that I can learn new things.

  @automated @google @panda
  Scenario: Simple Google search
    Given a web browser is on the Google page
    When the search phrase "panda" is entered
    Then results for "panda" are shown
Tags start with the “@” symbol. Tag names are case-sensitive and whitespace-separated. As a best practice, they should be lowercase and use hyphens (“-“) between separate words. Tags must be put on the line before a Scenario or Scenario Outline section begins. Any number of tags may be used.
Comments
Comments allow the author to add additional information to a feature file. In Gherkin, comments must use a whole line, and each line must start with a hashtag “#”. Comment lines may appear anywhere and are ignored by the automation framework. For example:
Feature: Google Searching
  As a web surfer, I want to search Google, so that I can learn new things.

  # Test ID: 12345
  # Author: Andy
  Scenario: Simple Google search
    Given a web browser is on the Google page
    When the search phrase "panda" is entered
    Then results for "panda" are shown
Since Gherkin is very self-documenting, it is a best practice to limit the use of comments in favor of more descriptive steps and titles.
Writing Good Gherkin
This post merely shows how to use the Gherkin syntax. The next post will cover how to write good Gherkin feature files.
Writing Features — Gherkin Language
Behat is a tool to test the behavior of your application, described in special language called Gherkin. Gherkin is a Business Readable, Domain Specific Language created especially for behavior descriptions. It gives you the ability to remove logic details from behavior tests.
Gherkin serves two purposes: serving as your project’s documentation and automated tests. Behat also has a bonus feature: it talks back to you using real, human language telling you what code you should write.
If you’re still new to Behat, jump into the /quick_intro first, then return here to learn more about Gherkin.
Like YAML or Python, Gherkin is a line-oriented language that uses indentation to define structure. Line endings terminate statements (called steps) and either spaces or tabs may be used for indentation. (We suggest you use spaces for portability.) Finally, most lines in Gherkin start with a special keyword:
Feature: Some terse yet descriptive text of what is desired
  In order to realize a named business value
  As an explicit system actor
  I want to gain some beneficial outcome which furthers the goal

  Scenario: Some determinable business situation
    Given some precondition
      And some other precondition
     When some action by the actor
      And some other action
      And yet another action
     Then some testable outcome is achieved
      And something else we can check happens too

  Scenario: A different situation
      ...
The parser divides the input into features, scenarios and steps. Let’s walk through the above example:
Feature: Some terse yet descriptive text of what is desiredstarts the feature and gives it a title. Learn more about features in the «Features_» section.- Behat does not parse the next 3 lines of text. (In order to… As an… I want to…). These lines simply provide context to the people reading your feature, and describe the business value derived from the inclusion of the feature in your software.
Scenario: Some determinable business situationstarts the scenario, and contains a description of the scenario. Learn more about scenarios in the «Scenarios_» section.- The next 7 lines are the scenario steps, each of which is matched to a regular expression defined elsewhere. Learn more about steps in the «Steps_» section.
Scenario: A different situationstarts the next scenario, and so on.
When you’re executing the feature, the trailing portion of each step (after keywords like Given, And, When, etc) is matched to a regular expression, which executes a PHP callback function. You can read more about steps matching and execution in /guides/2.definitions.
Features
Every *.feature file conventionally consists of a single feature. Lines starting with the keyword Feature: (or its localized equivalent) followed by three indented lines starts a feature. A feature usually contains a list of scenarios. You can write whatever you want up until the first scenario, which starts with Scenario: (or localized equivalent) on a new line. You can use tags_ to group features and scenarios together, independent of your file and directory structure.
Every scenario consists of a list of steps_, which must start with one of the keywords Given, When, Then, But or And (or localized one). Behat treats them all the same, but you shouldn’t. Here is an example:
Feature: Serve coffee
  In order to earn money
  Customers should be able to
  buy coffee at all times

  Scenario: Buy last coffee
    Given there are 1 coffees left in the machine
    And I have deposited 1 dollar
    When I press the coffee button
    Then I should be served a coffee
In addition to basic scenarios_, feature may contain scenario outlines_ and backgrounds_.
Scenarios
Scenario is one of the core Gherkin structures. Every scenario starts with the Scenario: keyword (or localized one), followed by an optional scenario title. Each feature can have one or more scenarios, and every scenario consists of one or more steps_.
The following scenarios each have 3 steps:
Scenario: Wilson posts to his own blog
  Given I am logged in as Wilson
  When I try to post to "Expensive Therapy"
  Then I should see "Your article was published."

Scenario: Wilson fails to post to somebody else's blog
  Given I am logged in as Wilson
  When I try to post to "Greg's anti-tax rants"
  Then I should see "Hey! That's not your blog!"

Scenario: Greg posts to a client's blog
  Given I am logged in as Greg
  When I try to post to "Expensive Therapy"
  Then I should see "Your article was published."
Scenario Outlines
Copying and pasting scenarios to use different values can quickly become tedious and repetitive:
Scenario: Eat 5 out of 12
  Given there are 12 cucumbers
  When I eat 5 cucumbers
  Then I should have 7 cucumbers

Scenario: Eat 5 out of 20
  Given there are 20 cucumbers
  When I eat 5 cucumbers
  Then I should have 15 cucumbers
Scenario Outlines allow us to more concisely express these examples through the use of a template with placeholders:
Scenario Outline: Eating
  Given there are <start> cucumbers
  When I eat <eat> cucumbers
  Then I should have <left> cucumbers

  Examples:
    | start | eat | left |
    |  12   |  5  |  7   |
    |  20   |  5  |  15  |
The Scenario outline steps provide a template which is never directly run. A Scenario Outline is run once for each row in the Examples section beneath it (not counting the first row of column headers).
The Scenario Outline uses placeholders, which are contained within < > in the Scenario Outline’s steps. For example:
Given <I'm a placeholder and I'm ok>
Think of a placeholder like a variable. It is replaced with a real value from the Examples: table row, where the text between the placeholder angle brackets matches that of the table column header. The value substituted for the placeholder changes with each subsequent run of the Scenario Outline, until the end of the Examples table is reached.
tip
You can also use placeholders in Multiline Arguments_.
note
Your step definitions will never have to match the placeholder text itself, but rather the values replacing the placeholder.
So when running the first row of our example:
Scenario Outline: controlling order
  Given there are <start> cucumbers
  When I eat <eat> cucumbers
  Then I should have <left> cucumbers

  Examples:
    | start | eat | left |
    |  12   |  5  |  7   |
The scenario that is actually run is:
Scenario Outline: controlling order
  # <start> replaced with 12:
  Given there are 12 cucumbers
  # <eat> replaced with 5:
  When I eat 5 cucumbers
  # <left> replaced with 7:
  Then I should have 7 cucumbers
Backgrounds
Backgrounds allows you to add some context to all scenarios in a single feature. A Background is like an untitled scenario, containing a number of steps. The difference is when it is run: the background is run before each of your scenarios, but after your BeforeScenario hooks (/guides/3.hooks).
Feature: Multiple site support

  Background:
    Given a global administrator named "Greg"
    And a blog named "Greg's anti-tax rants"
    And a customer named "Wilson"
    And a blog named "Expensive Therapy" owned by "Wilson"

  Scenario: Wilson posts to his own blog
    Given I am logged in as Wilson
    When I try to post to "Expensive Therapy"
    Then I should see "Your article was published."

  Scenario: Greg posts to a client's blog
    Given I am logged in as Greg
    When I try to post to "Expensive Therapy"
    Then I should see "Your article was published."
Steps
Features_ consist of steps, also known as Givens_, Whens_ and Thens_.
Behat doesn’t technically distinguish between these three kind of steps. However, we strongly recommend that you do! These words have been carefully selected for their purpose, and you should know what the purpose is to get into the BDD mindset.
Robert C. Martin has written a great post about BDD’s Given-When-Then concept where he thinks of them as a finite state machine.
Givens
The purpose of Given steps is to put the system in a known state before the user (or external system) starts interacting with the system (in the When steps). Avoid talking about user interaction in givens. If you have worked with use cases, givens are your preconditions.
note
Two good examples of using Givens are:
To create records (model instances) or set up the database:
Given there are no users on site
Given the database is clean
Authenticate a user (An exception to the no-interaction recommendation. Things that «happened earlier» are ok):
Given I am logged in as "Everzet"tip
It’s ok to call into the layer «inside» the UI layer here (in symfony: talk to the models).
And for all the symfony users out there, we recommend using a Given step with a tables_ arguments to set up records instead of fixtures. This way you can read the scenario all in one place and make sense out of it without having to jump between files:
Given there are users:
  | username | password | email               |
  | everzet  | 123456   | everzet@knplabs.com |
  | fabpot   | 22@222   | fabpot@symfony.com  |
Whens
The purpose of When steps is to describe the key action the user performs (or, using Robert C. Martin’s metaphor, the state transition).
note
Two good examples of Whens use are:
Interact with a web page (the Mink library gives you many web-friendly
Whensteps out of the box):When I am on "/some/page" When I fill "username" with "everzet" When I fill "password" with "123456" When I press "login"Interact with some CLI library (call commands and record output):
When I call "ls -la"
Thens
The purpose of Then steps is to observe outcomes. The observations should be related to the business value/benefit in your feature description. The observations should inspect the output of the system (a report, user interface, message, command output) and not something deeply buried inside it (that has no business value and is instead part of the implementation).
- Verify that something related to the Given+When is (or is not) in the output
- Check that some external system has received the expected message (was an email with specific content successfully sent?)
When I call "echo hello"
Then the output should be "hello"
note
While it might be tempting to implement Then steps to just look in the database – resist the temptation. You should only verify output that is observable by the user (or external system). Database data itself is only visible internally to your application, but is then finally exposed by the output of your system in a web browser, on the command-line or an email message.
And, But
If you have several Given, When or Then steps you can write:
Scenario: Multiple Givens
  Given one thing
  Given an other thing
  Given yet an other thing
  When I open my eyes
  Then I see something
  Then I don't see something else
Or you can use And or But steps, allowing your Scenario to read more fluently:
Scenario: Multiple Givens
  Given one thing
  And an other thing
  And yet an other thing
  When I open my eyes
  Then I see something
  But I don't see something else
If you prefer, you can indent scenario steps in a more programmatic way, much in the same way your actual code is indented to provide visual context:
Scenario: Multiple Givens
  Given one thing
    And an other thing
    And yet an other thing
  When I open my eyes
  Then I see something
    But I don't see something else
Behat interprets steps beginning with And or But exactly the same as all other steps. It doesn’t differ between them — you should!
Multiline Arguments
The regular expression matching in steps_ lets you capture small strings from your steps and receive them in your step definitions. However, there are times when you want to pass a richer data structure from a step to a step definition.
This is what multiline step arguments are for. They are written on lines immediately following a step, and are passed to the step definition method as the last argument.
Multiline step arguments come in two flavours: tables_ or pystrings_.
Tables
Tables as arguments to steps are handy for specifying a larger data set -usually as input to a Given or as expected output from a Then.
Scenario:
  Given the following people exist:
    | name  | email           | phone |
    | Aslak | aslak@email.com | 123   |
    | Joe   | joe@email.com   | 234   |
    | Bryan | bryan@email.org | 456   |
note
Don’t be confused with tables from scenario outlines_ — syntactically they are identical, but have a different purpose.
tip
A matching definition for this step looks like this:
/**
 * @Given /the following people exist:/
 */
public function thePeopleExist(TableNode $table)
{
    $hash = $table->getHash();
    foreach ($hash as $row) {
        // $row['name'], $row['email'], $row['phone']
    }
}
note
A table is injected into a definition as a
TableNodeobject, from which you can get hash by columns (TableNode::getHash()method) or by rows (TableNode::getRowsHash()).
PyStrings
Multiline Strings (also known as PyStrings) are handy for specifying a larger piece of text. This is done using the so-called PyString syntax. The text should be offset by delimiters consisting of three double-quote marks (""") on lines by themselves:
Scenario:
  Given a blog post named "Random" with:
    """
    Some Title, Eh?
    ===============
    Here is the first paragraph of my blog post.
    Lorem ipsum dolor sit amet, consectetur adipiscing
    elit.
    """
note
The inspiration for PyString comes from Python where
"""is used to delineate docstrings, much in the way/* ... */is used for multiline docblocks in PHP.
tip
In your step definition, there’s no need to find this text and match it in your regular expression. The text will automatically be passed as the last argument into the step definition method. For example:
/**
 * @Given /a blog post named "([^"]+)" with:/
 */
public function blogPost($title, PyStringNode $markdown)
{
    $this->createPost($title, $markdown->getRaw());
}
note
PyStrings are stored in a
PyStringNodeinstance, which you can simply convert to a string with(string) $pystringor$pystring->getRaw()as in the example above.
note
Indentation of the opening
"""is not important, although common practice is two spaces in from the enclosing step. The indentation inside the triple quotes, however, is significant. Each line of the string passed to the step definition’s callback will be de-indented according to the opening""". Indentation beyond the column of the opening"""will therefore be preserved.
Tags
Tags are a great way to organize your features and scenarios. Consider this example:
@billing
Feature: Verify billing

  @important
  Scenario: Missing product description

  Scenario: Several products
A Scenario or Feature can have as many tags as you like, just separate them with spaces:
@billing @bicker @annoy
Feature: Verify billing
note
If a tag exists on a
Feature, Behat will assign that tag to all childScenariosandScenario Outlinestoo.
Gherkin in Many Languages
Gherkin is available in many languages, allowing you to write stories using localized keywords from your language. In other words, if you speak French, you can use the word Fonctionnalité instead of Feature.
To check if Behat and Gherkin support your language (for example, French), run:
behat --story-syntax --lang=fr
note
Keep in mind that any language different from
enshould be explicitly marked with a# language: ...comment at the beginning of your*.featurefile:# language: fr Fonctionnalité: ... ...This way your features will hold all the information about its content type, which is very important for methodologies like BDD, and will also give Behat the ability to have multilanguage features in one suite.
Writing Features — Gherkin Language
Behat is a tool to test the behavior of your application, described in special
language called Gherkin. Gherkin is a Business Readable, Domain Specific Language
created especially for behavior descriptions. It gives you the ability to
remove logic details from behavior tests.
Gherkin serves two purposes: serving as your project’s documentation and
automated tests. Behat also has a bonus feature: it talks back to you using
real, human language telling you what code you should write.
If you’re still new to Behat, jump into the :doc:`/quick_intro` first, then
return here to learn more about Gherkin.
Gherkin Syntax
Like YAML or Python, Gherkin is a line-oriented language that uses indentation
to define structure. Line endings terminate statements (called steps) and either
spaces or tabs may be used for indentation. (We suggest you use spaces for
portability.) Finally, most lines in Gherkin start with a special keyword:
Feature: Some terse yet descriptive text of what is desired In order to realize a named business value As an explicit system actor I want to gain some beneficial outcome which furthers the goal Scenario: Some determinable business situation Given some precondition And some other precondition When some action by the actor And some other action And yet another action Then some testable outcome is achieved And something else we can check happens too Scenario: A different situation ...
The parser divides the input into features, scenarios and steps. Let’s walk
through the above example:
Feature: Some terse yet descriptive text of what is desiredstarts
the feature and gives it a title. Learn more about features in the
«Features» section.- Behat does not parse the next 3 lines of text. (In order to… As an…
I want to…). These lines simply provide context to the people
reading your feature, and describe the business value derived from the
inclusion of the feature in your software. Scenario: Some determinable business situationstarts the scenario,
and contains a description of the scenario. Learn more about scenarios in
the «Scenarios» section.- The next 7 lines are the scenario steps, each of which is matched to
a regular expression defined elsewhere. Learn more about steps in the
«Steps» section. Scenario: A different situationstarts the next scenario, and so on.
When you’re executing the feature, the trailing portion of each step (after
keywords like Given, And, When, etc) is matched to
a regular expression, which executes a PHP callback function. You can read more
about steps matching and execution in :doc:`/guides/2.definitions`.
Features
Every *.feature file conventionally consists of a single feature. Lines
starting with the keyword Feature: (or its localized equivalent) followed
by three indented lines starts a feature. A feature usually contains a list of
scenarios. You can write whatever you want up until the first scenario, which
starts with Scenario: (or localized equivalent) on a new line. You can use
tags to group features and scenarios together, independent of your file and
directory structure.
Every scenario consists of a list of steps, which must start with one of the
keywords Given, When, Then, But or And (or localized one).
Behat treats them all the same, but you shouldn’t. Here is an example:
Feature: Serve coffee In order to earn money Customers should be able to buy coffee at all times Scenario: Buy last coffee Given there are 1 coffees left in the machine And I have deposited 1 dollar When I press the coffee button Then I should be served a coffee
In addition to basic scenarios, feature may contain scenario outlines
and backgrounds.
Scenarios
Scenario is one of the core Gherkin structures. Every scenario starts with
the Scenario: keyword (or localized one), followed by an optional scenario
title. Each feature can have one or more scenarios, and every scenario consists
of one or more steps.
The following scenarios each have 3 steps:
Scenario: Wilson posts to his own blog Given I am logged in as Wilson When I try to post to "Expensive Therapy" Then I should see "Your article was published." Scenario: Wilson fails to post to somebody else's blog Given I am logged in as Wilson When I try to post to "Greg's anti-tax rants" Then I should see "Hey! That's not your blog!" Scenario: Greg posts to a client's blog Given I am logged in as Greg When I try to post to "Expensive Therapy" Then I should see "Your article was published."
Scenario Outlines
Copying and pasting scenarios to use different values can quickly become
tedious and repetitive:
Scenario: Eat 5 out of 12 Given there are 12 cucumbers When I eat 5 cucumbers Then I should have 7 cucumbers Scenario: Eat 5 out of 20 Given there are 20 cucumbers When I eat 5 cucumbers Then I should have 15 cucumbers
Scenario Outlines allow us to more concisely express these examples through the
use of a template with placeholders:
Scenario Outline: Eating Given there are <start> cucumbers When I eat <eat> cucumbers Then I should have <left> cucumbers Examples: | start | eat | left | | 12 | 5 | 7 | | 20 | 5 | 15 |
The Scenario outline steps provide a template which is never directly run. A
Scenario Outline is run once for each row in the Examples section beneath it
(not counting the first row of column headers).
The Scenario Outline uses placeholders, which are contained within
< > in the Scenario Outline’s steps. For example:
Given <I'm a placeholder and I'm ok>
Think of a placeholder like a variable. It is replaced with a real value from
the Examples: table row, where the text between the placeholder angle
brackets matches that of the table column header. The value substituted for
the placeholder changes with each subsequent run of the Scenario Outline,
until the end of the Examples table is reached.
Tip
You can also use placeholders in Multiline Arguments.
Note
Your step definitions will never have to match the placeholder text itself,
but rather the values replacing the placeholder.
So when running the first row of our example:
Scenario Outline: controlling order Given there are <start> cucumbers When I eat <eat> cucumbers Then I should have <left> cucumbers Examples: | start | eat | left | | 12 | 5 | 7 |
The scenario that is actually run is:
Scenario Outline: controlling order # <start> replaced with 12: Given there are 12 cucumbers # <eat> replaced with 5: When I eat 5 cucumbers # <left> replaced with 7: Then I should have 7 cucumbers
Backgrounds
Backgrounds allows you to add some context to all scenarios in a single
feature. A Background is like an untitled scenario, containing a number of
steps. The difference is when it is run: the background is run before each of
your scenarios, but after your BeforeScenario hooks (:doc:`/guides/3.hooks`).
Feature: Multiple site support Background: Given a global administrator named "Greg" And a blog named "Greg's anti-tax rants" And a customer named "Wilson" And a blog named "Expensive Therapy" owned by "Wilson" Scenario: Wilson posts to his own blog Given I am logged in as Wilson When I try to post to "Expensive Therapy" Then I should see "Your article was published." Scenario: Greg posts to a client's blog Given I am logged in as Greg When I try to post to "Expensive Therapy" Then I should see "Your article was published."
Steps
Features consist of steps, also known as Givens, Whens and Thens.
Behat doesn’t technically distinguish between these three kind of steps.
However, we strongly recommend that you do! These words have been carefully
selected for their purpose, and you should know what the purpose is to get into
the BDD mindset.
Robert C. Martin has written a great post
about BDD’s Given-When-Then concept where he thinks of them as a finite state
machine.
Givens
The purpose of Given steps is to put the system in a known state before
the user (or external system) starts interacting with the system (in the When
steps). Avoid talking about user interaction in givens. If you have worked with
use cases, givens are your preconditions.
Note
Two good examples of using Givens are:
-
To create records (model instances) or set up the database:
Given there are no users on site Given the database is clean
-
Authenticate a user (An exception to the no-interaction recommendation.
Things that «happened earlier» are ok):Given I am logged in as "Everzet"
Tip
It’s ok to call into the layer «inside» the UI layer here (in symfony: talk
to the models).
And for all the symfony users out there, we recommend using a Given step with a
tables arguments to set up records instead of fixtures. This way you can
read the scenario all in one place and make sense out of it without having to
jump between files:
Given there are users: | username | password | email | | everzet | 123456 | everzet@knplabs.com | | fabpot | 22@222 | fabpot@symfony.com |
Whens
The purpose of When steps is to describe the key action the user
performs (or, using Robert C. Martin’s metaphor, the state transition).
Note
Two good examples of Whens use are:
-
Interact with a web page (the Mink library gives you many web-friendly
Whensteps out of the box):When I am on "/some/page" When I fill "username" with "everzet" When I fill "password" with "123456" When I press "login"
-
Interact with some CLI library (call commands and record output):
Thens
The purpose of Then steps is to observe outcomes. The observations
should be related to the business value/benefit in your feature description.
The observations should inspect the output of the system (a report, user
interface, message, command output) and not something deeply buried inside it
(that has no business value and is instead part of the implementation).
- Verify that something related to the Given+When is (or is not) in the output
- Check that some external system has received the expected message (was an
email with specific content successfully sent?)
When I call "echo hello" Then the output should be "hello"
Note
While it might be tempting to implement Then steps to just look in the
database – resist the temptation. You should only verify output that is
observable by the user (or external system). Database data itself is
only visible internally to your application, but is then finally exposed
by the output of your system in a web browser, on the command-line or an
email message.
And, But
If you have several Given, When or Then steps you can write:
Scenario: Multiple Givens Given one thing Given an other thing Given yet an other thing When I open my eyes Then I see something Then I don't see something else
Or you can use And or But steps, allowing your Scenario to read more
fluently:
Scenario: Multiple Givens Given one thing And an other thing And yet an other thing When I open my eyes Then I see something But I don't see something else
If you prefer, you can indent scenario steps in a more programmatic way, much
in the same way your actual code is indented to provide visual context:
Scenario: Multiple Givens Given one thing And an other thing And yet an other thing When I open my eyes Then I see something But I don't see something else
Behat interprets steps beginning with And or But exactly the same as all other
steps. It doesn’t differ between them — you should!
Multiline Arguments
The regular expression matching in steps lets you capture small strings from
your steps and receive them in your step definitions. However, there are times
when you want to pass a richer data structure from a step to a step definition.
This is what multiline step arguments are for. They are written on lines
immediately following a step, and are passed to the step definition method as
the last argument.
Multiline step arguments come in two flavours: tables or pystrings.
Tables
Tables as arguments to steps are handy for specifying a larger data set —
usually as input to a Given or as expected output from a Then.
Scenario: Given the following people exist: | name | email | phone | | Aslak | aslak@email.com | 123 | | Joe | joe@email.com | 234 | | Bryan | bryan@email.org | 456 |
Note
Don’t be confused with tables from scenario outlines — syntactically
they are identical, but have a different purpose.
Tip
A matching definition for this step looks like this:
/** * @Given /the following people exist:/ */ public function thePeopleExist(TableNode $table) { $hash = $table->getHash(); foreach ($hash as $row) { // $row['name'], $row['email'], $row['phone'] } }
Note
A table is injected into a definition as a TableNode object, from
which you can get hash by columns (TableNode::getHash() method) or by
rows (TableNode::getRowsHash()).
PyStrings
Multiline Strings (also known as PyStrings) are handy for specifying a larger
piece of text. This is done using the so-called PyString syntax. The text
should be offset by delimiters consisting of three double-quote marks
(""") on lines by themselves:
Scenario: Given a blog post named "Random" with: """ Some Title, Eh? =============== Here is the first paragraph of my blog post. Lorem ipsum dolor sit amet, consectetur adipiscing elit. """
Note
The inspiration for PyString comes from Python where """ is used to
delineate docstrings, much in the way /* ... */ is used for multiline
docblocks in PHP.
Tip
In your step definition, there’s no need to find this text and match it in
your regular expression. The text will automatically be passed as the last
argument into the step definition method. For example:
/** * @Given /a blog post named "([^"]+)" with:/ */ public function blogPost($title, PyStringNode $markdown) { $this->createPost($title, $markdown->getRaw()); }
Note
PyStrings are stored in a PyStringNode instance, which you can simply
convert to a string with (string) $pystring or $pystring->getRaw()
as in the example above.
Note
Indentation of the opening """ is not important, although common practice
is two spaces in from the enclosing step. The indentation inside the triple
quotes, however, is significant. Each line of the string passed to the step
definition’s callback will be de-indented according to the opening """.
Indentation beyond the column of the opening """ will therefore be
preserved.
Tags
Tags are a great way to organize your features and scenarios. Consider this
example:
@billing Feature: Verify billing @important Scenario: Missing product description Scenario: Several products
A Scenario or Feature can have as many tags as you like, just separate them
with spaces:
@billing @bicker @annoy Feature: Verify billing
Note
If a tag exists on a Feature, Behat will assign that tag to all
child Scenarios and Scenario Outlines too.
Gherkin in Many Languages
Gherkin is available in many languages, allowing you to write stories
using localized keywords from your language. In other words, if you
speak French, you can use the word Fonctionnalité instead of Feature.
To check if Behat and Gherkin support your language (for example, French),
run:
behat --story-syntax --lang=fr
Note
Keep in mind that any language different from en should be explicitly
marked with a # language: ... comment at the beginning of your
*.feature file:
# language: fr
Fonctionnalité: ...
  ...
This way your features will hold all the information about its content
type, which is very important for methodologies like BDD, and will also give
Behat the ability to have multilanguage features in one suite.
Многие знакомы с методологией Test-Driven Development и, в частности, Behavior-Driven Development. Этот подход к разработке и обеспечению качества ПО набрал большую популярность, поскольку позволяет выстроить четко установленное соответствие между бизнес-требованиями и технической реализацией продукта.
На Russian Python Week 2020 Владислав Мухаматнуров, Senior QA automation на примере проекта голосового ассистента в Tinkoff, разобрал задачи, которые решает BDD. В своем докладе Влад разобрал, что такое BDD и Gherkin, откуда возникает потребность в поведенческом тестировании на проекте и как выглядит имплементация предметно-ориентированного языка для тестирования, базирующейся на диалогах системы. А под катом мы предлагаем вам прочитать расшифровку доклада.

Проект: Голосовой Ассистент «Олег»
Это тот самый голосовой помощник, который помогает людям в чатах мобильных приложений или когда они звонят в банк. Голосовой ассистент Олег от Tinkoff Mobile берет трубку и общается с клиентами.
Давайте подробнее поговорим об этом проекте:
-
Микросервисная архитектура.
-
В основе системы лежит:
-
Классификация и распознавание намерения пользователя;
-
Генерация действий на входное воздействие;
-
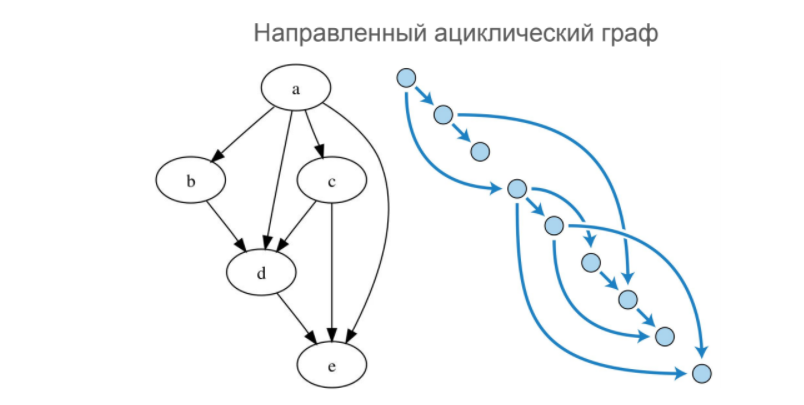
Сообщения в диалогах классифицируются на основе направленного ациклического графа.
Направленный ациклический граф
Это граф, который имеет начальный и конечный узлы, и из первого во второй можно добраться различными путями, в том числе параллельными. Но при этом нельзя выйти из начального узла и вернуться обратно в начальный узел.
Основные сервисы:
-
диалоговая платформа, которая осуществляет маршрутизацию сообщений клиента по нужным каналам обработки;
-
классификаторы, позволяющие выделять полезную нагрузку из сообщений пользователя и правильно понимать, как ее нужно обработать;
-
CRM-система, которая содержит процедуры работы с клиентами;
-
вспомогательные сервисы.
Тестирование на проекте
Однажды мы задались вопросом, как организовать тестирование на таком сложном проекте? Более того, у нас появились другие вопросы:
-
что у нас является тест-кейсом?
-
каким может быть входное воздействие на нашу систему?
-
каким может быть результат обработки сообщений?
-
как все это автоматизировать?
Мы начали думать и формулировать, как могут быть выражены бизнес-кейсы использования нашей системы. Для начала нужно было посмотреть на диалоги системы и пользователя:

Есть четко регламентированные воздействия на систему со стороны пользователя, а в ответ на эти воздействия система что-то генерирует. Попытаемся классифицировать эти ответы.
Посмотрим на взаимодействие в чате.
Действия пользователя:
-
напечатать текст;
-
надиктовать текст голосом;
-
нажать на подсказку;
-
нажать на кнопку виджета;
-
отправить файл.
Действия бота:
-
ответить текстом;
-
ответить текстом и голосом;
-
отправить подсказку;
-
отправить виджет;
-
отправить файл.
То есть бот делает то же самое, что пользователь, но в обратную сторону.
Описание бизнес-кейса
На основе этого сформировалось понимание, как может выглядеть бизнес-кейс на бумаге. Например:

User stories
В примере приведена пользовательская история. Это способ описания требований к разрабатываемой системе, сформулированных при помощи предметно-ориентированного языка.
Особенности user stories:
-
быстрый способ документировать требования бизнеса к реализации продукта;
-
минимизация обширных формализованных технических и бизнес спецификаций;
-
низкая цена поддержки.
На основе этого мы сформулировали требования к нашему процессу обеспечения качества и, в принципе, к улучшению процесса разработки на проекте.
Так, мы хотели связать постановку технических и бизнес-задач на основе историй использования системы, получить фундамент для тест-кейсов на основе бизнес-кейсов, автоматизировать регресс системы на основе пользовательских историй. Кроме того, нам было важно пополнить процесс разработки возможностью описать поведение системы и при помощи этих историй добиваться ее работоспособности согласно сценариям.
Я расскажу о чертах BDD или «разработки на основе поведения».
Behaviour-Driven Development
BDD — это ответвление методологии разработки через тестирование. Суть BDD заключается в том, что у нас есть бизнес-требования к продукту, которые мы описываем на предметно-ориентированном языке и получаем сценарий использования системы. Далее реализуем техническую часть системы и в конечном итоге создаем крутой конкурентноспособный продукт.

Классический цикл Behaviour-Driven Development состоит из 5 шагов:
-
Описываем поведение системы.
-
Определяем технические требования к системе.
-
Запускаем тесты или руками проверяем сценарии поведения. А они, естественно, падают, потому что система еще не готова или не реализована.
-
Дорабатываем нашу систему, то есть создаем, обновляем, дополняем, изменяем.
-
Добиваемся того, чтобы система проходила наши сценарии использования.
В основе BDD лежат спецификации поведения. Это документы, которые имеют следующую структуру:
-
заголовок — описание бизнес-цели;
-
описание — субъект, состав истории, ценность для бизнеса;
-
сценарии — ситуация поведения субъекта.
Gherkin и детали имплементации BDD
Gherkin — это предметно-ориентированный язык (по сути DSL), который позволяет описать поведение системы при помощи специальных ключевых слов, заранее зафиксированных.
Пример сценария, написанного на Gherkin:

В Gherkin употребляются ключевые слова. Их можно объединить по 4 основным группам:
-
Шаблон:
-
Background / Предыстория
-
Scenario / Сценарий
-
Scenario Outline / Структура сценария
-
Таблицы:
-
Examples / Примеры
-
Язык Gherkin: ключевые слова
-
Шаги:
-
Given / Дано
-
When / Когда
-
Then / Тогда
-
Предлоги:
-
And / И
-
But / Но
Пройдемся по этим ключевым словам.Ключевое слово: Функция.
Это название спецификации, отражающее определенную бизнес-функцию. Первая строчка в документе, описывающем ее, должна начинаться с ключевого слова «Функция:».

Ключевое слово: Сценарий.
Рядом с ключевым словом размещается краткое описание сценария.

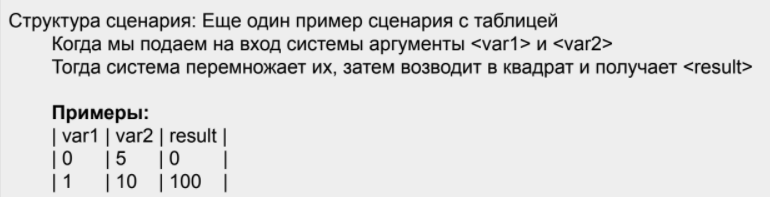
Ключевое слово: Структура сценария.
Структура сценария позволяет избежать повторения конструкций. Когда вы пишете много похожих друг на друга сценариев, их можно шаблонизировать. Для этого и употребляется структура сценария.

Ключевое слово: Примеры.
Это таблицы с данными для параметризации структуры сценария. Они могут содержать много переменных, быть заданы горизонтально и вертикально, как представлено в примере.
Ключевое слово: Предыстория.
Предыстории добавляют определенный контекст ко всем Сценариям в пределах Функции. Фактически, Предыстория — это сценарий без имени, состоящий из конечного множества шагов, которые, как правило, специфицируют систему и пользователя перед каждым Сценарием.

Ключевое слово: Дано.
Назначение шагов Дано состоит в приведении системы и ее пользователя в определенное состояние. Их можно рассматривать как предусловия сценария.

Ключевое слово: Когда.
Основная задача этого ключевого слова состоит в описании ключевого воздействия, совершаемого пользователем на нашу систему.

Ключевое слово: Тогда.
Оно необходимо для наблюдения за результатом выполнения действий. По сути, для проверки вывода системы (отчеты, интерфейс, сообщения). Наблюдения должны быть связаны с описанием Функции и Сценария.

Ключевые слова: И, Но.
Это предлоги. Они необходимы, когда есть несколько последовательных шагов Дано, Когда или Тогда. В данном случае предлог И — это смысловой аналог конъюнкции, а предлог Но — смысловой аналог инверсии.

Пример диалога системы с пользователем
Рассмотрим простейший пример, где пользователь пишет «Привет!», а бот отвечает ему текстом и показывает подсказки:

Рассмотрим, как это можно зафиксировать при помощи наших сценариев и спецификаций поведения.
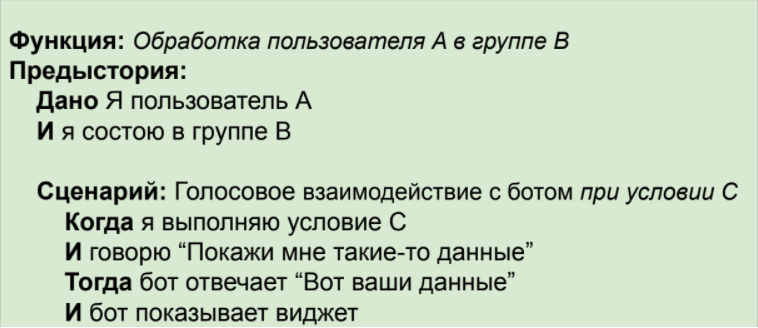
Пример использования Gherkin
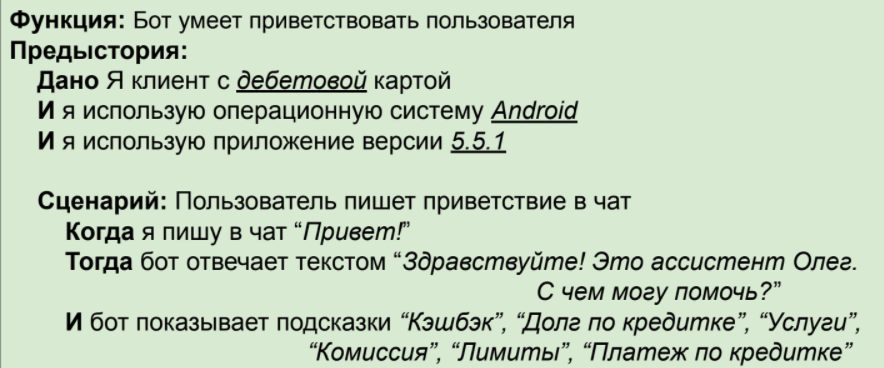
Здесь есть конкретная Функция: Бот умеет приветствовать пользователя. Кроме того, мы видим предысторию, о том, что это за клиент, в какой ОС он сидит и какую версию приложения использует. Ведь в зависимости от разных версий приложения могут быть показаны разные виджеты.И у нас есть сам сценарий, согласно которому в ответ на то, что пользователь пишет: «Привет!», бот отвечает фиксированным текстом и дает фиксированные подсказки.
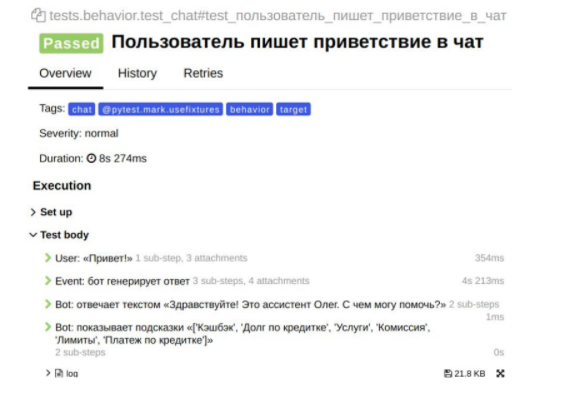
Пример отчета по сценарию поведения
Это автоматически сгенерированный отчет при помощи нашего внутреннего инструмента автоматизации, который отражает сценарий поведения с результатом Passed:
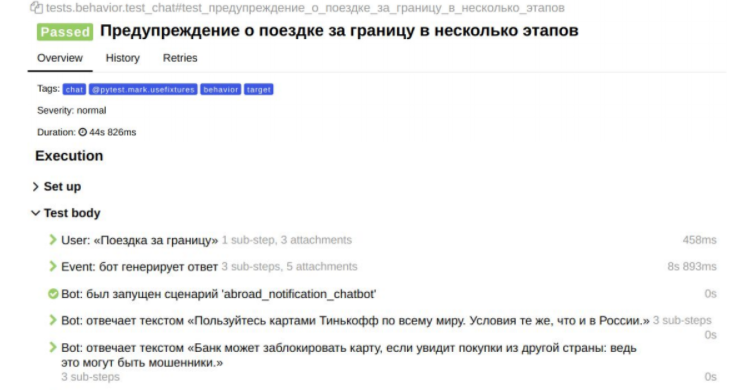
Пример посложнее: «Поездка за границу»

Тут пользователю необходимо написать о своем намерении уехать за границу. Бот это поймет, предложит добавить поездку, и начнется выбор страны, даты отъезда и т.д. А дальше мы ждем, что пользователь подтвердит факт, что поездка планируется.

Так может выглядеть этот бизнес-кейс при помощи нашего предметно-ориентированного языка:


То, что вы видите в приложении и пишите системе, описывается в сценариях поведения. У нас появляется прямое соответствие бизнес-кейсов и тест-кейсов, то есть они, по сути, идентичны.
А при помощи инструмента автоматизации можно собирать входные воздействия и добавлять регресс, автоматизировать, делать аналитику на основе получаемых данных.
Пример отчета по сценарию поведения
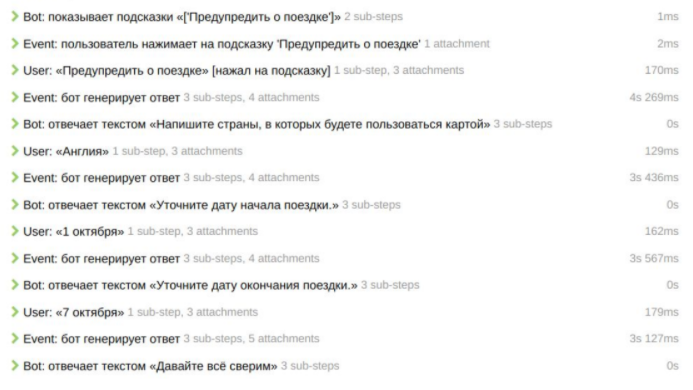

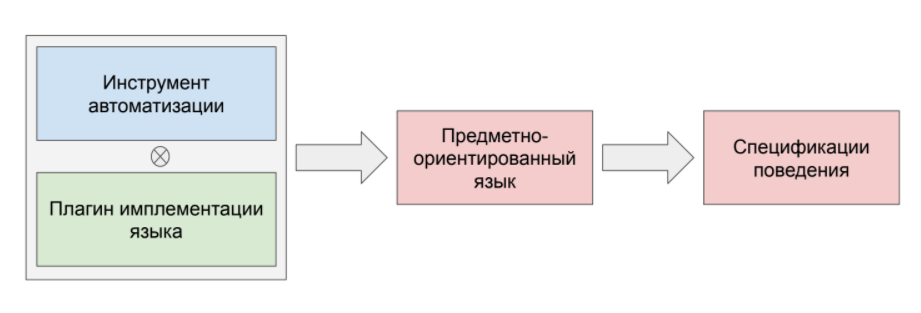
Интересно рассмотреть, как реализуется Gherkin «под капотом».
У нас есть инструмент автоматизации. К нему прикручивается плагин имплементации конкретно для нашего языка программирования. Далее, на основе этой конструкции, реализуется каркас предметно-ориентированного языка, и затем можно писать спецификации поведения.
Задачи, решаемые BDD
Я выделил три важные задачи, которые решает разработка на основе поведения:
-
объединение бизнеса и разработки;
-
установление единого восприятия бизнес-кейсов;
-
удешевление поддержки тест-кейсов.
Рассмотрим классическую ситуацию.
У нас есть продукт, а у него продакт-менеджер. Он хочет очередной бизнес-эпик, описывает его в виде бизнес-требований и передает в команду.
У команды есть технический аналитик, который на основе бизнес-требований формирует технический эпик и техническую спецификацию по данной фиче. На основе технической спецификации команда разработки реализует функциональность. Согласно задачам, эта функциональность поступает в отдел тестирования. И QA при помощи тест-кейсов тестирует фичу, находит баги или подтверждает работоспособность нашей системы.
В конечном итоге у нас сформирована спецификация по тестированию данной фичи.
Итак, у нас есть три основные документа:
-
Бизнес-требования к продукту.
-
Техническая спецификация продукта.
-
Спецификация по тестированию продукта.
И вот он — классический случай, где каждый из документов является новым отображением на основе предыдущего документа. Проблема в том, что у нас нет единого понимания, что такое сценарий использования приложения, и часто размыты понятия поведения системы и пользователя в этих документах. Как следствие, бизнес-кейсы сильно отличаются от тест-кейсов. Разница в формате реализации документов приводит к проблемам в восприятии информации участниками процесса.
Например, продакт-менеджер приходит и задает важный и правильный вопрос про фичу у продукта.
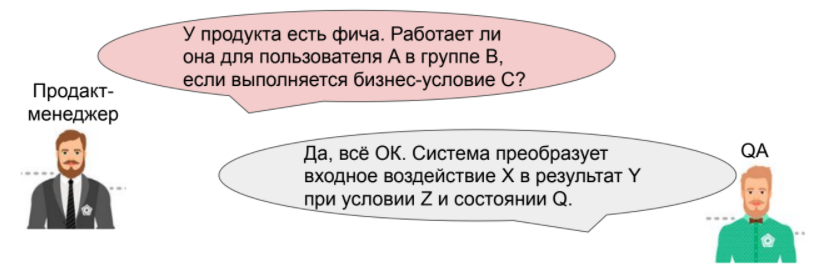
Чтобы ответить на него, QA переводит с бизнес-языка на технический: что за пользователь, как реализуются обработка конкретной группы и выполнение условия C в системе?
А потом смотрит, есть ли у нас кейсы на проверку комбинации из заданных технических особенностей при указанном условии. Если кейсы есть, QA сразу дает ответ. А если нет, проверяет руками.
На картинке QA дает ответ на вопрос менеджера продукта, но как будто бы на своем языке. И он тоже прав. Он дал абсолютно корректный, правильный ответ. Но кажется, что этот ответ не совсем коррелирует с заданным вопросом.
BDD — это про объединение бизнеса и разработки. Постановка задач BDD от бизнеса выполняется в виде спецификаций поведения. Такие спецификации уже используются в качестве основы для технических требований, а также являются фундаментом для тест-кейсов.

Единое восприятие продукта
Мы начинаем воспринимать продукт одинаково. Когда менеджер в следующий раз задаст свой правильный и важный вопрос, QA ответит на его языке:
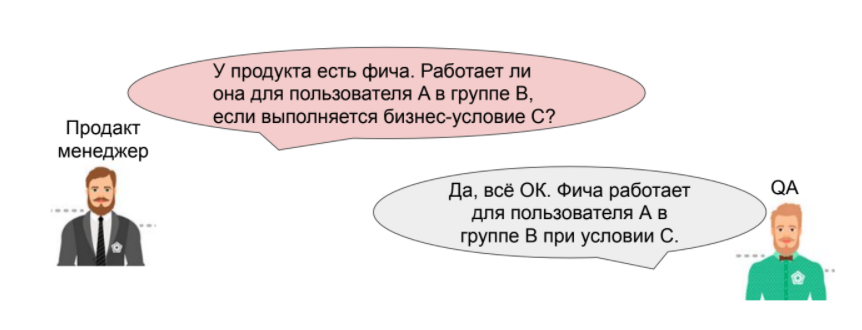
Он ответит так, потому что у него есть тот самый бизнес-кейс, который уже написан на Gherkin. В нем описывается функция и конкретный сценарий поведения.
У нас появляется единое восприятие бизнес-кейсов. Спецификации поведения (на основе утвержденного шаблона) понятны всем: продуктологам, аналитикам, разработчикам и тестировщикам.
Такие сценарии легко реализуемы. А если их автоматизировать, вы получите эффективный инструмент для сбора аналитики и формирования отчетов. Кроме того, эти сценарии позволят вам итеративно улучшать продукт.
Всё это можно делать непрерывно, ежедневно улучшая продукт. Также BDD позволяет удешевить поддержку тест-кейсов.
Спецификации поведения сами по себе реализуются на основе набора простых конструкций имплементированного предметно-ориентированного языка. По сути такие сценарии почти не зависят от программной реализации вашего инструмента автоматизации «под капотом».

То есть можно взять любой инструмент автоматизации, но при этом использовать один предметно-ориентированный язык, те же самые спецификации поведения, и все должно быть идентично. Не нужно переписывать тест-кейсы, если вы меняете фундамент инструмента автоматизации.
Давайте сравним тест-кейсы автоматизации: слева — уже привычный тест на Gherkin, справа — кейс на фреймворке Tavern.

Справа более технический тест-кейс, а слева, по сути, просто описание бизнес-функции. Но, как правило, всем приятнее видеть именно то, как работает система в тест-кейсах, и какие она генерирует ответы на запросы.
Преимущества интеграции BDD
На собственном опыте мы ощутили преимущества интеграции BDD:
-
Идеально тестировать диалоги чат-бота и говорящего робота.
-
Понятная спецификация системы и пользователя, например:
-
Версии приложения, ОС, часовой пояc.
-
Тип клиента, продукта, номер телефона.
-
На основе ограниченного набора шагов мы сделали маппинг. Используем ключевые слова:
-
Дано — для спецификации пользователя и системы, как это канонически предусмотрено.
-
Когда — для описания действий пользователя.
-
Тогда — для описания реакции системы.
Проблемы, не решаемые BDD
-
Процесс разработки: если он плохо поставлен, интеграция BDD не сделает его быстрее и качественнее.
-
Регрессионное тестирование: при отсутствии (или серьезной нестабильности) QA-контура или стейджинга не будет возможности обеспечить регресс на основе созданных сценариев поведения, в том числе, автоматизированный.
-
Релизный процесс: при отсутствии поставленных в командах проекта процессов по контролю качества и релизам, интеграция BDD не позволит гарантировать работоспособность согласно спецификациям поведения.
Если вы делаете BDD, нужно контролировать работоспособность системы до того, как все это выкатится в продакшен. Только тогда BDD принесет классные результаты.
Видео доклада можно увидеть тут.